Šimmumah ur-Nokru: Difference between revisions
From Destinypedia, the Destiny wiki
m (→Trivia) |
|||
| (34 intermediate revisions by 12 users not shown) | |||
| Line 11: | Line 11: | ||
|species= [[Hive]] | |species= [[Hive]] | ||
|class= [[Wizard]] | |class= [[Wizard]] | ||
|rank= [[Ultra]] | |rank= [[Major]] {{C|Story}} <br> [[Ultra]] {{C|Strike}} | ||
|faction= [[Grasp of Nokris]] | |faction= [[Grasp of Nokris]] | ||
|mission= [[Strange Terrain]] | |mission= [[Strange Terrain]] | ||
|ability= Darkness Blast <br> High Durability <br> Rapid Flight <br> | |ability= {{icon|Arc}} Darkness Blast <br> High Durability <br> Rapid Flight <br> {{icon|Solar}} [[Absorption Shield]] <br> {{icon|Kinetic}} Cloud of Darkness | ||
}} | }} | ||
|title2= Lucent Necromancer | |title2= Lucent Necromancer | ||
| Line 30: | Line 30: | ||
|class= [[Lightbearer Wizard]] | |class= [[Lightbearer Wizard]] | ||
|mission= [[Ghosts of the Deep]] | |mission= [[Ghosts of the Deep]] | ||
|weapon= [[Pulse Grenade]] | |weapon= {{icon|Arc}} [[Pulse Grenade]] | ||
|ability= Darkness Blast <br> High Durability <br> Teleportation <br> Summon Hive <br> Resurrect [[Vorlog|Vorlog, Risen in Heresy]] <br> Summon [[Lucent Moth]]s <br> Ritual Backlash <br> Ritual Immunity <br> [[Stormtrance]] <br> Healing Rift | |ability= {{icon|Arc}} Darkness Blast <br> High Durability <br> Teleportation <br> Summon Hive <br> Resurrect [[Vorlog|Vorlog, Risen in Heresy]] <br> Summon {{icon|Arc}} [[Lucent Moth]]s <br> Ritual Backlash <br> Ritual Immunity <br> {{icon|Arc}} [[Stormtrance]] <br> Healing Rift | ||
}} | }} | ||
}} | }} | ||
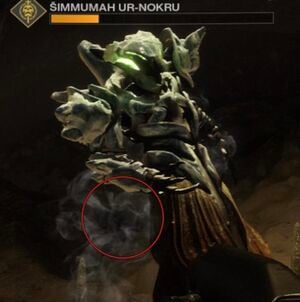
'''Šimmumah ur-Nokru''' is a [[Hive]] [[Wizard]] who was encountered in [[Penumbral Depths]] during the [[Strange Terrain]] mission. After being summoned by a group of four [[Knight]]s, Šimmumah had to be defeated to progress.<ref>'''Bungie (2018/8/5)''', ''[[Destiny 2]]: [[Warmind (expansion)|Warmind]] | '''Šimmumah ur-Nokru''' is a [[Hive]] [[Wizard]] who was encountered in [[Penumbral Depths]] during the [[Strange Terrain]] mission. After being summoned by a group of four [[Knight]]s, Šimmumah had to be defeated to progress.<ref>'''Bungie (2018/8/5)''', ''[[Destiny 2]]: [[Warmind (expansion)|Warmind]], [[Strange Terrain]]''</ref> | ||
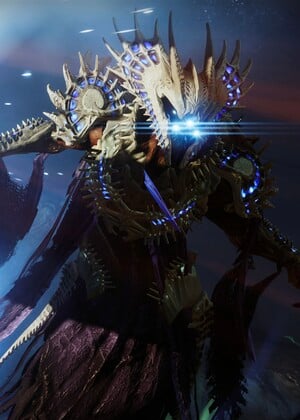
They would later be revived as a Lightbearer, taking the title '''Lucent Necromancer''', and join [[Savathûn, the Witch Queen|Savathûn]]'s [[Lucent Brood]]. During the events of [[Season of the Deep]], they would attempt a ritual to resurrect [[Oryx, the Taken King]] by force through a ritual involving the use of [[Necromancy]] and a Hive [[Ghost]]. | |||
==Gameplay== | ==Gameplay== | ||
===Strange Terrain=== | |||
Šimmumah appears as one the of the mini bosses seen within the "[[Strange Terrain]]" [[Strike]] where they were under the leadership of [[Nokris, Supplicant to Savathûn|Nokris]]. They appear about halfway through the strike after being summoned via ritual by four [[Knight]]s, having no special mechanics and serving only as a powerful enemy. Upon defeating the Wizard, the Fireteam would be able to progress deeper inside Nokris's lair. | |||
==Ghosts of the Deep== | ===Ghosts of the Deep=== | ||
Šimmumah ur-Nokru is the final boss of the ''Ghosts of the Deep'' [[Dungeon]] and can be found in the final room of the dungeon, conducting a ritual to forcefully bond a Hive Ghost to [[Oryx, the Taken King]]'s body through Hive necromancy and the [[Light]], possibly allowing him to be resurrected beyond his [[King's Fall|final death]] | Šimmumah ur-Nokru is the final boss of the ''Ghosts of the Deep'' [[Dungeon]] and can be found in the final room of the dungeon, conducting a ritual to forcefully bond a Hive Ghost to [[Oryx, the Taken King|Oryx]]'s body through Hive necromancy and the [[Light]], possibly allowing him to be resurrected beyond his [[King's Fall|final death]]. | ||
To begin the fight, the fireteam must either crush the Ghost they are overseeing, or enter one of the bodies of methane scattered around the room, to which they will teleport to a random location and summon [[Vorlog]] and a small army of [[Acolyte]]s and Revenant [[Knight]]s at each body part of Oryx's body except his left foot and heart. To proceeded through this encounter, the fireteam must first use a [[Deepsight]] orb to reveal the three parts of Oryx's body currently being used in the ritual (one of which will always be Oryx's heart), and kill Vorlog while standing in the radius of the ritual circle of said body part. One can tell if they're in the radius through a green circle beginning to glow around the body part and the player getting the Ritual Conductor buff. Upon Vorlog's destruction at one of the locations, a green circle will appear in the air between the location and another of the three. One of the fireteam members must head to the next body part and line up the circle with a Taken King symbol that appears above the previous body part. Successfully doing so will make the symbol and circle disappear and a rune to appear over one of the body parts. Shortly after Vorlog's death, Šimmumah ur-Nokru will teleport to the part that was used to kill him, and resurrect him while summoning in a swarm of [[Lucent Moth]]s. If Vorlog wasn't killed at a body part, they will resurrect him at Oryx's heart. | |||
Upon Simmumah ur-Nokru's | Repeat this at every body part until every one has a rune above it, to which Lightbearer Hive of each class will appear beyond three methane walls, located at the back of the room which contains the [[Lightbearer Knight]], to the right of spawn which contains the [[Lightbearer Wizard]], and to the right above Oryx's head which contains the [[Lightbearer Acolyte]]. Upon entering the rooms, take note of the rune above where the Lightbearer Hive spawns, as it will despawn upon the lieutenants' defeat. Destroy the lieutenant and their ghost alongside their reinforcements to gain a buff and quickly return to the main battlefield and find the Deepsight orb. Activate Deepsight and find the body part that matches the rune found in the lieutenant's room and deposite the buff on the bodypart. If it was wrong, the depositor dies, but if it was right, the text 'Simmumah ur-Nokru's control over the ritual wanes' will appear, signifying it as the right rune. Upon all runes being destroyed, the text 'Simmumah ur-Nokru is infused with Light' will appear and puddles of green energy will appear below all involved body parts which provide the buff Piercing Light, which will take away Simmumah ur-Nokru's immunity shield and allow them to be damaged. After about thirty seconds the text 'Simmumah ur-Nokru denies death' will appear and a new cycle will begin with new body parts chosen. | ||
Upon Simmumah ur-Nokru's healthbar being depleted, their ghost must be crushed to end the encounter. If their Ghost is not destroyed, they will be revived to an eighth of their health, forcing the team to go through another damage phase. | |||
==Trivia== | |||
*When [[Ghosts of the Deep]] first released, the boss's health bar read "Simmumah Ur-Nokru, Lucent Necromancer". However, when killed by the boss, the name was so long on the death screen that it actually went off the screen. As of ''[[Season of the Witch]]'', the health bar simply reads "Simmumah Ur-Nokru", the same as its appearance in [[Strange Terrain]]. | |||
==Gallery== | ==Gallery== | ||
| Line 62: | Line 63: | ||
==List of appearances== | ==List of appearances== | ||
*''[[Destiny 2]]:'' ''[[Warmind (expansion)|Warmind]]'' {{1st}} | *''[[Destiny 2]]:'' ''[[Warmind (expansion)|Warmind]]'' {{1st}} | ||
*''[[Season of the Deep]]'' | **''[[Season of the Deep]]'' | ||
==References== | ==References== | ||
Latest revision as of 12:29, March 18, 2024
| Šimmumah ur-Nokru | |
|---|---|

| |
| Biographical information | |
|
Species: |
|
|
Faction: |
|
|
Rank: |
|
|
Class: |
|
| Combat information | |
|
Mission: |
|
|
Abilities: |
|
| Šimmumah ur-Nokru, Lucent Necromancer | |
|---|---|

| |
| Biographical information | |
|
Species: |
|
|
Faction: |
|
|
Rank: |
|
|
Class: |
|
| Combat information | |
|
Mission: |
|
|
Weapon(s): |
|
|
Abilities: |
|
Šimmumah ur-Nokru is a Hive Wizard who was encountered in Penumbral Depths during the Strange Terrain mission. After being summoned by a group of four Knights, Šimmumah had to be defeated to progress.[1]
They would later be revived as a Lightbearer, taking the title Lucent Necromancer, and join Savathûn's Lucent Brood. During the events of Season of the Deep, they would attempt a ritual to resurrect Oryx, the Taken King by force through a ritual involving the use of Necromancy and a Hive Ghost.
Gameplay[edit]
Strange Terrain[edit]
Šimmumah appears as one the of the mini bosses seen within the "Strange Terrain" Strike where they were under the leadership of Nokris. They appear about halfway through the strike after being summoned via ritual by four Knights, having no special mechanics and serving only as a powerful enemy. Upon defeating the Wizard, the Fireteam would be able to progress deeper inside Nokris's lair.
Ghosts of the Deep[edit]
Šimmumah ur-Nokru is the final boss of the Ghosts of the Deep Dungeon and can be found in the final room of the dungeon, conducting a ritual to forcefully bond a Hive Ghost to Oryx's body through Hive necromancy and the Light, possibly allowing him to be resurrected beyond his final death.
To begin the fight, the fireteam must either crush the Ghost they are overseeing, or enter one of the bodies of methane scattered around the room, to which they will teleport to a random location and summon Vorlog and a small army of Acolytes and Revenant Knights at each body part of Oryx's body except his left foot and heart. To proceeded through this encounter, the fireteam must first use a Deepsight orb to reveal the three parts of Oryx's body currently being used in the ritual (one of which will always be Oryx's heart), and kill Vorlog while standing in the radius of the ritual circle of said body part. One can tell if they're in the radius through a green circle beginning to glow around the body part and the player getting the Ritual Conductor buff. Upon Vorlog's destruction at one of the locations, a green circle will appear in the air between the location and another of the three. One of the fireteam members must head to the next body part and line up the circle with a Taken King symbol that appears above the previous body part. Successfully doing so will make the symbol and circle disappear and a rune to appear over one of the body parts. Shortly after Vorlog's death, Šimmumah ur-Nokru will teleport to the part that was used to kill him, and resurrect him while summoning in a swarm of Lucent Moths. If Vorlog wasn't killed at a body part, they will resurrect him at Oryx's heart.
Repeat this at every body part until every one has a rune above it, to which Lightbearer Hive of each class will appear beyond three methane walls, located at the back of the room which contains the Lightbearer Knight, to the right of spawn which contains the Lightbearer Wizard, and to the right above Oryx's head which contains the Lightbearer Acolyte. Upon entering the rooms, take note of the rune above where the Lightbearer Hive spawns, as it will despawn upon the lieutenants' defeat. Destroy the lieutenant and their ghost alongside their reinforcements to gain a buff and quickly return to the main battlefield and find the Deepsight orb. Activate Deepsight and find the body part that matches the rune found in the lieutenant's room and deposite the buff on the bodypart. If it was wrong, the depositor dies, but if it was right, the text 'Simmumah ur-Nokru's control over the ritual wanes' will appear, signifying it as the right rune. Upon all runes being destroyed, the text 'Simmumah ur-Nokru is infused with Light' will appear and puddles of green energy will appear below all involved body parts which provide the buff Piercing Light, which will take away Simmumah ur-Nokru's immunity shield and allow them to be damaged. After about thirty seconds the text 'Simmumah ur-Nokru denies death' will appear and a new cycle will begin with new body parts chosen.
Upon Simmumah ur-Nokru's healthbar being depleted, their ghost must be crushed to end the encounter. If their Ghost is not destroyed, they will be revived to an eighth of their health, forcing the team to go through another damage phase.
Trivia[edit]
- When Ghosts of the Deep first released, the boss's health bar read "Simmumah Ur-Nokru, Lucent Necromancer". However, when killed by the boss, the name was so long on the death screen that it actually went off the screen. As of Season of the Witch, the health bar simply reads "Simmumah Ur-Nokru", the same as its appearance in Strange Terrain.
Gallery[edit]
Lucent Necromancer
List of appearances[edit]
References[edit]
- ^ Bungie (2018/8/5), Destiny 2: Warmind, Strange Terrain
