Sanctified Mind, Sol Inherent
From Destinypedia, the Destiny wiki
| Sanctified Mind, Sol Inherent | |
|---|---|

| |
| Biographical information | |
|
Species: |
|
|
Faction: |
|
|
Rank: |
|
|
Class: |
|
| Combat information | |
|
Mission: |
|
|
Weapon(s): |
|
|
Abilities: |
Summon Vex |


The Sanctified Mind is a massive Vex Mind, and the final boss of the Garden of Salvation Raid. It had previously established contact with the Witness and the Black Fleet sometime within the Black Garden and was left with one of the Pyramid Scales, only to be defeated by the Guardians.[1]
Gameplay[edit]
The boss encounter will begin when Sanctified Mind is hit by anything. It will then assemble into a Minotaur form and drop to the ground, which is covered in Vex Radiolarian Fluid.
During this time, a wave of Goblins and an Angelic will spawn. After around 20 seconds, both of Sanctified Mind's photoreceptors (the red, glowing circles that appear on its shoulder and thigh) will begin to glow, signaling they are vulnerable. Shooting these photoreceptors open up a portal with a corresponding color to the side that was shot (Left is Blue, Right is Orange) that leads to a section of the encounter that is separated from the main area. Within these portals are sets of Vex that come in one of two variants:
- 12 Goblins and 1 Minotaur
- 12 Harpies and 2 Hobgoblins
Harpies and Goblins will drop one Mote each, whereas Minotaurs and Hobgoblins will drop three Motes each.
In addition to creating a portal of the corresponding color, a Cyclops will spawn on the pillar of the corresponding side of the boss that was shot. Additionally, Sanctified Mind will disintegrate a portion of the floor, flooding that area with Vex Radiolaria.
On each side of the map (designated to be Left/Blue and Right/Orange) is a Relay. Atop these Relays, is a Tether Box, which will initiate a tether that connects to the closest Guardian in its radius. It will also be the locations players deposit motes acquired from the portals, increasing the energy inside them. Relays will start with ten Motes deposited.
Throughout the fight, waves of ten Goblins will spawn near Sanctified Mind's feet, and split into groups of five that attempt to sacrifice to the Relay on each side. Successful sacrifices will drain ten Motes from the Relay they sacrificed near. If a Relay reaches energy below zero, all Guardians are killed.
After any players deposit Motes to any relay, all Goblins that spawn will be surrounded in a shield that requires the "Enlightenment" buff, acquired from depositing Motes, to be destroyed. These shields will not appear on any side with a Relay that is pulsing with energy (40 total motes, or 30 deposited).
After around five minutes, or when both Relays are pulsing with energy, Sanctified Mind will begin casting an attack that will kill all Guardians after one minute, spawning a single Angelic in the process. While casting this attack, Sanctified Mind will lift up an object that is either Blue or Orange. This can be only be avoided by connecting the tether from a Relay that is both pulsing with energy and is the same color. Once this connects, the boss becomes vulnerable to all damage, and shortly after will fly into the air. Players can choose to use the other Relay (if pulsing with energy) to connect to boss during this phase, but this is optional.
After each damage phase, Relays have a chance to move to one of three spots on each side.
Strategy[edit]
Each player should be put onto one of three teams:
- Defender/Builder:
- These players will remain the main area for the entirety of the fight, barring rare exceptions. Their main tasks should be to ensure no Goblins sacrifice (if non-Shielded), Cyclopes are killed, Portal Teams are pulled when called, and the floors remain intact.
- Team One:
- These players are responsible for entering the first portal of each side. Within the portals, the players should eliminate all Vex, acquire Motes, then call out when all possible Motes have been picked up. The total value across both players should be 15-18. After being pulled back to main area, these players should deposit Motes and use their "Enlightened" buff to assist in defending the Relays.
- Team Two:
- Team two has a nearly identical role to Team One, with the exception being that they will utilize the second set of portals on each side.
Upon destroying the first photoreceptor (either left or right), the players designated to Team One should enter. During this time, Defenders should be doing their tasks with the assistance of Team Two. Upon Team One's callout, players in the main area should shoot the photoreceptor of the side Team One is currently on. This will bring Team One back to main area, and open a new portal that Team Two should enter. Team One should then deposit their motes. Likewise, when Team Two is completed inside their portal and have called to be brought back to the main area, the correct photoreceptor should be destroyed. Ideally, after Team Two deposits, the Relay should become pulsing with energy. This will not be the case if motes were missed such that the total across both teams is less than 30, or a Goblin sacrificed to that Relay. If either are the case, a player, ideally a player on the Defending team, should enter the portal of the side Team Two just returned from.
This process should be repeated on the opposite side.
During any downtime, Defenders should work with any players in the main area to complete the rebuilding of all adjacent floors to the Relays. Take caution in deciding when to construct these platforms, as players are unable to use any abilities or weapons while tethered.
Damage Phase[edit]
In addition the teams assigned for the main portion of this fight, there should be two teams designated for the damage phase of this fight. Players should be assigned as to two groups of three as follows:
- Tether Team:
- These players are responsible for organizing the tether used to disrupt Sanctified Mind's casting of the wipe mechanic. These should be segmented into (1) Anchor, the player closest to the Relay, (2) Middle, the player in the middle, and (3) Boss, the player closest to Sanctified Mind.
- Damage Team:
- This team's sole purpose should be to deal damage to Sanctified Mind. They should also assist in killing any Goblins that are attacking the Tether team.
While it is possible to extend the duration of a damage phase by tethering again, it is discouraged, as it is very difficult to coordinate compared to the first tether, and will prevent players using any "Relay Defender" mods from obtaining the damage increase while standing next to the opposite Relay.
After a brief period of time, the damage phase will end, and the process should be repeated. There is a long period of time between the end of damage and when the first Angelic spawns. This time should be utilized to reconstruct missing platforms.
Trivia[edit]
- Underneath all of the vernal growth and rock-like formations, its chassis is similar in appearance to Protheon, Modular Mind's chassis.
- Unlike other Axis Minds or other Ultra Vex bosses, the Sanctified Mind does not possess a glowing central eye.
- This is probably due to the two giant visors on two of its arm and leg, which are likely its optic sensors.
- Due to its name, the Sol Inherent may be a sub faction of Vex that were meant to replace the Black Heart due to the Vex of the Black Garden sacrificing themselves to the Inherent Minds.
- The Sanctified Mind is the largest Minotaur in Destiny history so far, larger than either Atheon or Protheon.
- Upon the defeat of the Sanctified Mind, a Pyramid Scale is revealed to the players, this is the first time a Pyramid Scale has appeared in-game. The second being in Season of Arrivals.
Gallery[edit]
 Render of the Sanctified Mind
 Fullbody front and back renders of the Sanctified Mind
 The Sanctified Mind during damage phase with its chassis exposed
 The Sanctified Mind battling alongside Goblins
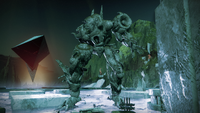 The petrified remains of the Sanctified Mind


Appearance[edit]
- Destiny 2: Shadowkeep (First appearance)
References[edit]
- ^ Bungie (2019/10/5),Destiny 2: Shadowkeep - Garden of Salvation