|
|
| (99 intermediate revisions by 16 users not shown) |
| Line 1: |
Line 1: |
| {{Sandbox}}<!-- Do NOT remove the {{Sandbox}} template on this page. Please start your editing below this line. -->
| | [[File:Destiny-BridgeSentinel-Render.jpg|thumb|150px|A render of an Annihilator Totem.]] |
| {{Userbox | | {{quote|Ir Anûk pulled a sword star out of the sky. Together the wizards charged it with killing power and made an annihilator totem, which they used to smash the Vex|[[Books of Sorrow]]<ref>'''Bungie (2015/9/15)''', ''[[Destiny]]: [[The Taken King]], PlayStation 4, Activision Blizzard, [[Grimoire]]: [[Grimoire:Enemies/Books_of_Sorrow#XXXIX:_Open_your_eye:_go_into_it|XXXIX: Open your eye: go into it]]''</ref>}} |
| |id = [[File:Sigil of the War Cult.jpg|45px]] | |
| |id-c = #2A2D73
| |
| |info = This Guardian pledges to the '''[[Future War Cult]]'''.
| |
| |info-c = purple
| |
| |info-fc = black
| |
| |border-c = black
| |
| }}<noinclude>
| |
| {{clear}}
| |
| {{Userbox
| |
| |id = [[File:Destiny-Symbol.png|50px]]
| |
| |id-c = black
| |
| |info = This Guardian pledges to the '''Future War Cult'''.
| |
| |info-c = Silver
| |
| |info-fc = black
| |
| |border-c = black
| |
| }}<noinclude> | |
|
| |
|
| ==Empathy Kill's Edits==
| | '''Annihilator Totems''' are [[Hive]] constructs found in [[Crota, Son of Oryx|Crota's]] [[Oversoul Throne|netherworld]], the [[Basilica]] and the [[Chamber of Suffering]] that appear to act as security measures.<ref>'''Bungie (2015/12/9)''', ''[[Destiny]]: [[The Dark Below]], PlayStation 4, Activision Blizzard, [[Crota's End]]''</ref><ref>'''Bungie (2015/9/15)''', ''[[Destiny]]: [[The Taken King]], PlayStation 4, Activision Blizzard, [[King's Fall]]''</ref> However the Totem itself would find use in the hands of Oryx's Sisters, where in the [[Savathûn, the Witch Queen|Savathûn's]] [[Lucent Brood]] they would use them as Ritual Conduits, and in [[Xivu Arath's Horde]] they would see use to be instruments of War and sound [[Xivu Arath, God of War|her]] Overwhelming Battlesong. |
| You may also note that there are at least two patrols available in the Plaugelands that require you to pass through Archon's Forge in order to obtain the necessary information or locate a specific ""bounty" or "target" so that you may complete the patrol. One of these missions requires that you have a SIVA cash key. Once you have completed either one of these patrols you have no choice but to backtrack through Archon's Forge to make it back to the Plaguelands. In many cases there may be a "battle" or "Public Event" already taking place when you reach the Archon's Forge "arena". If this is the case you have several options that you may choose from: If you are scared to death because your light level is relatively low and you feel unprepared just fall back about 50-100 feet down the small tunnel and wait for the battle to play its course. The longest the battle may last is five minutes but usually its over relatively quick. Especially if you have a number of experienced Guardians doing the dirty deed. Another option you have (and extremely sly, sneaky and unfair one) is to do exactly as mentioned in the first option... Fall back and wait. Except this time, sneak your way to the opening of the small tunnel. Making sure not to be seen by any baddies and dodging incoming fire, take careful aim and chuck a grenade of any sort or fire a shot or two from any weapon into the chaos. Just make sure you hit one of the many enemies that you see causing destruction in the "arena". Doing so will automatically include you and join your guardian to the team you walked in on. After you chuck your grenade or pop off a shot or two and hit your target, quickly head back down into the small tunnel, avoid incoming fire and wait for the battle to end. If done correctly, when the battle is over and the dust is cleared you will get full credit for the victory having tossed only a single grenade or firing one or two shots! The last option you have is to roll up your sleeves and join the fight! You can do this one of two ways. Stay at the entrance of the small tunnel and pick off any enemy you see that runs across your screen. While doing so make your way back into the tunnel if you need to recover health, switch weapons or shake off jitters. The second way is to come out of the small tunnel guns blazing or sword swinging! If this is the way yo decide to go... BE CAREFUL! There are enemies everywhere and just like you they are giving it all they got! Keep an eye on your health and remember where that small tunnel is located. If your bearings are straight and your life is in danger you can jump your way back to the small tunnel to recover. Look for the huge arching threads of red SIVA string banded together to make one large one. Find it and the tunnel is located right above it. The small tunnel is the ONLY spot in the arena where you are completely safe from incoming fire and you don't have to worry about anything coming up behind you to slit your throat or blow your brains out. However you decide to do it, after the battle is over there will be ammo scattered all over the arena along with a few and sometimes several engrams... All of this and all you expected was to scan an irregular anomaly or take out a specific target or bounty! If you enjoyed your time in the Forge you are more than welcome to stay. A lot of times the team that you walked in on will kickoff one battle after another. Sometimes as soon as one battle ends a Guardian will present a SIVA offering and start another. If this is the case you can stick around and reap the rewards for doing so as no one has the power to kick you out or give you the boot, although you can easily get left high and dry having to face an onslaught of enemies all wanting to kill you. Depending on the potency of the SIVA offering it is possible to go it alone, but usually you haven't a prayer unless you happen to be one of the best (or luckiest) gamers to ever play the game! Archon's Forge overs you the potential to level up your Guardian and gain faction points very quickly. Aside from this, if you decide to spend a relatively long time and fight several battles in Archon's Forge you may return to the Tower and cash in countless rare and legendary engrams.
| |
|
| |
|
| ==Dante's Edits== | | ==History== |
| ===Strategies===
| | They were created by the Deathsinger twins [[Ir Halak, Deathsinger|Ir Halak]] and [[Ir Anûk, Deathsinger|Ir Anûk]] to battle the [[Vex]] when they invaded [[Oryx]]'s [[Ascendant Realm]], the [[High War]], after [[Crota]] accidentally cut a hole through space and time.<ref>'''Bungie (2015/9/15)''', ''[[Destiny]]: [[The Taken King]], PlayStation 4, Activision Blizzard, [[Grimoire]]: [[Grimoire:Enemies/Books_of_Sorrow#XXXVIII:_The_partition_of_death|XXXVIII: The partition of death]]''</ref> Even after the death of Crota, Oryx and the Daughters who made the totem, it would find use in the [[Lucent Brood|hands]] [[Hidden Swarm|of]] [[Xivu Arath's Horde|other broods]] as powerful tools for their schemes whether it be as Instruments of War under [[Xivu Arath, God of War|Xivu Arath]], or as Ritual Conduits in the hands of the [[Hidden Swarm|Hive of the Moon]] or [[Savathûn, the Witch Queen|Savathûn's]] [[Lucent Brood|light empowered brood]] |
| There are at least two patrols available in the Plaugelands that require passage through Archon's Forge in order to obtain the necessary information or locate a specific ""bounty" or "target". One of these missions requires a SIVA cash key. Once either one of these patrols have been completed the player has to backtrack through Archon's Forge to make it back to the Plaguelands. In many cases there may be a battle or Public Event already taking place when the player reaches the arena.
| |
|
| |
|
| If this is the case one has several options to choose from.
| | ==Gameplay== |
| | In [[Crota's End]], four Totems play a part during the Bridge encounter, two on either side of the Bridge. When Guardians attempt to form the Bridge from either side, the two Totems on the same side will begin to charge up, and will eventually release a blast of energy that kills all Guardians. Annihilator Totems can be suppressed by a Guardian standing in close proximity to them, allowing the Bridge to form without Guardians perishing. When three Guardians have successfully crossed, they start forming the Bridge from the other end. |
|
| |
|
| *If one's Light level is relatively low and/or they feel unprepared just fall back about 50-100 feet down the small tunnel and wait for the battle to play its course. The longest the battle may last is five minutes but usually its over relatively quick, especially if there are experienced Guardians.
| | In [[King's Fall]], when the Brand of the Weaver/Unraveler is picked up, the nearby Annihilator Totems begin to charge and will cause a wipe if allowed to discharge. Like in Crota's End, Guardians must stand on the Totems in order to suppress them, but Guardians must alternate whom stands on the Totems based on who is holding the brands. |
|
| |
|
| *Another option (and an extremely sneaky one) is to do exactly as mentioned in the first option: Fall back and wait. One place to wait it out is the opening of a small tunnel. Making sure not to be seen by any baddies and dodging incoming fire, take careful aim and chuck a grenade of any sort or fire a shot or two from any weapon into the chaos. Doing so will automatically include the player Guardian to the team once a target's been hit. After this, quickly head back down into the small tunnel, avoid incoming fire and wait for the battle to end. If done correctly, when the battle is over and the dust is cleared the player will get rewards. However this is not as rewarding as the last option.
| | In [[Pit of Heresy]], there is one totem found in the Chamber of Suffering and functions just like it does in any other appearance. If allowed to discharge it wipes the team. |
|
| |
|
| *The last option is to join the fight. The player can do this one of two ways.
| | The Totems would appear in [[A Mysterious Disturbance]] and [[PsiOps Battleground: Moon]] as '''Ritual Totems''' glowing with light based on the brood, ([[Hidden Swarm|normal color]] and [[Lucent Brood|Light Blue]] respectively) but without the killing effect. |
| :Stay at the entrance of the small tunnel and pick off any enemy that runs by, occasionally backing into the tunnel to recover health, switch weapons or shake off jitters. | | The Totems appear again in [[The Descent]] but as '''War Totems''' that maintain the Overwhelming Battlesong when they are active instead of killing the [[Guardian]]. |
| :The second way is to come out of the small tunnel guns blazing or sword swinging and join the chaos. There are numerous enemies everywhere and can overwhelm the unprepared. Just remember to check health and where that small tunnel is located every so often. If the player has an awareness of the battlefield they can retreat quickly to safety.
| |
| :Look for the huge arching threads of red SIVA string banded together to make one large one. Find it and the tunnel is located right above it. The small tunnel is the only spot in the arena where the player are completely safe from incoming fire and, nothing will attack from behind.
| |
|
| |
|
| After the battle is over there will be ammo scattered all over the arena along with several engrams. Other Guardians will begin a new battle or leave, meaning one can sometimes face an onslaught of enemies alone. Depending on the potency of the SIVA offering it is possible to do it alone, but it is recommend to bring a fireteam or wait for a group of others.
| | ==List of appearances== |
| | *''[[Destiny]]'' |
| | **''[[The Dark Below]]'' {{1st}} |
| | **''[[The Taken King]]'' |
| | *''[[Destiny 2]]'' |
| | **''[[Shadowkeep]]'' |
| | **''[[Season of the Deep]] {{C|as War Totems}} |
| | |
| | ==References== |
| | <references/> |
| | |
| | {{Hive}} |
| | [[Category:Hive]] |
| | [[Category:Technology]] |
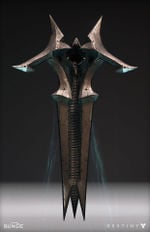
A render of an Annihilator Totem.
- "Ir Anûk pulled a sword star out of the sky. Together the wizards charged it with killing power and made an annihilator totem, which they used to smash the Vex"
- — Books of Sorrow[1]
Annihilator Totems are Hive constructs found in Crota's netherworld, the Basilica and the Chamber of Suffering that appear to act as security measures.[2][3] However the Totem itself would find use in the hands of Oryx's Sisters, where in the Savathûn's Lucent Brood they would use them as Ritual Conduits, and in Xivu Arath's Horde they would see use to be instruments of War and sound her Overwhelming Battlesong.
History
They were created by the Deathsinger twins Ir Halak and Ir Anûk to battle the Vex when they invaded Oryx's Ascendant Realm, the High War, after Crota accidentally cut a hole through space and time.[4] Even after the death of Crota, Oryx and the Daughters who made the totem, it would find use in the hands of other broods as powerful tools for their schemes whether it be as Instruments of War under Xivu Arath, or as Ritual Conduits in the hands of the Hive of the Moon or Savathûn's light empowered brood
Gameplay
In Crota's End, four Totems play a part during the Bridge encounter, two on either side of the Bridge. When Guardians attempt to form the Bridge from either side, the two Totems on the same side will begin to charge up, and will eventually release a blast of energy that kills all Guardians. Annihilator Totems can be suppressed by a Guardian standing in close proximity to them, allowing the Bridge to form without Guardians perishing. When three Guardians have successfully crossed, they start forming the Bridge from the other end.
In King's Fall, when the Brand of the Weaver/Unraveler is picked up, the nearby Annihilator Totems begin to charge and will cause a wipe if allowed to discharge. Like in Crota's End, Guardians must stand on the Totems in order to suppress them, but Guardians must alternate whom stands on the Totems based on who is holding the brands.
In Pit of Heresy, there is one totem found in the Chamber of Suffering and functions just like it does in any other appearance. If allowed to discharge it wipes the team.
The Totems would appear in A Mysterious Disturbance and PsiOps Battleground: Moon as Ritual Totems glowing with light based on the brood, (normal color and Light Blue respectively) but without the killing effect.
The Totems appear again in The Descent but as War Totems that maintain the Overwhelming Battlesong when they are active instead of killing the Guardian.
List of appearances
References
- ^ Bungie (2015/9/15), Destiny: The Taken King, PlayStation 4, Activision Blizzard, Grimoire: XXXIX: Open your eye: go into it
- ^ Bungie (2015/12/9), Destiny: The Dark Below, PlayStation 4, Activision Blizzard, Crota's End
- ^ Bungie (2015/9/15), Destiny: The Taken King, PlayStation 4, Activision Blizzard, King's Fall
- ^ Bungie (2015/9/15), Destiny: The Taken King, PlayStation 4, Activision Blizzard, Grimoire: XXXVIII: The partition of death
Hive
|
|
|
Infantry
|
|
|
|
Hive sects
|
|
|
|
Arsenal
|
|
|
|
Technology
|
|
|
|
Spaceships
|
|
|
|
Strongholds
|
|
|
|
Religious
|
|
|
|
Consumables
|
|
|
