Crota's End
From Destinypedia, the Destiny wiki
|
Prev: |
|
|
Next: |
|
| Crota's End | |
|---|---|

| |
|
Game: |
|
|
Player(s): |
1-6 |
|
Recommended Power Level: |
|
|
Location: |
|
|
Enemy faction(s): |
|
|
Hostile race(s): |
|
|
Objective(s): |
End Crota, Son of Oryx within his throne world and avenge the losses of the Great Disaster and the First Crota Fireteam. |
| “ | He waits in the dark below. | ” |
Crota's End is the Raid of The Dark Below expansion, made available to players on December 9th, 2014 and reprised for Destiny 2 on September 1st, 2023.
After having his soul banished and his brood all but devastated, Guardians must exact their vengeance against Crota, Son of Oryx by taking their fight into the depths of the Hellmouth and bear their blades against the God Knight himself; bringing a swift end at his own throne world.
Gameplay[edit]
It is available if players are at a high enough level; completing the expansion's story missions is not necessary.
In the reprised version of the Raid in Destiny 2, the raid is accessible to all players, provided they are at the appropriate Light level.[1]
Unique enemies[edit]
Destiny[edit]
Destiny 2[edit]
Bosses[edit]
- Ir Yût, the Deathsinger
- Crota, Son of Oryx (Final Boss)
Walkthrough[edit]
Enter the Abyss[edit]
Destiny 1[edit]

Players will spawn at the top of the Hellmouth; to enter the raid, the players must step on the sync plate to form the bridge; once the bridge is formed, the players enter a lift at the end of the bridge. The fireteam is then dropped all the way to the pitch-black bottom of the Hellmouth and take some fall damage, as well as acquire the debuff "Weight of Darkness." This debuff builds over time and slows down players. To remove the debuff, players need to stand near one of the abyssal lamps. The lamps also help players see any pitfalls in the dark. The lamp will eventually explode after a few seconds, so players need to stick close together and quickly move from one lamp to the next to avoid being weighed down too much. Along the way, large numbers of Thralls will attack the players, including a few Cursed Thralls, a couple of Knights and a couple of Ogres. It is possible to skip the Ogres if your fireteam is quick enough through the portal into the Ascendant Realm.
The fireteam will eventually reach a dead end and a sync plate; there are no more abyssal lamps at this point, so the players will reacquire the Weight of Darkness debuff. Players need to form the bridge while defending themselves from waves of enemies; once the bridge is formed, players will need to cross it; be warned that a few more Thralls and Cursed Thralls will climb onto the bridge. Wizards will also spawn during this, unless both knights were left alive whilst running through the previous lamps. After crossing the bridge, the debuff is removed. If there are any dead players, it is better to leave them behind once the bridge is complete as they'll respawn in the next section.
Destiny 2[edit]
In the Destiny 2 re-release, there are a few big mechanical changes to the raid, most notably a brand-new juggling mechanic called the "Chalice of Light", as well as the "Enlightened" buff that appears after passing the Chalice to another player. The Chalice is the overarching mechanic for the raid and appears in every encounter (including the hallway between the Bridge and Ir Yût, the Deathsinger). When forming any bridge in the raid, if you dump an Enlighten into the plate it will display the following message: The bridge resonates with additional enlightenment.
- Entrance/Maze
At the top of the Hellmouth, the Chalice will be hovering above a mini altar. Once picked up, it will begin to charge, and you will see a meter on the bottom left of your screen while you have it. Once fully charged, have another player take it off you before a 10-second cooldown expires and you die. Once the Chalice is passed to another player, it will grant you the “Enlightened” buff. Use this buff on the sync plate in order to begin building the bridge, and continue to pass the Chalice between players. Eventually, the bridge will finish and the Chalice will vanish for the time being. Once you’ve jumped down into the Hellmouth, the Chalice will appear again, and once picked up, you will gain two debuffs: "Weight of Darkness", and a new one called “Engulfed in Darkness”. This debuff lasts for one minute and will wipe players if not reset by preserving the Chalice. Players will notice that some lamps are lit up, and some are not. Lamps that are lit up will have a place to "preserve" the Chalice of Light, but ALL lamps are able to be Enlightened if any player has that buff. Enlightening a lamp will activate it, and gradually decrease each player's stacks of Darkness. After roughly 30 seconds, the lamp will stop lowering your Darkness stacks, emanate an orange glow, and explode, killing any players standing near it. At the end of the encounter, players must Enlighten the last lamp before the end plate in order to activate it and start building the bridge to end the encounter. If you want, you can choose to either preserve the Chalice or continue to pass it between players in order to build the bridge faster. If no player accelerates the bridge, it will take 90 seconds to fully build and allow players to cross.
- Secret Chest 1
From the beginning of the Abyss/Maze encounter, run to the left and hug the wall. Every little bit, there will be a lit-up door. Keep following the doors until you can turn left, turn left. There will be one more door on the left and one ahead of you. The chest will be behind the door directly ahead of you.
Cross the Bridge[edit]
Destiny 1[edit]

This next bridge is a bit more difficult to complete; not only are there sync plates, but also "Annihilation Totems" that will wipe the team if someone is standing under the sync plate and not the totems. Make sure to always have a teammate standing underneath both, especially if one is turning orange. Furthermore, there are two specific enemies: the Swordbearer, and the Gatekeeper. The only way to cross the bridge is to kill the Swordbearer and take his sword; without it, players cannot cross alive. Killing the Swordbearer results in the Gatekeeper spawning on the opposite side of the bridge, who can only be killed by the sword. Be warned, the sword will disappear after forty-five seconds, so it's crucial that the bridge is already formed before killing the Swordbearer and taking his sword. It is also crucial that each Gatekeeper is killed before the sword breaks, as each time the Swordbearer is killed, another Gatekeeper appears.
The first player who crosses the bridge should avoid standing on the sync plate on the opposite side, as that will activate the Annihilation Totems on their side of the bridge. Once the third player crosses the bridge, the players on the far side can now take over for forming the bridge and keeping the Annihilation Totems stable. The players on the starting side still need to kill the Swordbearer and the Gatekeeper to cross, but otherwise do not use the sync plates or totems. Upon the The fifth gatekeeper's death, the bridge will be permanently built for the sixth person, and six swords will spawn in, one for the sixth person, and five for the people already across. Then, waves of knights will begin to spawn from the left, middle, and right doors. After enough knights have been eliminated, Gatekeepers will start spawning in the middle. Once five more are killed, the doors on the far side will open, unleashing Thralls and Shriekers. Killing the second Shrieker will cause the doorway on the opposite side of the hallway to close, locking out the fireteam. The only thing on the other side is a chest, so it's not necessary, but be aware that it's there. Only one person needs to make it past the doorway, and after a couple of seconds, the door will open for the rest of the team. The hallway eventually leads to the final part of the raid.
Destiny 2[edit]
- Bridge
In Destiny 2, the encounters remain the same except the bridge does not stay built for the 6th person, nor is it safe to cross at any point without a sword. However, if you have the chalice this is the only exception to cross the bridge safely. When the encounter begins the team should have 2 people at every plate. The person starting with the Chalice will be the first person across the bridge so long as you follow the least time-consuming strategy of making sure everyone is enlightened except the 1st person who will dunk their enlightened into the bridge plate, this person will run across the bridge with the first sword person which should be the 2nd person enlightened. To ensure everyone gets enlightened, cycle people to and from the center to play hot potato with the chalice. Once everyone is enlightened; eliminate the Swordbearer who should be on the field by now being annoying. Once the Enlightened player has the sword, they and the chalice bearer must run across the bridge and kill the Gatekeeper and preserve the chalice respectfully. If anyone on the entrance side dies, the chalice will have to be run back over. Once the Gatekeeper is dead, the sword person should preserve their sword in a sword preservation point where there are 5 of them with the Chalice in front of them. From here the encounter is unchanged from D1 basics wise of course noting all D2 changes and additions. However as soon as all 6 players on the fortress side, play hot potato to enlighten 5 people to pick up the 5 preserved swords to kill the 5 gatekeepers then preserve the chalice. As you preserve the chalice to end the encounter.
- Shrieker Hallway
There is a short hallway, after the bridge encounter where you have to use the Enlightened buff to walk through a green force field. Once you pass through the wall, you’ll lose your Enlightenment. Juggle the Enlightenment buff and send one or two Enlightened people through the wall to kill the Shrieker. After the Shrieker is dead, the green wall will drop, and you’ll have to repeat this process twice. At this point, you can dunk the Chalice into the deposit point to end the run.
- Secret Chest 2
The second secret chest is located at the end of the Shrieker Hallway, but it’s timed. Once the second field drops, the player with the Chalice must sprint forward and dunk it into the preservation node at the front side of the hole before the door closes. If this is done correctly, the door will end up mostly closing, but the chest will spawn, and the door will reopen shortly.
Ir Yût, the Deathsinger[edit]
Destiny 1[edit]

The fireteam will need to kill Ir Yût, the Deathsinger before Crota will appear. Once any player fires at any of the enemies in the room, they will have three minutes to kill Ir Yut before she wipes the party. On top of that, she locks herself in a chamber and can only be accessed by killing the Wizards and Shriekers guarding each side of the chamber. First, the acolytes and Major knights must be killed to lure out the Wizard. Once the Wizard is dead, the Shrieker will open up next. Do this for both sides and the chamber will open. Ir Yut must be killed as quickly as possible, so plan ahead what equipment will be needed. Ir Yut will stand in place for the final thirty seconds of the timer, so that may be the easiest time to unload the team's heavy ammo onto her.
- Challenge Mode
In Rise of Iron, a challenge called Ir Yut's challenge is added with the addition of a 390 light version of the raid. The Ir Yut challenge is to defeat her with an Ascendant sword. To draw out a Swordbearer, the fireteam must defeat every enemy in the encounter. Teams should split into left and right groups, with one on each side dedicated to handling the Knights in the towers and adds in the middle. The remaining should work their way towards Ir Yût's chamber as normal. They should not forget the Knights that emerge inside once the barrier is broken, while avoiding damage to Ir Yût to prevent accidentally killing her prematurely. Once all of the adds are defeated, the fireteam will receive the message "Ir Yût shrieks in fear" and they should immediately return to the open arena. Three major Knights on top and a Hallowed Ogre on the bottom will spawn at each tower, along with Acolytes in the center. Defeating these enemies will spawn the Swordbearer. Defeat the Swordbearer and have your most agile player take it to Ir Yût's chamber to defeat her. She is taken down by literally any attack with the sword. Completing this in under two minutes unlocks the "Song of Silence" node in the Age of Triumph book.
Destiny 2[edit]
The first, you want to break your team into two teams of three. One team will go out to the right and the other to the left. Make your way up and around back to the center room with the crystal in it, killing the six yellow-bar knights along the way. Once they die, one shrieker will open on each side, killing those who will drop the green barrier to the middle. Your team will meet back here, starting the main part of the encounter. Once you’re in the room with the crystal, many more enemies will spawn and continue to spawn. The primary mechanic of this encounter is using the Enlightened buff to cross through the same type of green wall shields you passed through in the Shrieker Hallway to kill the wizards providing Ir Yut her shield. There wizards can spawn in seven places. The wizards can be hidden, so it is recommended that Enlightened 6 or your team’s scout run Wish-Ender or something else to gain Truesight to see these hidden Wizards more easily. You can also use your radar and note that if you see a red circle, that is a Shrieker, not a wizard. (It’s best to designate Enlightened 6 as your scout because, while the rest of the team passes around the buff to get Enlightened, that player can run around and call out where the wizards are.) The first phase has three wizards to kill, the second phase has four wizards to kill, and the third and final phase has five wizards to kill if needed. Collect the Chalice from the preservation node in front of the crystal. Pass around the Chalice to get the number of players Enlightened equal to the number of wizards that need to be killed. If you can get extra players Enlightened, those buffs can be used to deal more damage to Ir Yut, but we’ll talk about that shortly. Once the final person you want to get Enlightened gets the buff, that last player to take the Chalice dunks it into a preservation node in front of the crystal. Each player responsible for killing a wizard should go to one of the spots the scout called out. You have a couple options here.
- One option is to walk through the barrier when you get there and get the wizard into a finishable state, but note that walking through removes your Enlightened, and you cannot cross back out until the wizard dies. Once all wizards are ready to be killed, all players will have to finish the wizards at the same time.
- Another option is to wait outside the door until all players are ready, and then all players jump through their doors and kill their wizards simultaneously.
Either option works, but it is recommended you use the first method. As soon as a Shield Singer of Ir Yût Wizard dies, or if you take too long. The 45-second Wipe timer will start which is why it's imperative all wizards die quickly to maximize DPS time as you need to remove the highlighted section of Ir Yût's Health or you will wipe by her death song, noted by Dark Liturgy on your screen’s buff/debuff section and the message: Ir Yût begins her Dark Procession. Once the timer starts and all wizards are killed, the team should meet directly outside the crystal room for DPS. Once all of the wizards die as displayed by The Shield Singer's Song abates message, Ir Yût's shield will drop, and you’ll have the remaining time to damage her. One piece of her health bar will be highlighted. You must deal at least that much damage in a DPS phase, or she will trigger a wipe when her song ends. When you run out of time and have dealt enough damage, repeat the setup steps again until she is killed. You will know you have done enough damage to survive the wipe when the message: The Deathsinger's Liturgy ebbs away... appears. If you have any spare Enlightenment, a player with the buff can run next to her while her shields are down and interact with her. This gives you the option to “Expunge.” This deals significant damage and appears to make her take extra damage for the rest of that DPS phase. It is highly recommended having at least one player Expunge her at the start of each phase to increase your damage even more.
Crota, Son of Oryx[edit]
Destiny 1[edit]

The entire team needs to enter the chamber to activate the next part. The fireteam will be sealed inside as they are surrounded by enemies. Meanwhile, Crota will be summoned on the far side of the room. His arrival casts a debuff called the "Presence of Crota", which prevents players from healing. Once the chamber opens again, players need to eliminate the enemies and locate two items: the Chalice of Light, which appears in the center and allows players to heal, and another Swordbearer (note: the Chalice does not appear on hard mode. Players will need to find other ways to heal, such as equipping armor that regains health upon picking up Orbs of Light). Only one player at a time can carry the chalice, but other players nearby can swap the Chalice and heal, but keep in mind if you swap around the Chalice too much it will disappear. Once again, killing the swordbearer will drop a sword, which is the only thing that can do damage to Crota, and once again only lasts forty-five seconds. Crota's shields need to be downed before he can be attacked with the sword, so fireteams need to strip Crota's shields quickly to maximize the amount of damage the sword wielder can do. Another mechanic to Crota is his Oversoul, and the specifics of it will change, depending on the difficulty. The Oversoul itself is a large green object in the background that the fireteam needs to damage very quickly before it wipes the party. On Normal mode, his Oversoul will activate if any member of the fireteam dies. However, on either of the Hard modes, his Oversoul activates whenever he gets up from his downed state. Defeating Crota will successfully end the raid.
Furthermore, Ogres will start spawning in the room as well after two damage phases, which prevents a new Swordbearer from appearing. It's best to avoid getting killed altogether, which requires smart use of the Chalice and taking care of the thralls that appear. Also, Crota will enrage after his health is near depletion, automatically activating the Oversoul. At this point, players should attempt to finish Crota off, or at least bring Crota as close to his enrage point as possible before attempting another sword run.
- Challenge mode
Crota's challenge requires that no member of the fireteam can hold the sword more than once during the entire encounter. If a player accidentally picks up the sword, they must either use it or hand it off to another player, but they may not pick up another sword for the remainder of the fight. Likewise, if a player accidentally drops the sword, they cannot pick it back up or the challenge will fail. Teams should employ a double-down plan for Crota, so that each player with the sword has two chances to damage him.
Destiny 2[edit]
The entire team needs to enter the Crystal chamber to activate the next part. Everyone must be touching the crystal for it to start, so players have come up with the saying “Kiss the crystal” when they want everyone to gather and start the encounter. Once it starts, green barriers lasting 5 or so seconds will close everyone in the room. Crota will spawn directly in front of the room, so stand behind the crystal so he doesn’t attack you when the barriers come down. After the barriers drop, split the team into two groups of three again, one pushing out to the left and one to the right. Clear out the enemies and go outside to begin the setup to DPS. The cycle for this encounter is simple. First, kill the four boomer knights, two in the left and right towers. This will spawn two ogres and one Swordbearer in the middle. Once you kill the Swordbearer, someone who is Enlightened must pick up the sword. Like other parts of the raid, the window of opportunity to pick it up is short, so coordinate when to kill the Swordbearer. After that Swordbearer dies, some wizards and thrall will spawn under the towers and in the middle. The four boomer knights will respawn after a few seconds, and the cycle repeats. The above cycle should be completed three times to get three swords, however you can still pull it off with two swords and a Tractor Cannon. While the cycle is moving, the Enlightened cycle is also moving, but there is a small difference this time. For the entire encounter, players will see a Presence of Crota debuff on their screen. Which unlike in D1 where it blocked health regeneration without the Chalice, in D2 you cannot swap the Chalice, save for a small circle of light that can spawn in one of five locations. This just means that there is a little more coordination needed to swap the buffs. You need at least four players to become Enlightened, two to three for sword pick-ups, and one to shoot break the Oversoul. If you can get an additional person Enlightened, you can use that to Expunge Crota and, like Ir Yut, use it to deal free damage to him. After the last Chalice swap happens, that last player, likely Enlightened 6, should dunk the Chalice in the preservation location directly under the crystal room, down in the pit. Once two to three swords have been collected, everyone should gather near Crota to prepare to start DPS. Once you break Crota’s shields using the sword/swords, you can begin to actually damage him. There are two ways to break the shields:
- You can either have all sword users attack at once, which is the challenge for this encounter.
- Or you can attack Crota with each sword as you get it.
(Most people prefer the three-sword strategy, as attacking individually can be dangerous, because Crota can still attack you while you sword him down.) Whether you use one, two or three swords, it is recommended that one player on your team uses Tractor Cannon and hits Crota with it before the swords attack. This increases the amount of damage Crota takes, but more importantly, it increases the damage the swords do to his shield. This makes it much easier; his shield can be taken down with two swords if used this way. This is hard to do and has some luck involved as each sword user must hit all of their attacks, which isn’t a guarantee even for the best players. Once his shield goes down, DPS starts, when this happens two things occur;
- Crota becomes damageable and this is the time to unload damage into him. However be warned the other thing going on is the Wipe Timer.
- When Crota enters DPS, he summons his Oversoul which will wipe the team if the timer ends and an Enlightened player has not taken it out. However, doing so ends the DPS, so it is best to coordinate with your team to drop the Oversoul at not later than 3-4 seconds left.
Regardless of the Method to deal damage to Crota you will want multiple Wells of Radiance or lots of distance to rocket him as even while in damage phase Crota is not Idle and will break Wells quickly hence it is strongly recommended to have more than one. If you choose to Rocket, make sure to have one Gjallarhorn. You’ll reach the final stand once you do enough damage to Crota, as noted by the split on his health bar. Crota will stand up and go immune for a brief time. Players should run away to avoid getting damaged by him during this time. After that, his shield will drop again, and the Oversoul will reappear with a 20-second timer. You can destroy this Oversoul, assuming you have the Enlightened buff. Doing so will extend the DPS phase by ten seconds, giving you some more time to kill Crota. Once the Oversoul timer reaches zero, it will wipe you, but you have three to five extra seconds to deal damage. If you kill him in this time, the team will wipe, but you will respawn and still be able to collect your sweet loot. However, it is not recommended to count on this grace period, instead make sure you drop Crota before the timer expires.
Secret Deepsight Puzzle (Destiny 2)[edit]
After forming the bridge, but before jumping down the grav lift into the first encounter, zoom in with your weapon and take note of which statue in each pair of them is emitting soulfire from left to right. This will indicate which statue in each pair needs to be activated throughout the raid. After completing first encounter, but before starting the second encounter, face yourself toward the area where you would normally cross the bridge and then enter a room containing the statue that corresponds to the one emitting soulfire in the initial area of the raid on the left pair. Players will know they activated the correct statue among the pair when the following text is displayed: "A choice echoes into the future…". Activating the incorrect statue will display the following text: "An irredeemable mistake…". After completing the second encounter, do not enter through the doorway yet; instead, another pair of statues can be found at the end of a corridor where adds would spawn during the second encounter, then activate the statue corresponding to the one emitting soulfire in the middle pair of statues in the initial area of the raid. After completing the third encounter, the final pair of statues can be found adjacent to the top doorway in the middle where a Wizard or a Shrieker would spawn during the third encounter; activate the statue corresponding to the right pair of statues within the initial area of the raid. Once all 3 correct statues in each pair have been activated, the following will be displayed: "A balance is reached. To the victor go the final spoils," and a reward chest will spawn containing a weapon with guaranteed Deepsight Resonance once the final encounter is completed.
Master Mode[edit]
As with other Master difficulty content, the recommended power level is 20 above the Pinnacle Cap. The Extra Champions and Extra Shields modifiers are applied, as well as a selection of surges and weapon overcharge.
Encounter Challenges[edit]
During the Abyss encounter, "Conservation Of Energy" You may only light one lantern per Chalice deposit. After depositing the Chalice of Light on a pedestal, you may only light one lantern. This means that your fireteam will need to run past multiple unlit lanterns during the encounter, likely incurring x10 Weight of Darkness.
Also the Abyss encounter, "Feather-Light" Complete the Abyss encounter in the Stills without letting any player reach 10 stacks of Weight of Darkness. Your fireteam must beat the Abyss encounter without a single person reaching x10 Weight of Darkness.
During the Bridge encounter, "Precarious Balance" The challenge for the Bridge encounter is only to cross the bridge while no one stands on the plate that builds it. This is simple: the person crossing the bridge must communicate when they are crossing, and those responsable for the middle plates just step off. The bridge will start to unbuild, so the player crossing must jump over the small gap made as the bridge deforms.
Also during the Bridge encounter. "Threatening Reach" Defeat all Swordbearers in the Oversoul Throne Bridge encounter from the opposite side of the chasm.
During the Ir Yut encounter, "Equal Vessels" During the Ir Yut encounter, every player must receive the Chalice of Light before it can be claimed by the same person again.
Also during the Ir Yut encounter, "Communal Rites" During every DPS phase, one player must expunge their Enlightened buff on Ir Yut.
During the Crota encounter, "All For One" Crota's shield must be fully destroyed shortly after he receives damage. Once Crota's shields receive damage, they must be broken within a few seconds.
Also during the Crota encounter, "Singular Sensation" Complete the Crota, Son of Oryx encounter with only one player Enlightened at a time.
Messages[edit]
- A podium of Light has been activated (D2)
- Somewhere, a plate hums with the power of the Podiums of Light (D2)
- The bridge is fully formed
- The bridge is deconstructing
- The bridge resonates with additional enlightenment(D2)
- PlayerNameHere has picked up the Sword
- The path is whole (D1)
- The Deathsinger prepares her song
- Ir Yût Prepares her Dark Precession
- Ir Yût begins her Dark Procession (D2)
- The Shield Singer's Song abates (D2)
- The Deathsinger's Liturgy ebbs away... (D2)
- Ir Yût shrieks in fear (D1)
- The Deathsinger begins the liturgy (D1)
- Crota's presence stops health recovery (D1)
- Crota summons his Oversoul
- Crota beckons (D1)
- The Oversoul's shadow looms large... (D2)
Rewards[edit]
- Radiant Shards and Radiant Energy (Destiny 1, Normal and Hard modes only)
- DLC Exotic weapons (No Land Beyond, The 4th Horseman, Dragon's Breath)
- Crux of Crota (Destiny 1)
- Essence of the Oversoul (Destiny 1 and Destiny 2)
- Light in the Abyss Legendary Ship (Destiny 1) - Obtained from completing Crota's End on Normal mode or Light Level 390 mode
- Bane of Dark Gods Legendary Ship (Destiny 1) - Obtained from completing Crota's End on Hard mode or Light Level 390 mode
- S-13 "Graverobber" Legendary Sparrow (Destiny 1) - Obtained from completing Crota's End
- War's Lament Exotic Ship (Destiny 2) - Obtained from completing Crota's End on Master difficulty
- Crota's Exile Exotic Sparrow (Destiny 2) - Obtained from completing every Crota's End encounters on Master difficulty with the Challenges
- Cryptographic Legendary Shader (Destiny 1) - Obtained from completing Crota's End
- Glowhoo Legendary Shader (Destiny 1) - Obtained from completing Crota's End on Hard mode
- Dance of Bones Legendary Shader (Destiny 1) - Obtained from completing Crota's End on Light Level 390 mode (Random drop)
- Warped Rachis Legendary Shader (Destiny 2) - Obtained by opening all secret chests in Crota's End
- Shed Carapace Legendary Shader (Destiny 2) - Obtained by completing every Crota's End encounters without dying or leaving the activity
Armor[edit]
Weapons[edit]
- Necrochasm - Exotic
 (
( Destiny 2) Auto Rifle - Obtained from completion of the Bottomless Pit quest
 - Oversoul Edict (Adept) - Exotic Pulse Rifle - Obtained by completing a weekly Challenge Mode
- Abyss Defiant (Adept) - Exotic
 Auto Rifle - Obtained by completing a weekly Challenge Mode
 - Word of Crota (Adept) - Exotic
 Hand Cannon - Obtained by completing a weekly Challenge Mode
 - Fang of Ir Yût (Adept) - Exotic Scout Rifle - Obtained by completing a weekly Challenge Mode
- Oversoul Edict - Legendary ( Destiny 2) Pulse Rifle - Obtained by completing the Deathsinger or Crota encounters
- Abyss Defiant - Legendary ( Destiny 2) Auto Rifle - Obtained by completing the Deathsinger or Crota encounters
- Word of Crota - Legendary Hand Cannon - Obtained by completing the Deathsinger or Crota encounters
- Fang of Ir Yût - Legendary (
 Destiny 2) Scout Rifle - Obtained by completing the Deathsinger or Crota encounters
 - Swordbreaker - Legendary ( Destiny 2) Shotgun - Obtained by completing the Bridge
- Black Hammer - Legendary Sniper Rifle - Obtained by completing the Crota encounter (Replaced with Black Spindle in Age of Triumph)
- Light of the Abyss - Legendary Fusion Rifle - Obtained by completing the Bridge or the Deathsinger encounter
- Song of Ir Yût - Legendary Machine Gun - Obtained by completing the Crota encounter
- Hunger of Crota - Legendary Rocket Launcher - Obtained by completing the Crota encounter
- Husk of the Pit - Common Auto Rifle, obtained from your first completion of the Crota encounter and claiming the Bottomless Pit quest
- Eidolon Ally - Legendary Auto Rifle, obtained from killing 100 Hive with Husk of the Pit for the Bottomless Pit quest
Trivia[edit]
- Crota's End is the first Raid to feature the Ascendant Realm, and the realm's overall debut in Destiny
- Crota's End is the shortest raid in the original Destiny, only having four encounters, while both Leviathan, Eater of Worlds, and Leviathan, Spire of Stars have three.
- Crota's End is well renowned by players as a "Strike" due to the shortness and overall easiness of the raid, with many players managing to solo its entirety very early on. This resulted in Destiny 2's Contest Mode being MUCH harder than players thought it would be.
- Crota's End and Vault of Glass are so far, the only two raids in all of Destiny's franchise to have another fireteam attempt them before our guardians did.
- Crota's End is, so far, the only Raid to have been released in both Destiny 1, Destiny 2, and Destiny: Rising.
Gallery[edit]
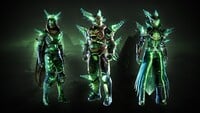
Crota's End raid armors in Destiny 2
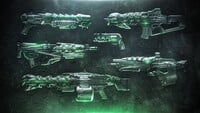
Crota's End raid weapons in Destiny 2

Crota's End exotic weapon Necrochasm in Destiny 2


List of appearances[edit]
- Destiny: The Dark Below (First appearance)
- Destiny 2: Season of the Witch (Non-canon appearance)
References[edit]
- ^ Bungie (2014-12-9), Destiny: The Dark Below, PlayStation 4, Activision Blizzard


