Wrath of the Machine
From Destinypedia, the Destiny wiki
|
Prev: |
|
|
Next: |
|
| Wrath of the Machine | |
|---|---|

| |
|
Game: |
|
|
Player(s): |
1-6 |
|
Recommended Power Level: |
370 |
|
Location: |
|
|
Enemy faction(s): |
|
|
Hostile race(s): |
|
|
Objective(s): |
Find the source of the remaining SIVA infection and destroy it. |
- "Where the Light ends, evolution begins."
Wrath of the Machine is the flagship Raid of the Rise of Iron expansion. It became playable on September 23, 2016, three days after the fourth expansion's release.
After the destruction of the Replication Complex, Guardians must bring a permanent end to the SIVA Crisis by killing the leader of the Devil Splicers: Aksis, Archon Prime.
Gameplay[edit]
The Raid exotic pulse rifle Outbreak Prime can be acquired by finding and activating all of the monitors throughout the map. The recommended Light Level is 370.
The Heroic Mode for Wrath of the Machine was released at 2PM PT on Tuesday, October 18, 2016. It features new mechanics that are meant to make the raid more challenging. The recommended Light Level is 380.
Unique enemies[edit]
- Splicer Scorch Captain
- Shock Captain
- Null Captain
- Shock Servitor
- Scorch Servitor
- Null Servitor
- Voltage Eater
- Rahndel, the Perfected
- Meksis, Siege Engineer
Bosses[edit]
- Vosik, the Archpriest
- Siege Engine
- Aksis, Archon Prime (Final Boss)
Walkthrough[edit]
Foundry 113[edit]

You will spawn outside the giant transport sphere that serves as a gateway into the lair of the Devil Splicers. Almost immediately, you should notice a number of white pillars of energy jutting up from the ground. These are voltage charges, which you need to accumulate and deposit in one of the generators, of which there are three - one directly ahead of where you start, and two further back to the left and right. Upon picking up a charge, you will have 15 seconds to find and pick up another for a maximum of four, otherwise you will die instantly when the timer runs out after 15 seconds. You will respawn quickly, however, after 5 seconds or until someone else revives you. When someone deposits four charges in a generator, the boss, Vosik, the Archpriest, will enter the field. He will attack you with an arm-mounted Scorch Cannon throughout the encounter, but do not focus on him for now.
Divide yourself into teams of two to cover each of the 3 generators and designate one of your team members as a runner to collect charges and deposit them in the generators, all while remembering to stay away from Vosik. While charges are being collected and while the generators are being defended, priority must be given to special enemies named Voltage Eaters, Fallen S.A.B.E.R.-style Void Shanks that will drain generators of their voltage if you let them get too close. They don't have a great deal of health so taking them out shouldn't be problematic, but you must kill them first and foremost.
Keep an eye out for Voltage Eaters and Vosik's positioning as you clear adds and drop charges in the generators. Once you have fully charged the generators, you will receive a notification that they are producing SIVA Charges, which all players must use. Pick these up and, using your right trigger, hurl them at Vosik to drain his shield. These eat through his defenses rapidly, and with concentrated throwing you should get through his shield quickly. Even if you do that, however, don't stop using the charges - they do far more damage than any weapon you have, taking roughly one hundred thousand points off his health per charge thrown when his shield is down. Damage him as much as you can, then rinse and repeat when his shield regenerates, clearing adds, collecting charges and eliminating Voltage Eaters, then throwing the charges once they're generated.
Once Vosik has sustained significant damage, he will retreat and gradually warp inside the lair. Jump up through the open doors and onto the pipes through the central opening, and you will come across a chest that can potentially contain Exotic loot, engrams or Splicer Key Fragments. From there, make your way through the narrow corridors beyond to enter the Splicer's Den. Sticking to the right walls will lead up to a hallway that leads to another chest.
Splicer's Den[edit]

Upon entering this area, you will immediately come across a jumping puzzle. There are a number of platforms you can use to reach the door at the end - be wary, however. Like the Wretched Eye Strike, some of these platforms may give way beneath your feet, so keep on your toes. There are a couple of ways to the end, from using the platforms on the side and the overturned tank chassis to get to the end to climbing up to the rafters and jumping on from there, but the route is fairly straightforward. Just watch your jumps, stay alert for falling platforms and eliminate the light enemy resistance ahead, and you'll come to a red hallway that leads to a drop.
Continue, and fall down to the next room.
You will come to a walkway terminating at a large platform, two lanes either side of it, and a wall festooned with multiple monitors at the far side of the room from where you enter, as well as two rooms each at the upper and lower right and left areas of the stage. Approaching the middle platform as well as stepping on the stage at the back near the monitors triggers the encounter, and Vosik, the Archpriest will warp in with his health and shield fully regenerated and will start laying down suppressing fire with his Scorch Cannon. Priority must be initially given to mob clearance, so separate into teams of two for each lane and take out as many Splicer Dregs and Splicer Vandals as you can. After a short time, a trio of SIVA Charges will drop from dispensers on the ceiling - much like the first encounter, one player from each team must pick up the charge and throw it Vosik to drain his shield. It is advised you do so simultaneously for increased damage.

After the initial shield damage phase, all focus must be placed on the wall of monitors. A screen will illuminate, and if it isn't destroyed within the next few seconds Vosik will trigger critical SIVA density, which will cause a wipe if you don't make it to a safe room in time, and which will greatly reduce the amount of potential damage you can do and use a safe room if you avoid dying regardless. Safe rooms are indicated by glowing orange light emanating from them, with there being a maximum of two safe rooms active after any damage phase. Safe rooms can be activated by shooting the glowing button on the right side of the doorway. If you are left out of a safe room after Vosik begins his wipe mechanic, you will die. Calling out the location of the screen is imperative (left, center, or right). After it has been destroyed, clear enemies and wait for the second wave of charges, doing the same as before. Keep your eyes on the monitors after the charges have been thrown.
For the third wave of charges and onward, assuming Vosik still isn't dead, until either the critical SIVA density is triggered or Vosik shield is destroyed, Splicer Captains will start spawning in with the mobs. Eliminate them swiftly - their toughness and damage output can torpedo your efforts. When you've thrown enough SIVA charges at Vosik to completely drain his shield, he will be stunned for a brief period. Damage him as much as you can, potentially amplifying the damage done with a Shadowshot if your team has a Nightstalker Hunter. In addition, other SIVA charges will drop from above, and these can be thrown at Vosik to damage him further. After the damage phase has elapsed, Vosik will activate the critical SIVA density. To avoid it, you have to run into the lit room on the left or right-hand side, with the room being called out beforehand, and shoot the glowing lock to activate a safe room. After the wipe mechanic passes, assume your previous positions, and rinse and repeat. Whittle away at the adds and at Vosik's shield when the charges arrive as before, all the while watching the other monitors.
When Vosik is below half health, numerous varieties of Splicer Shanks will begin drifting down from the ceiling. Destroy the Exploding shanks first - both to stop them cold before they do serious damage, and to occasionally take out other Shanks in the blasts they create. After you kill Vosik, he drops rewards, and a SIVA cache also appears on the middle platform. The SIVA chest can only be opened using a SIVA Cache Key. These rewards can include the raid boots, fusion rifle and shotgun (In light level 390, Vosik may drop the Ex Machina, the Raid's hard mode-exclusive sniper rifle)
Vosik challenge[edit]
All 4 safe rooms must be activated using a SIVA charge. This is accomplished using the 2 charges that drop during damage phases and going to safe rooms as soon as they drop. There is no need for any player to stay extra seconds for more damage, since this challenge forces at least 3 damage phases.
Apex[edit]

Upon exiting the Splicer's Den, you will reach the top of the wall in which the Devil Splicers have holed up. Turning around once you get outside will reveal a giant Fallen assault battery lying immobile. Progress along the wall, being careful not to touch the sides as they are electrified and being wary of fires across the area. Clear the handful of Splicers present and reach the barrier on the opposite side.
When the last of your team approaches the barricade on the other side of the wall, a short cutscene will play and the Siege Engine will activate and begin advancing towards you, laying down fire with its Arc siege turrets. To be touched by it brings about near-instantaneous death, so do not venture near it. At the same time, a massive horde of Splicer Dregs and Splicer Vandals will spawn crawling up from pits in the floor, while Splicer Skiffs in the air provide fire support. Be as far back as possible to avoid Skiff fire. Two or three members of the team should prioritize mob clearance using appropriate classes and builds, such as Sunbreaker Titans, Voidwalker Warlocks, and Nightstalker Hunters. Swords, especially Dark-Drinker due to its elemental match to the Void shields of Splicer Captains and efficient add-clear ability, are also very effective choices for this encounter. You must also be careful of the gaps in the floor down which you can easily fall. The others, potentially bolstered by Weapons of Light, must focus on taking out the Siege Engine's turrets situated on either side of its head. When both turrets are destroyed, the head of the Engine will rip open, and more firepower must be applied to reveal the entrance. Once you have done sufficient damage, the Siege Engine will suffer a hull breach. The electrical field surrounding it will dissipate, and you must jump up onto the Engine itself to continue forward.
The Engine will knock the first barrier down - do not stand near the head when this happens, as the resulting explosion can potentially kill you if you are under leveled. You'll come across a Skiff in the distance, a handful of adds, and a winding set of passageways riddled with slowing mines. Dismantling these before the start of the next phase can greatly speed things up. Race to the Skiff while being wary of its guns and its own arc mines, and kill the regular enemies and the Splicer Captain below it. After doing so, the Skiff will drop three items, the Engine Block, Warhead and Driveshaft and then leave. These items are crucial - they are components of the Siege Engine that you must transport back to it in order to repair it and continue. If one of these items are lost or the timer expires, the Siege Engine will explode and wipe your team.
Upon picking up one of the parts, you will receive the "Encumbered" debuff which lasts nine seconds that will greatly reduce your speed at the cost of you being able to carry the part around (Transversive Steps, as well as other walk speed buffs, are of great benefit). After the timer has elapsed, you will then receive the "Exhausted" debuff, leaving you unable to carry a part for an additional nine seconds. The team must juggle the parts between fresh and exhausted players, calling out the parts they carry, while simultaneously being wary of more Skiffs jumping in, Splicer Captains lining the way back that must be killed, and the mines. If at all possible, given room, one player should scout ahead and eliminate as many mines as possible in order to ensure that progress isn't slowed.

However, there is something else to factor in - as you advance, a Skiff will warp in behind the Siege Engine and dispatch a small boarding party. Among this group of enemies is a unique Major named Meksis, Siege Engineer. It is risky to charge ahead past the other adds and try and kill him first, but if he is not eliminated before he reaches the bridge of the Siege Engine, he will lock it down, retracting the ramp you need to climb up to deliver the parts. If you receive a notification that he has locked down the Engine, have people with shotguns, heavy weapons or active Supers race over to where he is in order to kill him as quickly as possible so the ramp can be lowered.
As you do all of this, the Siege Engine is on a timer - failure to get at all of its parts in place before the timer runs out results in it detonating, wiping the team. The extension you are offered if you get a part in place just before the timer passes is brief, so try and get there as quickly as possible without hindrance. Gjallarhorns, Dark-Drinkers and shotguns are effective at dispatching Captains, and Shadowshot, Stormtrance and Blessing of Light from a Titans bubble help immensely here for mob clearance and increased survivability. Be careful of the pits interspersed throughout the field, however. If you end up dropping a piece of the Engine down a hole, the run is unsalvageable, and the Engine immediately detonates.
Upon clearing the passageway and the adds, the parts must be placed. The Driveshaft goes in a receptacle to the right of where you climb up the ramp, the Warhead goes in a slot in the center, and the Engine Block goes in a port at the Engine's back right or back left from the perspective of players. Once you have all three parts in place, the Siege Engine will move again, and you must ride it through the second barrier as before. **The three pieces of the engine match the color of the slot they are assigned to**.
After the second roadblock is cleared, you will almost immediately notice that the wall terminates in a steep and sudden drop. Staying on the Siege Engine all the way down will guarantee your death, so get off it - or even hop off mid-fall, if you're a thrillseeker - and land carefully on the rocky outcroppings below, whereupon you'll find a chest and a SIVA Cache next to it containing either the raid Rocket Launcher, an artifact, or gauntlets or a chest piece. This chest also requires a SIVA Cache Key to open. A Dormant SIVA Cluster is also located on a small platform on the opposite side of the place you land on, and a chest is hidden in the large pipe hanging overhead, accessible via a short jumping puzzle. Once you're done, head onwards, and after dropping own the hole, you'll subsequently enter the Server Farm.
Server Farm[edit]

Upon entering The Server Farm players will have to navigate a maze-like SIVA containment area. Once you enter, the team will be assaulted by Devil Splicers and possibly Rahndel, the Perfected, a SIVA-enhanced Fallen Vandal who has a very small chance of spawning. At first, the lights will be red; upon defeating the Splicers in the area the lights will turn blue, although engaging and defeating this group of enemies is not required in order to move to the next encounter. Players will then have to get out of the maze. The easiest way to do this is to simply hug the wall to the right immediately after entering the server farm, with the exit into the next room being all the way up the right-most wall. Two monitors can be found within this room as well. These monitors are only used to open the large SIVA capsule in the next room and do not need to be interacted with if players will not be solving the puzzle in order to open said capsule.
Once the players leave the first half you will enter a large room with a SIVA Capsule in the middle. Guardians can open this capsule if they jump on the smaller containers on the North East, South East, North West, And South West sides of the Capsule in a certain way, guided by binary signals located on two small monitors in the previous room. Inside the capsule, there will be a monitor needed to be activated in order to get the Exotic Pulse Rifle Outbreak Prime.
The binary codes for the puzzle are numbered 1-5:
- 1- 0000
- 2- 0001
- 3- 0011
- 4- 0100
- 5- 0101
After going through two more entrances the Raid team will enter the Perfection Complex, the lair of Aksis, Archon Prime, who is also the Raid's final boss.
Perfection Complex[edit]

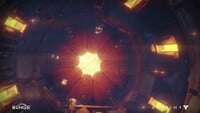
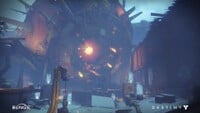
Head down the outer walkway into the Perfection Complex, and jump down carefully. You will come to a nearly pitch black room, and the boss encounter will not commence until a player steps into the swirling cloud of SIVA mites just ahead. When you do, the room lights up, and the raid's final boss - Aksis, Archon Prime - is revealed.
Coordination and communication are paramount across this entire encounter. As Aksis awakens, multiple adds will spawn soon after - Dregs, Vandals, and a Vandal Major on each lane. Organize the team into three groups of two, one for each sector, left, right and middle, and kill as many adds as you can, prioritizing the Major. Afterwards, a Scorch(Solar), Shock (Arc) and Null (Void) Captain will spawn, one in each area and in a random order. The Captains are to be killed as quickly as possible, and three players (1 from each section) pick up the cannons they drop. The other players are to call out which Servitors they need to kill, which will spawn in whenever a Captain dies. One Servitor of each element will appear in a random order, and they can only be destroyed by their corresponding cannon. They must be killed before reaching a red panel on their side, otherwise this will lead to Aksis initiating critical SIVA density that will lead to a wipe.
The players who are not holding the cannons need to pick up the SIVA charges that the Servitors drop after being killed, and throw the charges at the glowing red panels that surround Aksis. When a cannon is dropped by a player, they receive a debuff called Charge Lockout that prevents them from picking up a SIVA charge for 30 seconds. It is therefore vital that one player in every group of two is designated as a cannon user, and the other as a charge thrower.
This phase must be repeated three times: the first time, you need to throw two charges. The second time you need to throw three, and the third requires seven charges thrown at all of the corresponding panels/nodes. After both the first and second phases, many Shanks will descend to the stage from openings above Aksis. Focus on killing as many as you can until the adds come again.
Throughout all phases the strategy remains the same, but in the third phase it is up to both cannon bearers and charge runners to call out the positions and elements of Servitors once the captains have been killed and their guns obtained. When all seven charges have hit the SIVA containment cores, Aksis seemingly dies and the encounter ends.

A chest will spawn in the middle of the room that can contain an artifact or a Ghost shell. The final encounter begins when players shoot the glowing red square on Aksis' chest. Aksis will detach from the wall and fuse his body with a set of mechanical legs, gaining both the ability to teleport and the ability to attack you directly with his own cannon which launches both regular Solar projectiles and clouds of SIVA mites that will damage players over time the longer they stand in them. There is a distinctive charging sound before each shot which gives you time to relocate. Be wary of where Aksis teleports to between the central, left and right platforms (Although the boss can only teleport to 4 different places around the arena, if the boss teleports to where a player is standing, that player dies. Shield yourself from his fire as best as you can, and dispatch the horde of Shanks that spawn. After a short while, Captains will spawn in again, and just like the first phase, it's up to one player on each team to pick up the cannon and destroy the matching Servitor.
However, here is where things deviate from the first stage - as the Captains spawn, three random players will glow blue and receive an Empowered buff. The players with the Empowered buff cannot hold the cannons under a any circumstance, as the Charge Lockout debuff will cripple your chances of effectively taking down Aksis' shield and stunning him afterwards. As the assignment is random, players who receive the buff should call out Empowerment, and where you are - if there is more than one player empowered on a certain side, have them swap places to a side that needs them, replacing a player that isn't Empowered. While maintaining positions and clearing Shanks near the back on the right and left side, and hovering in between back middle and center middle for the center lane, the empowered players are to take the charges the Servitors drop and throw them at Aksis to destroy his shield. Meanwhile, the cannon bearers are to drop their cannons at the middle in front of the stairs. Upon this being done, Aksis will teleport to one of four areas in the room - back right, back left, back middle or center middle. The nearest empowered player has roughly five seconds to jump on top of Aksis' glowing back and stun him, done by holding square for Playstation players and X for Xbox players. This will leave him vulnerable and damage can be done. Empowerment also shifts with each stun and new players are affected - call out Empowerment, where you are, and if any Empowered players are needed on lanes that don't have them, move quickly. Note that this boss is technically a modified Fallen Walker tank, which means that each of his legs, his chest, and head all have separate hitboxes. Weapons such as Rocket Launchers with cluster bombs, the Dark-Drinker Exotic Sword, and Titan (class) Thermite grenades are capable of dealing exponentially more damage to Aksis, Archon Prime than weapons that can only deal damage to a single hitbox because they can hit multiple of them at a time.

Aksis will do this twice more, and players must maintain their positions, so they can stun him quickly. After the third stun, the longest damage phase begins. After the third phase elapses, Aksis will trigger critical SIVA density, which you must avoid by retreating to one of the pillars of light in the back of the room, of which there are four in total. It is imperative that you must all gather on the same platform, as each of them will disappear after being used. This means that the team can do no more than 5 damage phases.
Again, the process needs to be repeated - clear adds continuously, call out and kill your Captains fast, have the cannon-bearers call out and eliminate the Servitors, have the Empowered players throw the SIVA charges at Aksis while holding position around the left, middle and right, and stun him as quickly as possible after he teleports, with players being sure to call out empowerment and where empowered players are needed if there is more than one in a certain area. Repeat this process, using the pillars at the back to shield you from the wipe.
Once you whittle Aksis down to 5% health, he will warp to the middle of the arena where he begins the encounter and initiate a self-destruct sequence in a last-ditch effort to kill you. If sufficient damage is done, Aksis should fall dead, and you will have conquered the raid. Aksis will drop loot and there will be another SIVA cache, and you can get the raid auto rifle, scout rifle, helmet or class armor piece. In addition, for players who have fulfilled all the prior steps, a passageway will open up below on the back left of the arena, not far from the platform you dropped onto at the start, which leads to a well-hidden Exotic chest, and the start of the quest for the Outbreak Prime Exotic Pulse Rifle.
Aksis challenge[edit]
No slam may be missed, neither supercharge nor Aksis stun. If Aksis is near final stand, it is a good idea to wait for Aksis to teleport 3x before doing any damage. If Aksis teleports to a new location as damage sends him past the final stand threshold, he will teleport to middle immediately afterwards. This will count as a missed slam and the challenge will fail.
Messages[edit]
- Vosik enters the field
- Assembly Line Spinner is losing voltage
- Foundry Spinner producing SIVA Charges
- Vosik retreats
- SIVA Density critical
- The Siege Engine suffered a hull breach
- Meksis locked down the Siege Engine
- Siege Engine is now fully operational
- SIVA exposure empowers Guardian's Light
- Aksis generates SIVA mites
- Guardian's Supercharged
- Aksis' barrier is shattered
- Aksis initiates self-destruct sequence
- Aksis stabilized - activating extermination protocol
- -Stunned Aksis - Empowerment shifts
Gallery[edit]
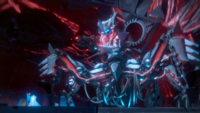
A close up of Aksis, Archon Prime

Another view of Aksis
Devil Splicers
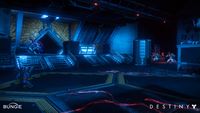
Entrance into the Server Farm

Server Farm
Entrance into the Perfection Complex
Another view of the Siege Engine
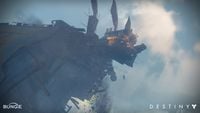
Siege Engine falls off the cliff
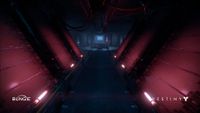
Close view of the raid door.
Far view of the raid door.


Rewards[edit]
- The ship Nanophoenix can drop from defeating Aksis Phase 2 on Hard Mode. [1]
- If running the Raid on Hard Mode, bosses will have a chance to drop both Hard Mode & Normal Mode loot (Normal Mode capping at 385 Light, Hard Mode 400 Light).
- You can only pick up the Normal Mode & HM shaders from the Shader Kiosk next to Eva Levante. They are unlocked by obtaining a Full set of Raid Armor for either the Normal Mode or Hard Mode Raid – NOT a combo of the two (Set – Helm, Arms, Chest, Boots & Class item).
- Upon defeating a Boss, SIVA Cache chests become available (Both Normal Mode & Hard Mode if done on Hard Mode) opening the Normal Mode chest on Hard Mode will not give Normal Mode gear higher than the 385 Light Level.
- Challenge mode will reward SIVA Ornaments to be applied to the Hard Mode Spliced Gear. 7 Ornaments are required to ensure the full armor set glows.
- The raid emblem will only drop once on the first character that completes the raid.
- The Weldfire shader can drop from defeating Aksis Phase 2 on Hard Mode.
Weapons[edit]
- Outbreak Prime - Exotic
 Pulse Rifle Available by completing a puzzle
 - CHAOS DOGMA~ - Legendary Scout Rifle Found in both Normal and Hard mode. Found after defeating Aksis phase 2.
- GENESIS CHAIN~ - Legendary Auto Rifle Found in both Normal and Hard mode. Found after defeating Aksis phase 2
- STEEL MEDULLA~ - Legendary Pulse Rifle Hard Mode exclusive. Found after defeating Aksis phase 2.
- FEVER AND REMEDY~ - Legendary Hand Cannon Hard Mode exclusive. Found after defeating Aksis phase 2.
- EX MACHINA~ - Legendary
 /
/  /
/  Sniper Rifle Found in Hard mode after defeating Vosik phase 2.
 - QUANTIPLASM~ - Legendary / / Shotgun Found in both Normal and Hard mode after defeating Vosik phase 2.
- ETHER NOVA~ - Legendary / / Fusion Rifle Found in both Normal and Hard mode after Vosik phase 2.
- ZEAL VECTOR~ - Legendary / / Sidearm Hard Mode exclusive. Found after defeating Vosik phase 2.
- SOUND AND FURY~ - Legendary / / Rocket Launcher Found in both Normal and Hard mode.
- IF MATERIA~ - Legendary / / Machine Gun Hard Mode Exclusive. Found after defeating the Siege Engine.
Trivia[edit]
- All of the raid weapons that are awarded are made similar to the weapons from the Last City's weapon Foundries. Specifically, they are akin to the weapon prototypes found at Banshee-44's stand. The only differences are the SIVA modifications and color scheme.
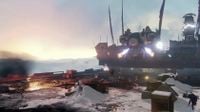
- Strangely, The entrance to the raid at Foundry 113 looks like a massive Fallen Servitor. This may be because the Fallen worshiped SIVA and they also worshiped Servitors. Another possibility is that it's simply for intimidation purposes.
- Despite being one of the main and most prominent enemies, Wrath of the Machine was the first-ever Raid to include Fallen.
- Wrath of the Machine was the only Raid in the first Destiny to include a fight where the primary antagonist for an encounter isn't a sentient being (the Siege Engine).
- Wrath of the Machine was the second and last Raid to feature modified versions of regular enemies, being SIVA-enhanced Fallen. The first being King's Fall with Taken Hive.
- SIVA weapons acquired from this Raid evolve their look as they are upgraded, gaining more of an "infected" look as the user unlocks perks. This type of weapon evolution is exclusive to this Raid and is not found anywhere else in either Destiny or Destiny 2.
- Wrath of the Machine was the first ever Raid, and the only one in Destiny 1, to feature a cutscene inside the Raid.
- Wrath of the Machine is currently the only Raid from Destiny to not have been remade for Destiny 2.


