Vault of Glass
From Destinypedia, the Destiny wiki
For more information, see the citation policy. |
| “ | Beneath Venus, evil stirs. | ” |
|
Next: |
|
| Vault of Glass | |
|---|---|

| |
|
Game: |
|
|
Player(s): |
1-6 |
|
Recommended Power Level: |
|
|
Location: |
|
|
Enemy faction(s): |
|
|
Hostile race(s): |
|
|
Objective(s): |
Stop the Vex from spreading through all of time through destroying the source of their operation. |
Vault of Glass is a Raid located on Venus, located in the Vex structure of the same name. It was made available in Destiny on September 16, 2014, and is one of the four Raids in the game. A reprised version of the Raid was released in Destiny 2 on May 22, 2021.[1]
Stored away, deep in the Vault of Glass on Venus is Atheon, Time's Conflux. No one knows what this Vex is. Guardians must access the Vault, navigate the fractures in space and time, and terminate Atheon before it can become an unstoppable threat.
Gameplay
The Vault is said to be "the most challenging experience that [Bungie] has ever created," and that players who complete it would "earn Destiny's ultimate rewards."[2] It is a raid that will take "hours upon hours to complete."[3]
According to Eric Osborne, the entrance alone is a challenge in itself, taking his team "forty-five minutes to crack."[4] A well-coordinated team however can open the entrance more quickly.
The Vault of Glass includes a number of challenging puzzles, unique enemies, and boss fights, as well as various traps to instantly kill the entire party if performed incorrectly. Time travel to the past and future also plays an important part in the Vault.
Walkthrough
Destiny
The Vault of Glass can be broken up into multiple stages, each with a different puzzle and/or boss encounter. There are no objective markers or instructions on how to complete the Vault within the game. Note that the Raid may be entered by as little as one player, but six is recommended if not necessary to complete. The minimum recommended Level that players should be is 26 on Normal difficulty, and weapons that do Void damage are recommended, as they will come in handy for dropping Minotaur shields.
On Hard Mode, revival is disabled. While inside Darkness Zones, fallen Guardians cannot be revived by their teammates. Anyone who dies will stay dead until the remaining team members complete the current Raid phase or wipe and revert to the last checkpoint. Sunsinger Warlocks can still use Radiance to self-revive.
Destiny 2
This raid takes place on Venus, a previously accessible planet in Destiny. Playing this raid is the only way that you can be on this planet, as Venus has not been introduced as a playable destination in Destiny 2. As such, players cannot access other areas of the planet (blocked by barriers) other than the raid encounter rooms. The raid is almost entirely identical to the original version in terms of aesthetics, but there have been numerous changes to both mechanics and other aspects, such as loot chest placement, secret passageways, etc.
Stage 1: Waking Ruins
Destiny
Players spawn in an open area outside the Vault's entrance littered with Vex ruins. The goal is to open the gate by assembling a Spire, which acts as a key. The Spire is built by having all three Sync Plates in the area continuously active for a period of five minutes. Sync Plates are initially activated by clearing them of enemies and standing on them. Once activated, waves of Vex enemies will spawn at points near the Sync Plates and attempt to deactivate them. Players must destroy the Vex before they can force Guardians away from Sync Plates, or the Spire's construction will reverse.
As a puzzle, this stage is fairly simple. The most significant threat to the Sync Plates are powerful Minotaur variants called Praetorians. Once a Praetorian spawns, it will rapidly advance toward the nearest Sync Plate. Players should focus on destroying Praetorians above all else so that the Spire is not interrupted as they are the only units that can capture Plates, the adds being shields and cannon fodder. When the Spire is complete, it will link with the Vault portal and open it, allowing the party to proceed.
Destiny 2
This encounter works exactly the same as its Destiny 1 counterpart, the only exceptions being the types of enemies that spawn. Goblins and Hobgoblins are the main enemies players will fight, with the occasional Elite Minotaur spawning with a group of other grunts. Every few waves, a Malignant Cyclops will spawn on a rock in a random location near a plate. These enemies are annoying to deal with, so they should be killed as quickly as possible. The encounter ends when the Spire is fully formed, enabling players to advance further into the Vault of Glass.
Stage 2: The Trial of Kabr / Templar's Well
Destiny
Follow the passageway down. Along the way, the players will come across their first chest full of either Ascendant Energy or Raid-specific gear, though the former is more likely than the latter. Off to the side of this platform, and down, is a special tunnel a little ways below, hidden by greenery; by timing the jump players can easily make it to the underground tunnel. With some trial-and-error players can skip the platforming and appear to the left of the Templar's Well, although it takes time to navigate.
If players ignore the underground tunnel and continue down the passageway there will be a series of platforms to jump down on first before entering the first major room. A sniper can be left on the initial platform before the Well to deal with Hobgoblins that spawn on distant rocks, although this is not recommended unless they have an awareness of what is around them.
This is the area of the first boss, but the boss will not be open to attack yet. Firstly, the players must eliminate all the lesser enemies. Be warned, there are also a unique Vex type called Fanatics in this room—these are headless Goblins that glow and sparkle green, much like ordinary Goblins who have been decapitated; if the player touches them, or steps into the green pools they leave behind when destroyed, the player gets the Mark of Negation, and has a few seconds before they are killed by the Templar's Ritual of Negation. Players who are debuffed need to enter the pool of light in the middle of the map to cleanse themselves; be warned that this takes a small amount of damage. The pool will disappear if used too many times.
After a few waves, the players are prompted to defend the Vex Conflux that spawns toward the front of the room where the players enter, and then, later on, two more Confluxes on the left and right sides of the room, from Vex attempting to sacrifice themselves; and finally, all three Confluxes. Each Conflux will allow four sacrifices before the mission fails. Vex will appear in three places: the middle, and a cave area near each of the latter two Confluxes toward the rear of the map. Following each wave, a header will appear in the left corner of your screen saying "The Templar summons its legions". This spawns a massive number of Fanatics in the center area. Fanatics are very aggressive and will not hesitate to confront the player head-on so it is important to corral them in the center area without touching the green pools they leave behind. Also important is that many yellow bar Axis Harpies spawn at this time at the sides of the room which are deadly even on their own. As the Legion phase concludes, enemies will disappear and the next Confluxes spawn in.
Once the final set of Confluxes have been successfully defended, players will be prompted to kill a Vex enemy called the Oracle. Oracles will spawn in one of seven places, three on each side and one in the middle, and every time an Oracle spawns, it makes a distinct musical sound (possibly based on the C Lydian-Mixolydian scale[5]), lower notes appearing first and higher notes appearing last. Before they spawn there will be a preview of where they appear. Where the Oracles spawn depends on their specific note:
- C: Center of the stage across from the cleansing fountain ("mid").
- D: Left side of the stage on the top of a small flight of stairs behind the left conflux ("L1").
- E: To the right of the center oracle ("R1").
- F♯: Left side of the left conflux area next to a small edge wall ("L2").
- G: Back right corner of the right conflux area ("R2").
- A: Left of The Templar's platform ("L3").
- B♭: Right of The Templar's platform ("R3").
Players need to kill all the Oracles that spawn as quickly as possible (ten to fifteen seconds is the limit) or they will be Marked for Negation. Hobgoblins will appear on the edges of the map, far out on distant platforms, so be careful of stray sniper shots. If a player sniper has successfully managed to stay alive, and conserved their ammo well, they can deal with the Hobgoblins, although wariness and caution is required.
Destiny 2
Players should split into 3 teams of two to cover each of the 3 sections. The encounter starts after any player enters the arena. Once the encounter begins, enemies begin spawning from the various caves and crevices on the far sides of each area. Waves will consist of mostly Goblins and Hobgoblins, with a Sacrificial Wyvern or Overload Minotaur spawning occasionally. If a Minotaur or a Wyvern sacrifices to any of the three Confluxes in the arena, it will cause the team to wipe, forcing a restart. There are also Fanatics that spawn alongside regular waves of enemies, with the same "headless Goblin" configuration of Destiny instead of their Destiny 2 incarnation, and killing them leaves a negation pool for around 15 seconds. Entering a negation pool will give the player the "Marked For Negation" debuff, and in order to get rid of this debuff a player must enter the cleansing pool in the center of the arena. Be warned, entering the pool will cause it to despawn for a period of time, so players should call out if they've been marked.
The Oracle phase has also changed: There are still 5 waves of Oracles to kill, but this time, they must be killed in the order they appear. If an Oracle is killed out of order, all players will receive the "Marked For Negation" debuff. Players can only remove this buff by jumping into the cleansing pool in the center of the arena, similar to the Confluxes encounter immediately prior. Quantum Minotaurs and will also spawn every few waves.
Stage 3: The Templar
Destiny
After defeating the Oracles, the players will reach a checkpoint and have a break to reorganize before the boss fight. The pool of light will disappear, and in its place will be a Relic called The Aegis, a wieldable shield forged by Kabr, the Legionless. Once a player picks it up the Templar will appear.
The Relic has two melee attacks (one being a dash-attack, the other a "death-from-above" style-attack if the player jumps in the air), a cleansing attack bound to the grenade/block button, and a Super attack—the only way to take down the Templar's shield. The Relic also has a shield similar to Ward of Dawn when the cleanse effect is active, aside from players actually being able to shoot the Relic's shield. Once the cleansing is used there will be a cooldown, its length based on how long the cleanse was used, preventing the holder from activating it again until it is recharged.
If anyone drops the Relic someone else needs to pick it up in five seconds or else the "Curse of the Aegis" will eliminate all players. The Templar has a full shield surrounding it that cannot be damaged with any weapon except for the Relic's Super, which can be charged fairly quickly by attacking the Major Harpies in the room, which spawn in great numbers. The Super appears as either a wave or a bubble of projectile energy, depending how close one is to the Templar.
Once the Templar's shield is down, it will summon a red bubble around every player. Players should avoid firing rockets at the bubble, as it will explode inside and kill them. Instead, they should attack it with their primary weapons or a Solar-damage non-explosive weapon. After a few seconds, the Templar will attempt to teleport to another part of the room and get its shield back. To prevent the Templar from teleporting, one player stands in the red circle that appears on the radar, manifesting as a pillar of light in a circle, which marks where the Templar will appear. If the players do succeed in preventing the Templar from teleporting a Minotaur will spawn. Fortunately, the Relic is fairly effective against them.
Teleporting will make Oracles appear in the room, though in the same spots as before. The Oracles spawn in seven waves—each one fifty seconds after the other, with the final two a full minute—the first and second waves start with three Oracles, third and fourth with five, and sixth and seventh with a total of nine. Each Ritual of Negation's length cast by the Templar depends on the wave: twenty seconds for the first two, with five added on for the others. If the players do not dispatch the Oracles quickly enough, getting the Mark of Negation debuff if they fail, the only way to cleanse themselves is with the Relic's grenade ability. (Note: the Relic's cleanse has a cooldown, so use sparingly and time it right.)
It is better to let the other players handle the Oracles, as the player with the Relic will have a hard time dispatching them; however, the Relic can one-shot Oracles easily. Instead, that person should focus on the weaker enemies to build up their Super. If the players do not kill the Templar within seven to eight minutes it will become enraged, and summon a large number of enemies and more Oracles. By this point, the encounter will become too difficult as the Oracles will keep reappearing and Marking everyone for Negation. It is best to finish off the Templar before it can become enraged.[6]
On Hard Mode, two Oracles will initially spawn. If neither are killed in time players will be Marked with Negation twice.
For the challenge mode of this encounter (Weekly 390 only), the Templar cannot teleport. Successfully completing this challenge will award players an Age of Triumph ornament and an Exotic version of one of the raid's primary weapons.
Destiny 2
The only change to this encounter is the way that Oracles can be killed, which is in order of appearance. The Relic holder also cannot pick up Orbs of Power to charge the super attack quicker.
Stage 4: The Gorgons' Labyrinth
Destiny
The players will enter a room with a very large drop to the bottom. Jump down, then double-jump before hitting the bottom to negate fall damage.
This next part will require high coordination and quick reactions. The maze ahead is filled with glowing silver-white Harpies called Gorgons. Gorgons will kill the entire party in five seconds if they spot them, so the party needs to exit the labyrinth without being seen.
If, for whatever reason, players choose to kill the Gorgons, rather than avoid them, a lot of firepower is needed to completely destroy the Harpy before it wipes the party. Rocket launchers, Raze-Lighter,thermite grenades and Melting Point, and Supers are all recommended to take it out. Once the Gorgon is destroyed a message will appear saying, "The Gorgons grow more stronger". It is possible to kill all nine Gorgons at once, though generally only some will be destroyed at a time.[7]
To complete this puzzle the party must move left from the large rock near where you fall down the chasm; once you find the large hall to the left, enter, and climb to the top of the other large rock in the middle of the room and wait until the two Gorgons are clear to the right. Once they have moved out of range jump down to where they were and keep moving until you find a small alcove on the right. Once there just hug the right wall until you find a hole in the wall. If a Hunter has the Nightstalker subclass equipped a Smoke bomb can disguise the party for a few seconds.
Another point of note is that if you head right from the large rock in the chasm and move through the tunnels without being seen there is a white room that contains a chest with high quality materials, either Ascendant Energy, Shards, or Raid-specific gear. Also noted that in the beginning of the labyrinth, where the river along the bottom goes back into the cliff, there is a small cliff hole that you can jump into. Enter this hole and follow the cavern to find another chest.
On Hard Mode there are four permanent Gorgons watching specific parts of the map, further limiting where the party may go.
Destiny 2
There is a secret chest hidden to the right of where players enter this area, easily accessed by hugging the wall. Inside the chest room, there is also a place to put a rally flag for ammo, in case players want to attempt to kill any Gorgons. The secret chest room can only be opened by destroying three Oracles hidden around the area.
Stage 5: Jumping Puzzle
Destiny
After exiting the Gorgons' Labyrinth, the next room is a large, bottomless chamber with a platform nearby. Standing on the platform will summon a new platform, but will also make the current platform disappear in a few seconds. The party needs to jump from platform to platform until they can reach the narrow ledge on the other side, then follow it until they reach a doorway to the right in a recessed chamber. If players have sufficient patience they can navigate all the way down to the recessed chamber, although this is not recommended.
More daring players can attempt to jump once a sufficient way through to the ledge on the furthest side of the room, though careful timing is needed so Lift or double-jump can slow players. From there careful navigation along the ledge will take you to the platform that leads into the Glass Throne.
There are a few recommendations for this section of the Raid:
- Agility affects jump height, so players should adjust their subclass to maximize agility. If possible, equip a weapon with a +2 Agility bonus.
- Guardians can travel down a series of platforms along the right-side wall and Lift/Jump/Glide across the canyon.
- Hunters with the Bladedancer subclass equipped can use Arc Blade to get across the canyon without using the platforms.
- Titans with the Striker subclass equipped can use Shoulder Charge or Fist of Havoc to get a slight distance increase after Lift is exhausted.
There is an alternate route of platforms that spawn directly to the opposite side. To get there, approach the edge of the beginning of the area and jump up into a cave that is up to the left and proceed through the cave. The platform will spawn directly beneath it.
Destiny 2
After crossing the chasm with the disappearing platforms, players can open another secret chest. This one is hidden directly up and to the right of the hallway immediately before Atheon, Time's Conflux's chamber.
Stage 6: Awaken the Glass Throne
Destiny
For this stage you are required to kill the first of three Gatekeepers—high-level Hydras without a shield—and open both of the portals within the final room. Once the Gatekeeper is defeated, players must activate one of two (or both) Sync Plates, which will, in turn, open the corresponding portals. Both portals are guarded by high-level Goblins and Hobgoblins but they will despawn shortly after the Gatekeeper dies.
Once a portal is open players will need to enter the portal, kill the Gatekeeper within and retrieve the Relic—the Aegis—then return through the portal. When the Gatekeeper, either Precursor or Descendant depending on which portal gone through, guarding it is killed a debuff called "Marked by the Void" will appear on the portal team and will remain as long as they are in the portal. This debuff will gradually cloud a player's vision until the screen is completely black but can be removed by the cleansing function of the Relic (Note: the debuff can also do damage to players if they manage to stay alive with the debuff for an extended period of time). This must be done on both portals on either side of the room. It is recommended that the Relic holder of the first team accompanies the second group, which will make this process go much faster. If a Praetorian succeeds in capturing one of the Plates and prevents its reopening, an Oracle will spawn above the portal. If it is not destroyed in time the players will wipe and a message will appear, saying "You are forever lost in the dark corners of time."
While this is happening players outside the portals will need to defend the Plate next to the portal to keep it open, and defend the Conflux that appears in the center of the room once the Relic from the one portal is retrieved. Once both Relics are retrieved and the Conflux is completely built players will need to defend against Minotaurs from both portals and from the main room; once this is complete this stage is done.
Destiny 2
The encounter starts when a player shoots any gun. Bullets do not have to hit an enemy to trigger the encounter. Avoid firing any weapons or using offensive abilities until all players are ready. Once ready, first kill the Gatekeeper Hydra in the middle, then split into 2 teams of 3: 3 on the right plate (called Venus) and 3 on the left plate (called Mars). One player from each team will be assigned to defend their plate while killing various enemies, mostly Goblins the occasional Overload Minotaur. The other two players will enter the corresponding portal above their sync plate.
Outside team AKA Plate defenders: Every few waves of enemies, an additional Gatekeeper will spawn and must be killed as soon as possible, as having it alive prevents portals from opening. All that these players need to do is stay on or around their plates to prevent enemies from re-capturing them. They may also be required to sub in for a member of the inside team and hold the Relic (refer to the beginning of the article for how to use this item).
Inside team: Once inside the portals, players will need to immediately call out whether they have a shielded Praetorian on their planet or not, as whoever is holding the Relic will need to find and kill it as soon as possible. It's advised that whoever wants to pick the Relic up first remain outside before the first callout, because if the Relic holder is not on the same planet as the Minotaur, they will need to exit the portal and give the Relic to someone else, switching jobs with them. Once a player drops the Relic, they cannot pick it back up again for 45 seconds. Likewise, once you exit a portal, the same cooldown applies and that player cannot enter a planet with the Relic for that period of time. communication is paramount during this encounter, failing to kill a shielded Praetorian in time or allowing too many enemies to sacrifice the confluxes at the center of each planet will wipe the team, forcing a restart.
After three waves complete (marked by how many times Hydras spawn inside a planet), a message reading "A Conflux appears before the Glass Throne." will appear in the kill feed, signaling all players to exit back through their respective portals and into the Vault of Glass once again. Enemies will spawn all around the arena, including shielded Minotaurs which the Relic holder will have to break or kill. After a couple more waves of normal enemies spawn in, another one will begin, this time with two Wyverns. Once this wave is complete, the encounter ends, and a loot chest will appear.
Stage 7: Atheon, Time's Conflux
Destiny
For this section, the final boss will appear: Atheon, Time's Conflux. Periodically it will teleport Guardians to a point in time, either past (Mars) or future (Venus) versions of the Vault, where one player picks up a Relic and deals with the enemies, and the other two focus on destroying six red/yellow Oracles. On Hard Mode, Atheon will also Detain Guardians not sent into the portals. The away team will face either three Descendant Hobgoblins if in the past or two Precursor Goblins and a Praetorian if in the future. In the past, the relic holder can instantly kill the Hobgoblins, so the other two players should not shoot them, which would cause their shields to activate, providing further hassle for the relic bearer. However, the Minotaur on Venus is very deadly and takes several hits with the relic to kill. To help out the Relic holder, the other two players should throw their grenades at it, doing damage and also making it cower for a few seconds, giving the Relic holder invaluable time to damage it. Aside from clearing the enemies, the Relic holder can destroy the oracles in one hit with a "Jump + Heavy" attack or by using the Relic's unique Super ability. Caution must be observed as the player's screen will eventually go black; using the Relic's cleanse will wipe the darkness away.
In the meantime, the Guardians left behind in the Vault will face Atheon and Supplicants, special Harpies that explode upon death or within close proximity to a player. While Atheon is summoning Supplicants it will stand still, allowing damage to be done. Players will need to stand on one of the corresponding Sync Plates that opens the portal which releases the trapped players. If the players who get teleported call out "Mars", then those outside would stand on the left plate. If "Venus" is called, they would stand on the right plate. To avoid getting exploded by the Supplicants, players should stand on the pillar in the middle of both plates. This allows the portal to be opened while simultaneously being out of reach of the Supplicants. When all oracles are destroyed a message will show, saying, "Guardians make their own fate."
Once the oracles are destroyed and players receive "Time's Vengeance", a buff greatly increasing the damage taken by Atheon and speeding up players' cooldowns, they should go to the middle floating block to do their damage. Here, the Relic holder activates the shield ability to protect the other players while they deal damage to Atheon. When the "Time's Vengeance" timer is low, Guardians should jump out the back, towards where they entered the Vault, because if they jump to the left or right, Supplicants will most likely blow them up. When the buff ends, Atheon will again "open the timestream", and players should repeat the process until Atheon is defeated.
Destiny 2
This encounter is nearly unchanged from the Destiny version, with two exceptions. There will be 3 Sets of 3 Oracles, therefore making it 3 rounds. and their locations change each time they appear. Oracles must be killed in the order they appear to the players that were not teleported, or the team will wipe. Have someone from the team who wasn't teleported sit in the middle of the arena (in the back and away from enemies) and call out which Oracles must be killed as they appear. Additionally, during the damage phase, Atheon will randomly select one person and apply an "Imminent Detain" debuff. That person must stop doing damage and move away from other players, otherwise, they risk trapping the entire group and wiping them. Whoever receives this debuff should move either to the back or front of the group, far away from anyone else. Players should be quick to break the containment field surrounding the unlucky person or risk killing them. Also, have a team member pick up the relic periodically then drop it right after to reset the timer or the entire fireteam will wipe if no one picks up the relic.
Unique enemies
Destiny
Destiny 2
Bosses
- The Templar
- The Gorgons
- Atheon, Time's Conflux (Final Boss)
Messages
- The Spire is forming
- The Vex are taking control of a sync plate
- The Spire have activated
- The Templar prepares for Ritual of Negation
- The Templar summons its legions
- The Templar summons the Oracles
- The Oracles recognize their refrain
- The Oracles prepare to sing their refrain
- MARKED BY AN ORACLE
- You are lost to the dark corners of time
- You and the Relic have been lost to time
- The Templar is attempting to teleport
- The Templar calls for its Minotaurs.
- The Relic has been dropped
- A Gorgon has found its prey
- A Vex Timegate is active
- A Gatekeeper appears…
- The Vex have captured a sync plate
- A Vex has sacrificed itself to the conflux
- A new conflux has appeared before the Glass Throne
- The timestreams stabilize
- Atheon opens the Timestreams
- Atheon sends forth the Supplicants
- Atheon calls upon the Oracles
- Your Time has run out…
- You succumbed to the Oracles
- Guardians make their own fate
Rewards
Destiny 1
Weapons
- Atheon's Epilogue - Legendary
 (
( Year 3) Auto Rifle
 - Vision of Confluence - Legendary
 ( Year 3) Scout Rifle
 - Praedyth's Timepiece - Legendary
 ( Year 3) Pulse Rifle
 - Fatebringer - Legendary ( Year 3) Hand Cannon
- Found Verdict - Legendary Shotgun
- Praetorian Foil - Legendary Fusion Rifle
- Praedyth's Revenge - Legendary Sniper Rifle
- Hezen Vengeance - Legendary Rocket Launcher
- Corrective Measure - Legendary Machine Gun
- Vex Mythoclast - Exotic Fusion Rifle
Adept weapons
- Atheon's Epilogue (Adept) - Exotic Auto Rifle
- Vision of Confluence (Adept) - Exotic Scout Rifle
- Praedyth's Timepiece (Adept) - Exotic Pulse Rifle
- Fatebringer (Adept) - Exotic Hand Cannon
Armor
- Kabr Suit - Legendary Titan Armor
- Prime Zealot - Legendary Hunter Armor
- Armor of the Hezen Lords - Legendary Warlock Armor
Other
- Continuum Pin - Legendary Titan Artifact
- Oraclery - Legendary Hunter Artifact
- Chronofuse - Legendary Warlock Artifact
- Templar Shell - Legendary Ghost shell
- XV0 "Timebreaker" - Legendary Sparrow
- "Glass Minuet" - Legendary Jumpship
- "Aspect of Glass" - Legendary Jumpship
- Timeglass - Legendary Shader
- Chatterwhite - Legendary Shader
- Collapse of Space - Legendary Emblem
- Glass and Time - Legendary Emblem
- Knuckles of Eao - Consumable
Destiny 2
Weapons
- Vision of Confluence - Legendary Scout Rifle
- Fatebringer - Legendary Hand Cannon
- Found Verdict - Legendary Shotgun
- Praedyth's Revenge - Legendary Sniper Rifle
- Hezen Vengeance - Legendary Rocket Launcher
- Corrective Measure - Legendary Machine Gun
- Vex Mythoclast - Exotic Fusion Rifle
Timelost weapons
- Vision of Confluence (Timelost) - Legendary Scout Rifle
- Fatebringer (Timelost) - Legendary Hand Cannon
- Found Verdict (Timelost) - Legendary Shotgun
- Praedyth's Revenge (Timelost) - Legendary Sniper Rifle
- Hezen Vengeance (Timelost) - Legendary Rocket Launcher
- Corrective Measure (Timelost) - Legendary Machine Gun
Armor
- Kabr Suit - Legendary Titan Armor
- Prime Zealot - Legendary Hunter Armor
- Armor of the Hezen Lords - Legendary Warlock Armor
Other
- Vaultstrider - Exotic Jumpship
- Bitterpearl - Legendary Shader
- Continuum Alloy - Legendary Shader
- Corrective // Protective - Legendary Shader
- Omnichronia - Legendary Shader
- Exotemporal - Legendary Emblem
- Infinite Reflections - Legendary Emblem
Gallery
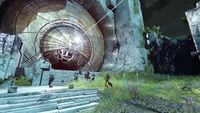
The Vault's entrance, showing the Sync Plates and the enemy spawns.

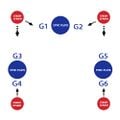
Phase one of the Templar fight, showing the enemy spawns, ideal positions of players (G1, G2, etcetera), the cleansing pool, and the Confluxes.
Phase two, showing where the Oracles spawn, the cleansing pool, and the enemy spawns during during Oracle phase, as well as ideal player locations.

Phase three, showing Oracle spawns, ideal player positions, and enemy spawns.
A user-made map of the Gorgons' Lair and the routes taken by each of the nine Harpies, as well four permanent Gorgons on Hard Mode.

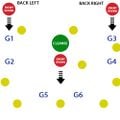
Phase two of Atheon, showing enemy spawns, ideal player locations, the portals, the Sync Plates, and the Conflux.

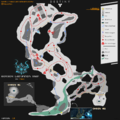
Map of the Vault of Glass, including all known chest locations.
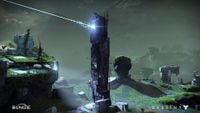
The Glass Throne.
The Door to the Vault opens.

The Door as seen from a distance.

The Door opening from a different angle.
The Spire to unlock the Vault.
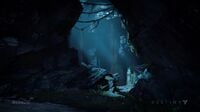
Trial of Kabr


Trivia
- In the final boss room, players face several different programmings of Vex. As you exit the door leading into the room, they are as follows: left: Sol Primeval, center: Aphix Invasive, right: Sol Imminent. Respectively, these Vex signify past, present and future. This is similar to the last fight in the Black Garden, where you must fight three minotaurs who symbolize past, present and future.
- At multiple points throughout the Vault, it is possible to observe specks of light darting in and out of view. Upon closer examination, these appear like tiny projections of Ghosts.
- Cayde-6 was interested in the Vault of Glass at one point.
- From the Epistemic lore entry, Praedyth mentions that he has seen various figures standing in front of the shard of the Traveler in European Dead Zone and that they are all different from each other but bear the same light. This is likely another example of the Destiny Universe playing at the 4th Wall Awareness theme with each individual player as The Guardian going through the same Story of Destiny, across multiple Timelines.
- Vault of Glass is the first raid to be reprised and revamped for the sequel, Destiny 2, during the events of Season 14.
- Kabr, Pahanin and Praedyth were members of the first fireteam to enter the vault. However, they could not defeat the Templar and it's oracles.
List of appearances
- Destiny (First appearance)
- Destiny 2: Season of the Splicer (Non-canon appearance)
References
- ^ Bungie.net: This Week At Bungie – 4/29/2021 ("Vault of Glass will go live on May 22 at 10 AM PDT")
- ^ Youtube: Destiny - E3 Gameplay Experience Trailer - E3 2014
- ^ Youtube: Destiny - Angry Joe Interview E3 2014
- ^ NeoGAF: New Destiny Gameplay
- ^ Reddit Thread RaidSecrets: Oracle Scale, C Lydian, and the Destiny Soundtrack
- ^ PlanetDestiny.com: Vault of Glass: Templar Walkthrough
- ^ Reddit: All gorgons dead


