The Wretched Eye: Difference between revisions
From Destinypedia, the Destiny wiki
m (→Transcript) |
mNo edit summary |
||
| (10 intermediate revisions by 7 users not shown) | |||
| Line 1: | Line 1: | ||
{{Level infobox | {{Level infobox | ||
|prev= | |prev= [[The Summoning Pits | The Abomination Heist]] | ||
|next= | |next= | ||
|game= ''[[Destiny]]'': [[Rise of Iron]] | |game= ''[[Destiny]]'': [[Rise of Iron]] | ||
| Line 11: | Line 10: | ||
|objective= | |objective= | ||
}} | }} | ||
'''The Wretched Eye''' is a Level 38 [[Strike]] that sends [[Guardian]]s to the depths of a [[Hive]] nest located within [[Bunker Triglav]], to stop [[Kovik, Splicer Priest]] from infusing a captive Hive [[Ogre]] with [[SIVA]].<ref>[https://www.youtube.com/watch?v=qvfsy1FyYco '''Destiny: Rise of Iron Wretched Eye Strike - Gamescom 2016''']</ref> | '''The Wretched Eye''' is a Level 38 [[Strike]] introduced in [[Rise of Iron]] that sends [[Guardian]]s to the depths of a [[Hive]] nest located within [[Bunker Triglav]], to stop [[Kovik, Splicer Priest]] from infusing a captive Hive [[Ogre]] with [[SIVA]].<ref>[https://www.youtube.com/watch?v=qvfsy1FyYco '''Destiny: Rise of Iron Wretched Eye Strike - Gamescom 2016''']</ref> | ||
==Objectives== | ==Objectives== | ||
| Line 35: | Line 34: | ||
*'''Ghost''': Sounds like the place to be. | *'''Ghost''': Sounds like the place to be. | ||
*'''Shiro-4''': For my [[Glimmer]], yeah. And remember, target anything that moves. Every kill gets us one less Splicer or Hive to be warped by [[SIVA]]. | *'''Shiro-4''': For my [[Glimmer]], yeah. And remember, target anything that moves. Every kill gets us one less Splicer or Hive to be warped by [[SIVA]]. | ||
''The Guardian approaches a bridge where many Hive and Splicer enemies are battling each other. The Guardian kills them and destroys the Hive [[Hive | ''The Guardian approaches a bridge where many Hive and Splicer enemies are battling each other. The Guardian kills them and destroys the Hive [[Hive Trap|Traps]] along the way. On the other side, the Guardian is attacked by more Hive and Fallen who are deployed by a SIVA-infused dropship. They are killed and the Guardian continues to the Silos.'' | ||
*'''Ghost''': I'm picking up several concentrated [[SIVA Node]]s ahead. | *'''Ghost''': I'm picking up several concentrated [[SIVA Node]]s ahead. | ||
*'''Shiro-4''': The Splicers are using SIVA to augment the Silo's old defense protocols. They've got the inner doors sealed tight. If you want to get inside, you'll need to find and destroy those SIVA Nodes. | *'''Shiro-4''': The Splicers are using SIVA to augment the Silo's old defense protocols. They've got the inner doors sealed tight. If you want to get inside, you'll need to find and destroy those SIVA Nodes. | ||
| Line 47: | Line 46: | ||
*'''Shiro-4''': They must have driven the Hive deeper into the Silos. Fight through it. | *'''Shiro-4''': They must have driven the Hive deeper into the Silos. Fight through it. | ||
''Guardian kills enemy hoard and destroys several SIVA Nodes acting as turrets.'' | ''Guardian kills enemy hoard and destroys several SIVA Nodes acting as turrets.'' | ||
*'''Ghost''': I am reading new SIVA energy spikes below us. Multiple Nodes, all powering another barrier. But | *'''Ghost''': I am reading new SIVA energy spikes below us. Multiple Nodes, all powering another barrier. But I can't nail down their locations. The readings are too sporadic. | ||
*'''Shiro-4''' You know what to do Guardian, find those nodes, unload on them, and keep moving. | *'''Shiro-4''' You know what to do Guardian, find those nodes, unload on them, and keep moving. | ||
''The Guardian locates one of the SIVA Nodes being guarded by Splicer Vandals, and destroys them both.'' | ''The Guardian locates one of the SIVA Nodes being guarded by Splicer Vandals, and destroys them both.'' | ||
| Line 74: | Line 73: | ||
'''{Mission ends}''' | '''{Mission ends}''' | ||
==Enemies== | ==Enemies== | ||
'''Fallen - Devil Splicers''' | |||
'''Fallen''' | |||
*[[Splicer Dreg]] | *[[Splicer Dreg]] | ||
*[[Splicer Vandal]] | *[[Splicer Vandal]] | ||
| Line 93: | Line 81: | ||
*[[Splicer Servitor]] | *[[Splicer Servitor]] | ||
'''Hive''' | '''Hive - Hidden Swarm''' | ||
*[[Thrall]] | *[[Thrall]] | ||
*[[Acolyte]] | *[[Acolyte]] | ||
| Line 103: | Line 91: | ||
*[[Kovik, Splicer Priest]] | *[[Kovik, Splicer Priest]] | ||
*[[Kovik's Monster]] | *[[Kovik's Monster]] | ||
==Trivia== | |||
*The Wretched Eye is the only strike that was added to [[Destiny]] with the [[Rise of Iron]] expansion. The others were only remastered. | |||
==Gallery== | ==Gallery== | ||
| Line 117: | Line 108: | ||
<references/> | <references/> | ||
{{ | {{Strikes|D1}} | ||
[[Category:Earth]] | [[Category:Earth]] | ||
[[Category:Strikes]] | [[Category:Strikes]] | ||
Latest revision as of 20:35, December 9, 2023
|
Prev: |
|
| The Wretched Eye | |
|---|---|

| |
|
Game: |
|
|
Player(s): |
1 - 3 |
|
Location: |
|
|
Destinypedia has a walkthrough guide for this level; see The Wretched Eye/Walkthrough. | |
The Wretched Eye is a Level 38 Strike introduced in Rise of Iron that sends Guardians to the depths of a Hive nest located within Bunker Triglav, to stop Kovik, Splicer Priest from infusing a captive Hive Ogre with SIVA.[1]
Objectives[edit]
- Confront the Devil Splicers
- Destroy SIVA nodes
- Descend into the Nest
- Enter the Silos
- Destroy SIVA nodes
- Find the Splicer Priest
- Scan the captive Ogre
- Defeat the Splicer's High Priest
Transcript[edit]
{Loading screen}
- Shiro-4: The Splicer's High Priest has crews pushing further underground in the Plaguelands, looks like a large scale mobilization against a Hive nest.
- Ghost: An army of Hive controlled by the Splicers would be the end of Old Russia.
- Shiro-4: Could be the end, of everything.
- Shiro-4: The Devils are evolving, neutralize them before this goes any further Guardian.
A trio of Guardian ships fly to Old Russia, dropping the Player off at the Forgotten Pass.
{Gameplay}
- Shiro-4: Alright, there's a series of old missile silos near the bunker. I've got reports of Hive near that location.
- Ghost: Sounds like the place to be.
- Shiro-4: For my Glimmer, yeah. And remember, target anything that moves. Every kill gets us one less Splicer or Hive to be warped by SIVA.
The Guardian approaches a bridge where many Hive and Splicer enemies are battling each other. The Guardian kills them and destroys the Hive Traps along the way. On the other side, the Guardian is attacked by more Hive and Fallen who are deployed by a SIVA-infused dropship. They are killed and the Guardian continues to the Silos.
- Ghost: I'm picking up several concentrated SIVA Nodes ahead.
- Shiro-4: The Splicers are using SIVA to augment the Silo's old defense protocols. They've got the inner doors sealed tight. If you want to get inside, you'll need to find and destroy those SIVA Nodes.
The Guardian reaches a location designated as Bunker Triglav and after eliminating the Splicers and Hive guarding the entrance, destroys the first of four SIVA Nodes. Entering the Silo, the Guardian kills all of the enemies within before finding and destroying two more Nodes.
- Ghost: Picking up one more Node, let's go get it.
Guardian finds final Node and after killing all enemies, destroys it.
- Ghost: That's the last Node, security protocols are clear and hack-able.
- Shiro-4: Push forward Guardian.
Guardian approaches Silo's inner doors which Ghost now opens. Hoards of Fallen attack.
- Ghost: The Splicers have fortified the entrance, we've got heavy resistance.
- Shiro-4: They must have driven the Hive deeper into the Silos. Fight through it.
Guardian kills enemy hoard and destroys several SIVA Nodes acting as turrets.
- Ghost: I am reading new SIVA energy spikes below us. Multiple Nodes, all powering another barrier. But I can't nail down their locations. The readings are too sporadic.
- Shiro-4 You know what to do Guardian, find those nodes, unload on them, and keep moving.
The Guardian locates one of the SIVA Nodes being guarded by Splicer Vandals, and destroys them both.
- Ghost: It's hard to get a clean reading down here, keep moving. The closer we get to each Node, the easier they are to unmask.
Guardian explores the area, looking for the next Node.
- Ghost: Looks like the Splicers have taken this hatch room. The Hive bio-organic architecture is still in tact, but there are micro-bursts of SIVA activity all around us.
- Shiro-4: Used to be the Fallen would attack for resources, for survival, revenge. To invade a Hive nest like this, SIVA's changed them.
The Guardian encounters more Fallen and another SIVA Node. Both are destroyed.
- Ghost: Alright, still getting strong SIVA readings. There must be another Node.
The Guardian discovers the final SIVA Node guarded by more Splicers.
- Ghost: That did it. No idea what those nodes were protecting, but the barriers down.
Guardian continues their descent into the Hive nest.
- Shiro-4: You're all that stands between the Splicer's High Priest, and whatever mad science he is cooking up down there. End this.
Guardian kills a group of Splicers and their Servitor.
- Ghost: This doesn't look good.
- Shiro-4: Did you find the High Priest?
- Ghost: Not exactly.
Guardian finds the captive Hive Ogre.
- Ghost: Let's get a closer look at that thing.
Guardian scans Ogre.
- Ghost: Makes you wonder what they're willing to do to us./That Ogre is...well, that's disgusting.
- Shiro-4: Sounds like you're about to find out. Eyes up, Guardian!/There's more where that came from if the High Priest isn't removed from the field.
Kovik, Splicer Priest appears, roaring a challenge. The Guardian kills him.
- Ghost: What a mess, the High Priest wasn't looking to build a Hive slave army, he was just removing their body parts to be joined with SIVA.
- Shiro-4: Bioengineering's become the Splicer's main M.O. We're luck to have dropped their High Priest before he can perfect any of this madness, but, it's gotta make you wonder; what other perversions are they planning?
{Mission ends}
Enemies[edit]
Fallen - Devil Splicers
Hive - Hidden Swarm
Bosses[edit]
Trivia[edit]
- The Wretched Eye is the only strike that was added to Destiny with the Rise of Iron expansion. The others were only remastered.
Gallery[edit]

The Ogre being held captive by the Devil Splicers.
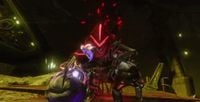
Kovik, Splicer Priest, the main boss of the strike.


List of appearances[edit]
- Destiny
- Rise of Iron (First appearance)
References[edit]
|
| |||||


