Scourge of the Past
From Destinypedia, the Destiny wiki
|
Prev: |
|
|
Next: |
|
| Scourge of the Past | |
|---|---|
| |
|
Game: |
|
|
Player(s): |
1-6 |
|
Recommended Power Level: |
640 |
|
Location: |
|
|
Enemy faction(s): |
|
|
Hostile race(s): |
|
|
Objective(s): |
Confront the Fallen that has breached the Last City and destroy their war machine. |
| “ | Beneath the ruins of the Last City lies the Black Armory's most precious vault, now under siege by Siviks and his crew, the Kell's Scourge. | ” |
Scourge of the Past is a Raid added in Season of the Forge. It was made available to players on December 7th, 2018 and then sunset with the release of Beyond Light on November 10th, 2020.
Serving as the climax of the seasonal storyline, Fallen from the Kell's Scourge had occupied an abandoned part of the Last City and taken over a lost vault from the Black Armory. Guardians must breach through the Kell's Scourge's territory and face against a heavily armed war machine built from stolen technology.
Objectives[edit]
- The Black Armory Vault
- Reach Vault Ebisu.
- Berserker
- Fight through the Kell's Scourge force and gain access to the sewers.
- The Black Armory Vault
- Enter the sewers and search for the Black Armory Vault.
- ESCAPE!
- Escape the flaming Servitor, Ablazed Glory.
- The Black Armory Vault
- Enter Vault Ebisu.
- The Black Armory Vault
- Navigate the tunnels.
- Vault Access
- Gain access into Vault Ebisu by whatever means necessary.
- INSURRECTION PRIME
- Destroy INSURRECTION PRIME.
Unique enemies[edit]
- Berserker, Kell's Scourge
- Brutal Shank, Kell's Scourge
- Unhinged Servitor, Kell's Scourge
- Insurrection Defender, Kell's Scourge
Bosses[edit]
Walkthrough[edit]
Berserker[edit]
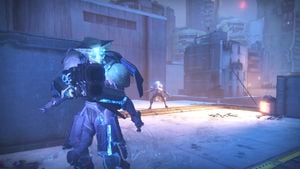
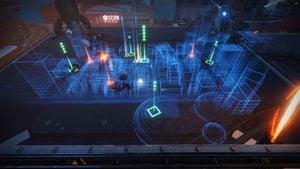
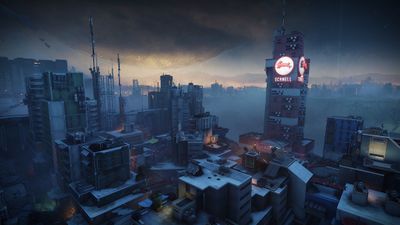
The raid begins with the Fireteam flying dropping into the Botza District in The City. It is an exceptionally large urban area with many buildings, alleyways and rooftop patios and allows for the use of Sparrows. The most notable building is the Schnell building with a neon light picture of a bunny. The team starts in one of the corners of the map and will make their way towards the center of the map to a set of Fallen tech. Behind that, a Berserker class Fallen Captain mini-boss will be invisible unless at a close enough distance. The Berserker is immune unless the team shoots two spots, one on his chest and one on his back with both glowing orange, while his suppression field is up and the Berserker is charging a powerful shot. This shot has a very good chance of a one-shot kill. Once the shield is down and the Berserker killed, it will drop a Radiant Battery. The battery will only last for one minute and that timer does not reset when picked up, rather it is "inherited". The battery is then placed in an energy station to officially begin the encounter. Once a Radiant Battery is placed in an energy station, the player receives the "Ionized" Debuff, which makes it so the player cannot pick up another battery for two minutes.
Once the center energy station is activated, the Holomap will turn on. There is an elevated platform to view the map from. The Holomap will show you a 3D makeup of the Botza District, as well as the location of additional Berserkers and energy station locations, indicated by the number of dots above each one, one top (Schnell) 1, right 2, bottom 3, left 4, and center (map) 5. There is a timer on the top left piece of Fallen tech transmitting the map. If this timer runs out, the Holomap will detonate and the team will wipe. The team must locate a Berserker specifically marked on the map with a large multi-square beacon that follows its movements. Teams that are usually one/two stay at the map while four/five go after the Berserker. The team kills the Berserker and instead of one battery, two will spawn. One of these batteries will go to the map, the other will go to one of the four surrounding energy stations. Once a battery is picked up, it will appear on the map with a number of dots, indicating the correct energy station it needs to go to. Placing it in a wrong one will cause it to explode, killing the player and anyone close. Upon coming to an energy station, adds and two major servitors will spawn. The servitors must be killed, since they are blocking access to the energy station. Once they are killed, the player with the battery places it into the energy station. This process must be done 4 times, or rather, the outside energy stations must be done 4 times (not each one, ex. you could put 3 batteries on top and one in left then the encounter is complete). The station in the middles adds time to the timer to stop the team from wiping. Once the encounter is complete, enter the cave where the last battery was placed to obtain a chest. One player must approach the chest to open it, then everyone is given their reward.
Ablazed Glory[edit]
The next encounter of the raid consists of Guardians to hop on their sparrows to outrun the enormous flaming Servitor and overcome the obstacles of the Fallen and ramps. Guardians should have sparrows of 160 speed and perks of instant summoning and quick cooldown after sparrow being destroyed (Perks are recommended). To start the encounter, two Guardians must melee the buttons to open the door and release the flaming Servitor.
To complete this encounter, at least two Guardians must make it to the end of the obstacles and press the buttons (identical to the start of the encounter buttons) to stop the Servitor from wiping the entire team. Guardians must make their way, with their sparrows, to dodge Fallen projectiles and not fall behind or else the Servitor will consume you.
This encounter also rewards the Guardians a chest (not powerful gear) if all 8 switches were switched on. These switches are spread across the encounter and Guardians must touch it to activate the switches. For those fire-teams wanting for the chest, only one Guardian must make it till the end. At the beginning of the race, there is one switch on the lower floor, just don't go up the first ramp. The next two switches are relatively close to each other, it is at the 2nd ramp where there is one on the top level and one on the bottom level. The next two are also in the same room, straight after the room that the Fallen starts shooting projectiles, where there will be switches on the left and right. The right switch is on the cliffs where Guardians can easily fall off and the other switch is the left side of a small wall. Two more switches will be in the next room of Fallen shooting at you with two cliffs on both sides, consisting of switches. The last switch is the 3rd room after the Fallen where the switch is located on the right side, also on a cliff. Once all switches have been turned on (they will light up green) a message will say "a door is open, somewhere", which means that after the room where you close the door on the Servitor, instead of hitting the switch, continue driving to the left side, drive over the ramp and there will be a room that will consist of platforms for the Guardians to jump up. Jump to the top-most level and wait for the Servitor to fly pass. Once the Servitor is gone, there will be a hole in the top level and a chest will spawn.
Vault Access[edit]
This encounter is the first phase for the final boss, Insurrection Prime, which consists of two teams of three within the raid fireteam. There are two main locations for the two teams to collaborate with each other, ground level that mainly consists of enemy clearance and the underground level which mainly focus on the mechanism of this encounter.
The Ground Level team mainly focus on clearing out the enemy that can infiltrate the underground level, causing severe damage to the underground team. The enemies are Shanks which are heavily shielded with the three elements, Void, Arc, and Solar (in that order of spawn). The enemies will spawn from a Fallen Ship, randomly top, left, right or behind of the map. The Ground Level team must equip a variety of element weapons to quickly take down the Shanks before reaching the Underground Level, however, if a few got down below, it's not fatal towards the other team. Additionally, there will be a Ultra Servitor spawning in the midst of the encounter in which will be later explained down below. It is recommended to use Hardlight against these shanks due to it covering all elemental needs.
The Underground Level team focuses on finding buffs around the circular room that they must melee on. These buff consist of Continuous (Pink) Angular (Blue) and Parallel (White) and a debuff that can cause an immediate wipe on the team. The debuff portrays as red and always shape-shifting that players must avoid at all cost. The three players must have one of the buffs that's randomly located around the room. Once melee the buff, the player will receive the buff on the left screen and will have a circular line around the player's avatar corresponding to the color of the buff. There will also be Fallen enemies in this room so be mindful when traveling around the Underground Level. Once all three players received their buffs, the Ground Level must defeat the Ultra Servitor to reset the buff spawn so that Underground Team can gain another buff. Once reset, the Underground team must find their exact same buff from before that is randomly located around the room. If melee the wrong buff, the player will instantly die and also, running pass another player with a different buff will cause a debuff called Tethered. Tethered causes damage towards players that are near each other, entangled with their circular line around the player's avatar. Once the team has found their buffs again, the Ground team must yet again destroy the Servitor.
Once the Servitor is destroyed and the Underground Team has 2x of their buff, they must leave the room to the Ground level and place these buff into the Tanks spawn in which are located at the very top of the map, bottom left and bottom right of the map. Once inserted the three buffs at the three tank location, three tanks will spawn that are main damage towards grounded Insurrection Prime, located in the middle of the map. Tanks can also use missiles in which when the three tanks use it simultaneously, does severe damage. Once the damage starts, the boss will shoot out missile airstrike that will portray as a red circle on the ground, near the location of the tank. The tank drivers must avoid the airstrike to avoid an early Tank explosion. After some time, the tanks will reach its limit and will start to self-destruct. The Tank drivers must evacuate and return to the Underground level to repeat the whole process again. If however, the Tanks do enough damage to defeat the boss, then this encounter is completed.
INSURRECTION PRIME[edit]
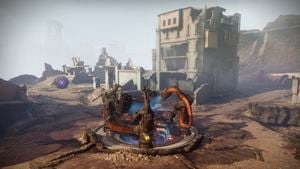
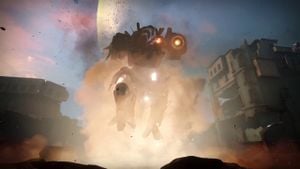
The final encounter of the raid combines elements of the first and previous encounters. As soon as the Berserker in front of the starting point is killed and the Holomap is charged, Insurrection Prime will rise from the center.
Loadouts are role-specific. One player must be assigned as a map reader, and another as a sniper. The rest should be grabbing the charges, and one person should be designated to drive the Drake Tank. The Holomap reader should have been equipped with close to medium range weapons. Hand cannons, pulse rifles, and shotguns are highly recommended. A sniper should be equipped with a pulse rifle and a kinetic or energy sniper rifle. Everyone else should have the same loadouts as the map reader, but mid to long range weapons are recommended due to the large size of the map. Regardless of roles, it's recommended that everyone come equipped with Whisper of the Worm, D.A.R.C.I, or Outbreak Perfected for the DPS phase.
As with the first encounter, the Holomap reader will call out where the Berserkers are while keeping an eye out for jamming Servitors. Unlike the first encounter, there is only one that drops two batteries. The four runners must head to the Berserker's location, clear the adds surrounding him, and provoke him into exposing his weak points. After the Berserker is killed, two players will take their batteries to one of the three generators on the map. The other two should get ready with the next Berserker and wait for the battery holders to charge the generators and regroup, and then repeat with the next two players.
The sniper should be focused on destroying Insurrection Prime's shield generators. There is six total, and they are located on its knees, its shoulder blades, and its shoulders. They must work with the map reader to destroy the generators using Whisper of the Worm. At the same time, once the runners kill a Berserker, a Vandal will spawn. The sniper must switch to their secondary sniper and kill them quickly.
Once four batteries are deposited, one person must head to the top of the map and summon a Drake. All other players must move to the Holomap and get ready. The driver must shoot Insurrection Prime with the cannon in order to stun it. Once this is done, its cockpit will open and expose the pilot inside. The tank driver should regroup with the rest of the group for the damage phase.
After the first part of the DPS phase, Insurrection Prime will emit a pulse that will give all players one of three charges; Angular, Continuous, or Parallel. No more than two players will be affected by the same buff. Two players affected by the same charge must stand next to each other to increase their damage output. However, if they stand next to a player with a different charge, the next time the boss emits a pulse, both players will die. The easiest way to get into formation is to form a V, with Angular on the left, Continuous on the bottom, and Parallel on the right. However, a popular option would be going to the green building which is the bottom left of the four buildings that form the inner area. People would go to the three platforms that are above the electric gate and they would go to the word CAP from left to right. C is for Continuous, A is for Angular, and P is for Parallel. The boss will repeat this three times, so watch for your buffs and get ready to move. If the boss does not go down in this damage phase, the group has to start from the top. When the boss is killed, the area in which Insurrection Prime was formerly docked will open up and reveal to the team the room below with the final Raid chest. This chest is the only one to potentially award Anarchy.
Challenge Mode[edit]
- 1st Encounter: Do not let the map timer go below half.
- Insurrection Prime phase 1: Every player must pick up and deposit every variation of Phase Radiance at least once.
- Insurrection Prime phase 2: All players must break 1 shield generator per phase. If a player breaks 2, the challenge will fail.
Transcript[edit]
{Loading Screen}
- Ada-1: Siviks was after much more than simply stealing and abusing our forge. His gaze has turned to our most prized possession: a vault, filled with the finest wares the Black Armory has to offer. Our very soul resides in that vault. It must be secured.
{Gameplay}
- The fireteam lands in downtown Botza District within the Last City.
- Throughout the district, the Kell's Scourge have blocked entrance into the sewers.
- The fireteam defeats a Berserker, Kell's Scourge and procures their Radiant Battery. They use the battery to power the Holomap which shows the location of Phase Generators throughout the district. They track the other Berserkers, taking their batteries and powering up the generators. The batteries inflicts the holder with Unstable Reaction which will detonate if not used.
- A battery has detonated
If a battery is used for the wrong generator, it will cause an explosion through its Mismatched Polarity.
- Meanwhile, the Holomap is attacked by an Unhinged Servitor, Kell's Scourge; attempting to deactivate it.
- Holomap Detonation Imminent
If not stopped, the Holomap is detonated by a Radiance Overload.
- Holomap Detonation Activated
- With all the generators powered, the barrier into the sewers dissipates. The fireteam traverses through a series of tunnels to reach the Botza Underground proper.
Botza Underground, Botza District, The Last City
- As the fireteam opens the way through the Underground, a Servitor, Ablazed Glory, Kell's Scourge arrives to give chase threatening to kill them with a Blaze of Glory.
- The fireteam speed down the Underground on their Sparrows; avoiding gunfire and activating switches.
- A door opens, somewhere…
- As they reach the end, they switch the gate closed on Ablazed Glory, Kell's Scourge. From there, they climb back up into the interior of Vault Ebisu.
Vault Ebisu, Botza District, The Last City
- They find the Vault ransacked of its equipment. They follow the destruction to the surface where INSURRECTION PRIME, Kell's Scourge sits upon the plunder; being upgraded by Phase Radiance. It is protected by Insurrection Defender, Kell's Scourge.
Botza Ruins, Botza District, The Last City
- INTRUDER ALERT, EXECUTE COUNTDOWN SEQUENCE
- The fireteam defeats Insurrection Defender, Kell's Scourge. Electricity barring access to a tunnel filled with Phase Generators dissipates; defended by Brutal Shanks, Kell's Scourge and other Fallen.
- SERVITOR OFFLINE, RESETTING PHASE GENERATORS
If the wrong Phase Generator is activated, a detonation countdown begins.
- Incorrect Phase Generator activated
If INSURRECTION PRIME is not damaged in time, it will kill the fireteam with Turbulent Detonation.
- TURBULENT DETONATION CHARGING
- TURBULENT DETONATION ACTIVATED
- A Guardian activates one of the switches, bestowing Angular, Continuous, or Parallel Phase Radiance. If a Guardian attempts to gather more than one type, they will perish from the Crossed Streams.
- The fireteam uses the Phase Radiance to transmat in a Powered Drake Tank.
- Drake ready for transmat
- They pilot the tank to damage INSURRECTION PRIME.
- DAMAGE SUSTAINED… REBOOTING COUNTDOWN SEQUENCE
- SIGNIFICANT DAMAGE SUSTAINED… REBOOTING COUNTDOWN SEQUENCE
- HEAVY DAMAGE SUSTAINED…REBOOTING COUNTDOWN SEQUENCE
- After sustaining heavy damage, INSURRECTION PRIME activates and engages the fireteam.
- The fireteam destroys the shielding to expose the Servitor hidden within its core.
- SHIELDING MATRIX REBOOTING…
- Exposed, the fireteam defeats INSURRECTION PRIME, Kell's Scourge. They recover the stolen armory of Vault Ebisu.
{Raid Ends}
Post-Raid Content[edit]
After the first raid completion, speak with Ada-1 at the Annex of the Tower to get the following dialogue.
- Ada-1: For centuries, Guardians have been barred from our history. Today, they changed that — and secured our most important artifacts. The Black Armory papers — the soul of our organization. These books belonged to our founder. They were her personal journals. Siviks desecrated them... Tore many of the pages from their bindings. They must be recovered if we're to know what he's after.
Players may now have a chance to earn Lore entries of the Black Armory Papers as a random drop from Lost Forge activity completions.
Rewards[edit]
Weapons[edit]
- Anarchy – Exotic
 Grenade Launcher
 - No Feelings – Legendary
 Scout Rifle
 - Bellowing Giant – Legendary
 Rocket Launcher
 - Tempered Dynamo – Legendary
 Fusion Rifle
 - Threat Level – Legendary
 Shotgun
Armor sets[edit]
- Bulletsmith's Ire Suit - Titan Armor set
- Gunsmith's Devotion Suit - Warlock Armor set
- Bladesmith's Memory Suit - Hunter Armor set
Miscellaneous[edit]
Trivia[edit]
- Scourge of the Past is the second Raid in Destiny history to feature the Fallen as the main enemy, the first being Wrath of the Machine.
- The designers sought to style the raid in the vein of Wrath of the Machine, with climatic, escalating encounters characterized by fast, chaotic gameplay.
- This is the first raid in the Destiny series to take place within the Last City, and the second overall to take place on Earth.
- Although it is a raid, it is much closer to a raid lair due to the number of encounters and that there is only one main boss.
