Drake Tank: Difference between revisions
From Destinypedia, the Destiny wiki
No edit summary |
Tag: Mobile edit |
||
| (32 intermediate revisions by 21 users not shown) | |||
| Line 1: | Line 1: | ||
{{ | {{Vehicle infobox | ||
|image= [[File:Tank.png|300px]] | |||
[[File:Tank.png| | |manufacturer= [[Amanda Holliday]] | ||
|line= | |||
|model= Battle Tank | |||
|cost= | |||
|length= | |||
|width= | |||
|height= | |||
|mass= | |||
|max speed= | |||
|engine= | |||
|hull= | |||
|armament= Main Cannon <br> Missiles | |||
|crew= [[Guardian]] | |||
|complement= | |||
|consumables= | |||
|othersystems= Side Armor <br> Headlights <br> Taillights | |||
|firstuse= [[Red War]] | |||
|role= Heavy Assault | |||
|affiliation= [[The Last City]] | |||
}} | |||
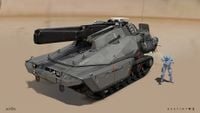
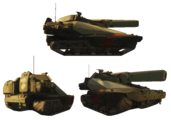
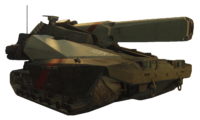
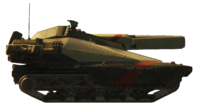
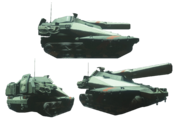
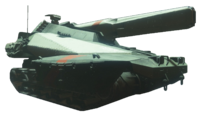
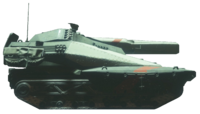
The ''' | The '''Drake Tank'''<ref>''Destiny 2: The Prima Guide'', pg. 31</ref> is a battle tank that was designed by [[Amanda Holliday]] and used by [[Guardian]] forces during the [[Red War]]. It seats only one occupant, the driver. The Drake is armed with a powerful main cannon and rocket launchers with both dumbfire and targeting modes. With its firepower and armor, the Drake can go toe-to-toe with even the [[Goliath Tank]] of the [[Red Legion]]. Designed to be bi-directional, the Drake's side armor, headlights, and taillights automatically reconfigure depending on the direction the turret is facing. | ||
Following the end of the Red War, the Drake Tank was commissioned into further service by the [[Vanguard]]. The Tanks were notably deployed again during the Vanguard's return to the [[Moon]], transported into battle by [[Hawk]]s. | |||
==Gameplay== | |||
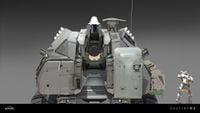
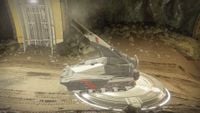
The Drake Tank's main armament is a turret-mounted cannon that fires a fast flying explosive [[Solar]] round. This shot is powerful enough to take off a quarter of the health of a [[Thresher]] in one shot, and its explosion can cover a large area. Players can also use the "aim" button to zoom in slightly for more precise shots. Be aware though that the cannon cannot fire straight up, so one will need to move to find an angle for flying or elevated targets. In addition to the cannon, the Drake is also outfitted with eight homing [[Arc]] missiles set in groups of four on the turret's sides. These missiles can be aimed by holding the "melee" button, which will show target lock designators over enemies they pass with their scope. Releasing the button will fire the missiles, which will home in to the target. The missiles will then slowly reload. On top of this, the Drake is heavy enough to crush most enemies it runs over, with only massive foes like [[Ogre]]s being capable of resisting it. Finally, when the tank's health goes critical, it will overload for a few moments before exploding, giving players time to get out and reach safety. | |||
The Drake Tank is mostly used in [[Mission]]s, but can be found is some [[Strike]]s and the [[Scourge of the Past]] [[Raid]]. Appropriately, it will be given to the player when they are expected to face heavy resistance. Occasionally, there will be large plates on the ground that allow the spawning of a fresh Drake. | |||
==Trivia== | ==Trivia== | ||
*It's possible that the tank is a modified variant of [[Maintenance Tank|the almost identical vehicles]] found on [[Titan (moon)|Titan]]. | |||
**Extracted assets show that the Drake is roughly 1.25x the size of the maintenance tanks found on Titan and [[Europa]]. While it most likely is not a modified version of them, the design similarities do indicate that they may have served as the core design source. | |||
*[[The Tribute Hall]] had a Drake Tribute that was unlocked by earning points by meeting the minimum score threshold in Nightfalls using Calus-themed armor and weapons earned from the Menagerie or any Leviathan raid. | |||
==Gallery== | ==Gallery== | ||
<gallery> | <gallery> | ||
File: | File:Destiny2-DrakeTank-Front-Concept.jpg|Frontal concept. | ||
File:Destiny2-DrakeTank-Back-Concept.jpg | |||
File:Destiny2-DrakeTank-Turret-Concept.jpg | |||
File:Destiny2-DrakeTank-Views.png | |||
File:Destiny2-DrakeTank-FrontAngleView.png| | |||
File:Destiny2-DrakeTank-SideView.png| | |||
File:Destiny2-DrakeTank-BackAngleView.png| | |||
File:Destiny2-Payback-DrakeTank-Views.png | |||
File:Destiny2-Payback-DrakeTank-Front.png | |||
File:Destiny2-Payback-DrakeTank-Side.png | |||
File:Destiny2-Payback-DrakeTank-Back.png | |||
File:Destiny2-DrakeTank-AAA-Mode-Screen.jpg | |||
File:Destiny2-DrakeTank-HUD-Screen-01.jpg| | |||
File:Destiny2-DrakeTank-HUD-Screen-02.jpg| | |||
File:D2 tank compare.png|Extracted maintenance tank and Drake game assets, showing size difference. | |||
</gallery> | </gallery> | ||
{{Linkbox|gallery=yes|gallerypage=Images of Drake Tank}} | |||
{{Clear}} | |||
==List of appearances== | ==List of appearances== | ||
*''[[Destiny 2]]'' {{1st}} | *''[[Destiny 2]]'' {{1st}} | ||
**''[[Forsaken]]'' | |||
**''[[Shadowkeep]]'' | |||
**''[[Season of the Risen]]'' | |||
**''[[Lightfall]] | |||
== References == | ==References== | ||
<references/> | <references/> | ||
[[Category:Vehicles]] | [[Category:Vehicles]] | ||
Latest revision as of 19:32, June 21, 2023
| Drake Tank | |
|---|---|

| |
| Production information | |
|
Manufacturer: |
|
|
Model: |
Battle Tank |
| Technical specifications | |
|
Other system(s): |
Side Armor |
|
Armament: |
Main Cannon |
|
Crew: |
|
| Usage | |
|
Year introduced: |
|
|
Role(s): |
Heavy Assault |
|
Affiliation: |
|
The Drake Tank[1] is a battle tank that was designed by Amanda Holliday and used by Guardian forces during the Red War. It seats only one occupant, the driver. The Drake is armed with a powerful main cannon and rocket launchers with both dumbfire and targeting modes. With its firepower and armor, the Drake can go toe-to-toe with even the Goliath Tank of the Red Legion. Designed to be bi-directional, the Drake's side armor, headlights, and taillights automatically reconfigure depending on the direction the turret is facing.
Following the end of the Red War, the Drake Tank was commissioned into further service by the Vanguard. The Tanks were notably deployed again during the Vanguard's return to the Moon, transported into battle by Hawks.
Gameplay[edit]
The Drake Tank's main armament is a turret-mounted cannon that fires a fast flying explosive Solar round. This shot is powerful enough to take off a quarter of the health of a Thresher in one shot, and its explosion can cover a large area. Players can also use the "aim" button to zoom in slightly for more precise shots. Be aware though that the cannon cannot fire straight up, so one will need to move to find an angle for flying or elevated targets. In addition to the cannon, the Drake is also outfitted with eight homing Arc missiles set in groups of four on the turret's sides. These missiles can be aimed by holding the "melee" button, which will show target lock designators over enemies they pass with their scope. Releasing the button will fire the missiles, which will home in to the target. The missiles will then slowly reload. On top of this, the Drake is heavy enough to crush most enemies it runs over, with only massive foes like Ogres being capable of resisting it. Finally, when the tank's health goes critical, it will overload for a few moments before exploding, giving players time to get out and reach safety.
The Drake Tank is mostly used in Missions, but can be found is some Strikes and the Scourge of the Past Raid. Appropriately, it will be given to the player when they are expected to face heavy resistance. Occasionally, there will be large plates on the ground that allow the spawning of a fresh Drake.
Trivia[edit]
- It's possible that the tank is a modified variant of the almost identical vehicles found on Titan.
- Extracted assets show that the Drake is roughly 1.25x the size of the maintenance tanks found on Titan and Europa. While it most likely is not a modified version of them, the design similarities do indicate that they may have served as the core design source.
- The Tribute Hall had a Drake Tribute that was unlocked by earning points by meeting the minimum score threshold in Nightfalls using Calus-themed armor and weapons earned from the Menagerie or any Leviathan raid.
Gallery[edit]
Frontal concept.

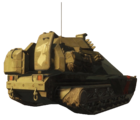


Extracted maintenance tank and Drake game assets, showing size difference.


| Browse more images on this article's gallery page. |
List of appearances[edit]
- Destiny 2 (First appearance)
References[edit]
- ^ Destiny 2: The Prima Guide, pg. 31


