The Wretched Eye: Difference between revisions
From Destinypedia, the Destiny wiki
| Line 35: | Line 35: | ||
''The Guardian approaches a bridge containing many Hive and Splicer enemies. The Guardian kills them and destroys the Hive traps along the way. On the other side, the Guardian is attacked by more Hive and Fallen who are deployed by a SIVA-infused dropship. They are killed and the Guardian continues to the Silos.'' | ''The Guardian approaches a bridge containing many Hive and Splicer enemies. The Guardian kills them and destroys the Hive traps along the way. On the other side, the Guardian is attacked by more Hive and Fallen who are deployed by a SIVA-infused dropship. They are killed and the Guardian continues to the Silos.'' | ||
*'''Ghost''': I'm picking up several concentrated SIVA Nodes ahead. | *'''Ghost''': I'm picking up several concentrated SIVA Nodes ahead. | ||
*'''Shiro-4''': The Splicers are using SIVA to augment the Silo's old defense protocols. They've got the inner doors sealed tight. If you want to get inside, you'll need to find and destroy those SIVA Nodes. | |||
''Guardian arrives at Bunker Triglav and after eliminating the Splicers and Hive guarding the entrance, destroys the first of four SIVA Nodes.'' | |||
==Enemies== | ==Enemies== | ||
Revision as of 08:28, August 21, 2016
This article has new content coming soon and may not be complete, confirmed, or correct. Please update it as soon as any relevant and accurate material is available. Editors must cite sources for all contributions to this article. Edits that do not follow this standard will be reverted without notice. For more information, see the Citation policy.
| Wretched Eye | |
|---|---|
|
Game: |
|
|
Player(s): |
1 - 3 |
|
Location: |
|
|
Destinypedia has a walkthrough guide for this level; see The Wretched Eye/Walkthrough. | |
Wretched Eye is a Level 38 Strike that sends Guardians to the depths of a Hive nest located within in a Missile Silo near the Triglav Bunker, to stop Kovic, Splicer Priest from infusing a captive Hive Ogre with SIVA.[1]
Objectives
- Confront the Devil Splicers
- Destroy SIVA nodes
- Descend into the Nest
- Enter the Silos
- Destroy SIVA nodes
- Find the Splicer Priest
- Scan the captive Ogre
- Defeat the Splicer's High Priest
Transcript
{Loading screen}
- Shiro-4: The Splicer's High Priest has crews pushing further underground in the Plaguelands, looks like a large scale mobilization against a Hive nest.
- Ghost: An army of Hive controlled by the Splicers would be the end of old russia
- Shiro-4: Could be the end, of everything.
- Shiro-4: The Devils are evolving, neutralize them before this goes any further guardian.
{Gameplay}
- Shiro-4: Alright, there's a series of old missile near the bunker. I've got reports of Hive near that location.
- Ghost: Sounds like the place to be.
- Shiro-4: For my Glimmer yeah. And remember, target anything that moves. Every kill gets us one less Splicer or Hive to be warped by SIVA.
The Guardian approaches a bridge containing many Hive and Splicer enemies. The Guardian kills them and destroys the Hive traps along the way. On the other side, the Guardian is attacked by more Hive and Fallen who are deployed by a SIVA-infused dropship. They are killed and the Guardian continues to the Silos.
- Ghost: I'm picking up several concentrated SIVA Nodes ahead.
- Shiro-4: The Splicers are using SIVA to augment the Silo's old defense protocols. They've got the inner doors sealed tight. If you want to get inside, you'll need to find and destroy those SIVA Nodes.
Guardian arrives at Bunker Triglav and after eliminating the Splicers and Hive guarding the entrance, destroys the first of four SIVA Nodes.
Enemies
Fallen
Hive
Bosses
Walkthrough
Forgotten Pass
Follow the Pass to a small bridge. There will be multiple Fallen Splicers and Hive Acolytes battling each other, dispatch them and destroy the Hive Traps before continuing. At the end of the bridge, more Hive Traps will spawn, and a SIVA infused Fallen dropship will spawn more Splicers as well, destroy them along with the surrounding Hive and follow the fenced ridge through a miniature canyon. Upon reaching the other side, you will end up at the Triglav Bunker.
Triglav Bunker
Once at the Silo, you will have to dispatch the Hive Knights and Fallen Vandals as well as the first of four SIVA nodes. When all enemies and the first node have successfully been eliminated, the facility's doors will open, and Hive Thrall and Acolytes will attack, so be on your guard. After clearing the room of the Hive foes, follow the left till you reach another room where another SIVA node is being guarded by a host of Hive Knights. Continue to the end of the room where you will descend a flight of stairs where you encounter a Hive Wizard and some Acolytes near the third node which is at the top of ramp. From there, another room contains another flight of steps leading to a large room adjoined to a larger room containing a dead missile. On the other side of the divide, you will come to another room containing Hive Knights at the end of a small hallway which contains the fourth and final node. Destroying it allows Ghost to hack the Silo's old security protocols. Returning to the previous room with the missile, the doors will open and Fallen Splicer Vandals will come swarming out. After dispatching the enemies, there will be several more nodes that must be destroyed in order to shut down another barrier.
Cyclone 141G
After all SIVA nodes have been destroyed, you must descend into a Hive nest, where you will see an Ogre, Kovic's Monster being held captive while struggling to free himself. This gives your team an opportunity to gear up and plan accordingly. After you have fully prepared, use your Ghost to examine the Ogre. This will cause Kovic, Splicer Priest to intervene and start the battle by opening fire in an attempt to get your team to scatter. He is armed with a SIVA-based weapon with the Ogre's Eye infused to it, effectively turning it into a machine gun. This weapon has a blazing rate of fire and high range, as well as pinpoint accuracy and punishing damage, allowing him to suppress Guardians and melt their shields in an instant. If wishing to re-position himself, he can teleport long distances by disappearing for a brief moment and then reappearing a few seconds later at a new location. As lethal as he is from range, if would be even more dangerous to face Kovic in melee combat, for he can unleash a powerful Ultra Smash that inflicts massive damage and tremendous knockback, although in most cases, it is an outright death. However, it is possible to stun him with either high-impact weaponry or sustained fire, allowing the player more time to retaliate and take him down. But beware: Kovic isn't the only enemy in the room to worry about because, while this is all happening, Kovic's Monster will slowly creep up on unaware Guardians and pound them to death with a ground slam, and when Kovic's health reaches a certain damage threshold, his monster will enter a berserker rage, and will begin charging down on the player's position in an attempt to finish them off. Kovic's Monster will be fully immune to all damage in this fight. The keys to success are mobility and situational awareness; think fast and watch your back for any enemies that slip past your radar. You have to focus fire on Kovic while avoiding his monster. It's a risky affair, but once you finally kill Kovic, his monster will die, and your team will have finished the strike. Congratulations!
Gallery

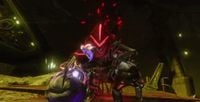
The Ogre being held captive by the Devil Splicers.
Kovic, Splicer Priest, the main boss of the strike.


List of appearances
- Destiny
- Rise of Iron (First appearance)


