Ablazed Glory, Kell's Scourge: Difference between revisions
From Destinypedia, the Destiny wiki
m (added a period at the end of the last trivia line and added a space before the last sentence of the first paragraph.) |
(Changing to past tense as Scourge of the Past has been sunset. Fixing some vocab to make the entry be more "neutral" sounding for lack of a better word. Formatting updates. Also Templar was the first in Destiny history to have an undamagable phase.) |
||
| Line 11: | Line 11: | ||
|class= [[Servitor]] | |class= [[Servitor]] | ||
|mission= [[Scourge of the Past]] | |mission= [[Scourge of the Past]] | ||
|weapon= | |weapon= | ||
|ability= [[Solar]] Flare <br> Burning Effect <br> Total Immunity <br> Rapid Flight <br> Summon Fallen | |ability= [[Solar]] Flare <br> Burning Effect <br> Total Immunity <br> Rapid Flight <br> Summon Fallen | ||
}} | }} | ||
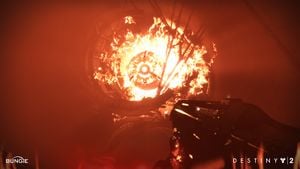
'''Ablazed Glory, Kell's Scourge''' | '''Ablazed Glory, Kell's Scourge''' was a giant, flaming [[Servitor]] that served as the main enemy during the second encounter of the [[Scourge of the Past]] [[Raid]]. | ||
==Gameplay== | |||
To start the encounter, [[Guardian]]s had to melee the pads at the sides of the door at the same time, then run down the sparrow track consisting of subterranean tunnels. Ablazed Glory would emerge from the door the team activated and pursue the fireteam down the track and would instantly kill anything it passes. To end the encounter, the team needed to get to the other end of the track and melee two other pads. The door would then promptly close and would mark the end of the encounter. | |||
==Trivia== | ==Trivia== | ||
* | *Ablazed Glory was similar to [[The Mad Warden]] as both were able to utilize Solar Flare attacks. | ||
* | *Ablazed Glory was the second boss in Destiny 2 that does not need to be damaged to end the encounter and the second in the history in Destiny, the first being [[The Templar]], the third [[Argos, Planetary Core]], the fourth being the [[Consecrated Mind, Sol Inherent]], and the fifth being [[Taniks, the Scarred|Taniks, Reborn]]. | ||
* | *Ablazed Glory was the only Raid boss to be completely invulnerable to any and all attacks (No mechanics can be completed to make it damageable). | ||
==List of appearances== | ==List of appearances== | ||
Revision as of 08:46, June 4, 2022
| Ablazed Glory, Kell's Scourge | |
|---|---|

| |
| Biographical information | |
|
Species: |
|
|
Faction: |
|
|
Rank: |
|
|
Class: |
|
| Combat information | |
|
Mission: |
|
|
Abilities: |
Solar Flare |
Ablazed Glory, Kell's Scourge was a giant, flaming Servitor that served as the main enemy during the second encounter of the Scourge of the Past Raid.
Gameplay
To start the encounter, Guardians had to melee the pads at the sides of the door at the same time, then run down the sparrow track consisting of subterranean tunnels. Ablazed Glory would emerge from the door the team activated and pursue the fireteam down the track and would instantly kill anything it passes. To end the encounter, the team needed to get to the other end of the track and melee two other pads. The door would then promptly close and would mark the end of the encounter.
Trivia
- Ablazed Glory was similar to The Mad Warden as both were able to utilize Solar Flare attacks.
- Ablazed Glory was the second boss in Destiny 2 that does not need to be damaged to end the encounter and the second in the history in Destiny, the first being The Templar, the third Argos, Planetary Core, the fourth being the Consecrated Mind, Sol Inherent, and the fifth being Taniks, Reborn.
- Ablazed Glory was the only Raid boss to be completely invulnerable to any and all attacks (No mechanics can be completed to make it damageable).
List of appearances
- Destiny 2
- Season of the Forge (First appearance)