Vow of the Disciple
From Destinypedia, the Destiny wiki
|
Prev: |
|
|
Next: |
|
| Vow of the Disciple | |
|---|---|

| |
|
Game: |
|
|
Player(s): |
1-6 |
|
Recommended Power Level: |
1520 |
|
Location: |
|
|
Destinypedia has a walkthrough guide for this level; see Vow of the Disciple/Walkthrough. | |
| “ | The disciple beckons... | ” |
Vow of the Disciple is a Raid in Destiny 2, released in the Witch Queen expansion on March 5, 2022.[1]
At a sunken Pyramid lying deep in the swamps of Savathûn's Throne World, Guardians must venture inward and confront the ancient Disciple imprisoned within; all before he threatens to seal the Light from the throne world with his doomsday machine.
Bosses
Walkthrough
Entrance
Guardians will spawn facing the entrance to the raid, with a Projection of Savathûn and numerous Hive defending it. Killing the Projection will despawn all enemies and allow progression. It's just a short Sparrow section to reach the first area.
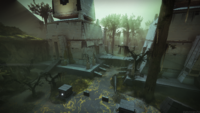
Disciple's Bog
Guardians must get within close proximity of the payload to begin this section. The payload will advance towards the Pyramid, stopping at 6 different points. At each stop, waves of Scorn will begin spawning, including Knowledge Bearer Abominations. Killing these Abominations will cause knowledge-granting Darkness shards to spawn in the area. Collect these (a maximum of 3 can be held) and bring them all back to the payload to allow it to advance again. While Knowledge Bearers live, anyone not within close proximity to the payload will receive stacks of Pervading Darkness, progressively impeding their vision. Once these reach 10, the Guardian will die.
There are 3 different Darkness shard switches that can be shot during this segment to allow an optional chest to be opened. The first shard can be found nestled beneath the rocks and trees on the left hand side of the second stopping point for the payload. The second can be found at the end of the long path that is taken by the payload to reach the third stopping point. The final switch can be found beneath the bridge that the payload flies over, just after the fourth stopping point. This can be shot from the far side from the fourth stop.
The reward chest can be found to the right of the fifth stopping point, inside a building above the swamp level. The door will only open once all 3 switches have been shot.
Once inside the Pyramid, on the way to the first encounter, players will run into a room with 26 symbols. Looking at these symbols shows their name on the screen. These will reoccur over the whole raid, and knowledge of their identification will be helpful.
Acquisition
In this section, Guardians must defend 3 obelisks from Scorn attackers (various minor units, and Unstoppable Abominations). Two Elite Lurkers named Abated Adherent will home in on the obelisk, firing upon it rather than the players, causing it to fill up with energy. Once any obelisk completely fills, a wipe will occur, killing all Guardians.
To complete this section and open the way to continue, 3 specific symbols on each obelisk must be shot within a short period of time of each other. Knowing which to shoot is revealed via a specific process. The fireteam should split into 3 teams, 2 at each obelisk, with one nominated as the runner, the other as the defender.
Directly across from each obelisk, there are columns of 3 panels that start out blank. When the encounter begins (by firing upon the Darkness switch found in the middle of the area), the top symbol will be revealed on one of these columns, showing either Traveler or Pyramid. This indicates the spawning point for a Disciple's Compass Taken Knight. The large central structures of the area will indicate which side is Traveler and which side is Pyramid, via the symbols found on them. Killing the Disciple's Compass will reveal the next symbol on the column that indicated its spawn point.
The middle symbol will then reveal which room must be entered, of which there are 9 spread around the area. Each runner will have 3 rooms they handle, closest to their obelisk. The runner must enter the specified room to begin revealing the next symbol on the current concern column. If the door of the room is not open, shoot the Darkness switch to swap which side of the room has open doors, Traveler or Pyramid.
Once inside, the runner will contend with a wave of Screebs, and two Glyphkeeper Chieftains, spawning on the "Light" and "Dark" side of the room. Depending upon the third symbol revealed on the column outside (light or dark), the runner should kill the corresponding Glyphkeeper, which will then reveal a symbol on its initial spawn point. This will be one of the symbols you have to shoot on an obelisk outside. Killing a Glyphkeeper will reset the level of energy in all obelisks around the room, providing more time to survive.
Repeat this process of hunting the Knight via the revealed symbol, sending a runner to the specified room, calling out whether to kill the light or dark side Glyphkeeper, until you have 3 symbols. Once you know all 3, check which obelisk has all 3 of these symbols, and shoot them within a short period of time of one another. This will then "accept" your offering, to complete the first stage. If you are too slow to shoot the right symbols, your offering will be rejected, shuffling the symbols and causing the obelisk to fill up with energy. Try shooting the right symbols again to progress.
Repeat this process until you have shot 3 symbols for each of the 3 obelisks, and you will succeed.
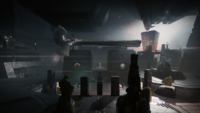
Collection
The next encounter is against The Caretaker. For this fight, a recommended setup is to split into 3 teams of 2. One team will be the Symbol Team, another team will be the Stun Team, and the third team will be the Kill Team. To begin, shoot either of the Darkness switches on the sides of the door opposite the obelisk.
Symbol Team: The Symbol Team's job is to enter the dark room across from the obelisk one at a time. The reason for the one at a time rule is that the door to the room will close after a short period, leaving the Guardian inside trapped. Shooting a switch outside will open the door again. The other team member should be keeping the door open at all times, while assisting the Kill Team
Once inside, Pervading Darkness stacks will begin to accrue, of which 10 will kill the Guardian. Symbols can be found floating off the ground in the room, of which a Guardian can pick up a maximum of 3. The objective is for a Symbol Team member to race into the room, grab symbols, leave the room, and then shoot the corresponding symbols they picked up on the obelisk outside. Warning text in the bottom left corner will indicate when a Guardian can begin shooting their symbols to provide an "offering". Picking up only 2 symbols is advised, as it is easiest to be able to shoot 2 within the small timeframe you have to have your offering "accepted". Picking up 3 risks having each symbol be on a different face of the triangular prism that makes up an obelisk. You have a tough timeframe to rotate and shoot the right symbol on all 3 sides, in this instance. With only two symbols, you may have them both on one side, or can stand facing the edge shared by the two sides and shoot the symbols you have with ease. Failing to shoot the correct symbols in the granted timeframe will cause your offering to be "rejected", meaning you lose any symbols you collected, returning them to the room.
Be careful of your Pervading Darkness stacks when entering the room. Higher stack counts will limit your visibility, hampering your chances of navigating the room and obtaining symbols, and 10 will kill you. You may need to wait a short time outside for these stacks to tick down before going back inside.
Collecting, shooting and clearing all symbols from the Obelisk will provide a warning message that the ritual is complete, indicating that the damage phase will soon begin.
Stun Team: The Stun Team's objective is to prevent The Caretaker from progressing to the obelisk, as once it reaches the obelisk, it will overflow the obelisk with energy, killing all raid fireteam members. One member should be nominated as the face side, the other member as the back side. The face side member should stick close to The Caretaker, which will force it to fixate on them. They should then shoot the face of The Caretaker when it glows, which will cause the coffin-like object on its back to open, exposing a weak point. The back side member should then shoot this weak point, which will cause The Caretaker to become stunned, falling to one knee. The face side member should always try to rotate The Caretaker so that it is walking backwards to the obelisk, which will allow the back side member to stun it easily, and also provide the ability for other Guardians to assist with shooting this if the back side member is unable to for any reason. As the face side member, be wary of stomps from The Caretaker. A well-timed melee attack will prevent you from being knocked away.
Kill Team: The Kill Team objective is to kill any and all enemies that spawn in the room. Abated Adherents will spawn again, aiming to shoot the obelisk to fill it with energy. These take priority over other enemies. Kill Team members should also help take care of the Darkness Scale drones that spawn from The Caretaker's back. Leaving these alive can heavily endanger the Stun Team, as they will turn into homing missiles when an unspecified mechanism is triggered.
Damage Phase: Once all 9 symbols on the obelisk have been shot and cleared, The Caretaker will no longer be stunnable, continuing its advance to the obelisk. 3 plates will surround the obelisk, which is where damage is performed. When The Caretaker reaches the obelisk, the plate from the side The Caretaker approached will glow, providing a Resonant Breakthrough buff to anyone standing on it. This allows damage to be done. After a set amount of time, the plate will de-power and the next one along will begin glowing. Move to this plate as a group and begin damage again. Once more, the plate will de-power and the final plate will glow. Move to this for your final chance to do damage for this floor.
Once the boss has been damaged enough, or all 3 plates have been exhausted, The Caretaker will gain immunity and teleport away. Stairs will lower on both sides of the floor, allowing the fireteam to advance to the next. Repeat this process on 3 different floors to advance to the final stand floor, where the 3 plates will be in a row towards The Caretaker. The same mechanic to damage exists here, no obelisk to worry about.
For skilled fireteams, it is possible to skip the third floor obelisk entirely. When damaging The Caretaker per floor, on the second plate, be careful not to push its health to the end of its current segment. The reason for this is that the third damage plate provides a longer opportunity to damage The Caretaker than the first and second. If the fireteam pushes as much of its damage on the third plate, it's possible to push damage into The Caretaker's next health segment. Save your high damage supers (Moebius Quiver, Nova Bomb, Cuirass Thundercrash) for the third plate, in this instance.
Platforming
Next comes a short platforming section. The route forward is rather clear, though has a mechanic to mix it up for Guardians. After reaching a large room with Taken and Scorn enemies, Guardians will spot a Darkness switch, similar to those seen in Acquisition and Collection. Shooting this switch will cause specific platforms to extend or retract in the next section of platforming. Therefore, leave behind a couple of Guardians and let the rest proceed to clear the platforming. Calling out to each other when to shoot and only firing upon it then will be important to help your teammates avoid falling to their death. Once a Guardian reaches the next room with spawning waves of Taken and Scorn, the previous platforms will "stabilise" and the switch is no longer required to make progress.
In this next room, the same business will repeat. You should send platforming-confident Guardians ahead, while the rest can stay to kill enemies and operate the switch. However, take note that there are two paths in this section. One will allow the fireteam to directly proceed, whereas the other will allow a secret chest to be obtained. Following the path that keeps a wall to your right hand side will ensure you reach the secret chest. You'll reach a section where you have to jump between vaguely tubular platforms that straddle the gap between two walls, jumping up on the last one to reach the room containing the chest. Once in here, a shortcut to reach the next intended room will open up on the right hand side upper-level of this room. This chest will provide drops of weapons and armor you have already obtained in the raid, as well as a raid mod.
Once in the third room of spawning Scorn and Taken, you'll find another switch. Shooting this will cause hexagonal columns to begin scrolling side to side in front of it, rotating at different points. Shooting the switch will reverse the direction the platforms travel. Yet again, platforming-confident Guardians should be sent ahead to take care of this, with everyone else operating the switch and killing enemies. Be careful of shooting the switch too early, as doing this locks out the ability to use the switch for a short time, and may make the platforms recede into their hiding spots on the sides. Waiting until they are at least 3/4th of the way across to the side they are heading to will provide ample time and space for Guardians to make it across.
Once completed, the platforms will once again stabilise, jutting out on each side. Everyone should then cross the gap using these, and continue on to the next fight, as this is the end of this platforming section.
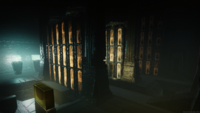
Exhibition
The Exhibition encounter will start the fireteam off in a small room with a Resonant Shard to pick up. One Guardian must pick this up to start the encounter. When picked up, everyone will be given the Terminal Resonance debuff. It will have a countdown timer on it, which, when it reaches 0:00, will kill all Guardians. The aim of this encounter is to move as fast as possible to the next room to deposit relics to reset your timer, to allow progression.
Room 1: After picking up the Shard, a Glyphkeeper Chieftain on the left, a Resonant Glyphkeeper Taken Phalanx on the right and a shielded Disciple's Hourglass Taken Knight will spawn in the room. Killing a Glyphkeeper will cause 3 symbols to appear in a column, in a fixed position on its side of the room. The Chieftain symbols can be read by anyone not holding a relic. The Phalanx symbols can be read by anyone who is currently holding a relic. Kill both Glyphkeepers to learn which symbol is in common between the two columns that spawn. Shooting this symbol out of the 6 surrounding the locked door will cause it to open, allowing the fireteam to advance.
To make it simple to identify which symbol is in common, one side should call out their symbols, and the other side should then determine which is in common and declare that to the fireteam.
For the Disciple's Hourglass, this Taken Knight allows the fireteam to reset the Terminal Resonance timer. The shield surrounding it can only be destroyed by firing the laser from the Shard at it. Once dead, it will reset the timer on Terminal Resonance to maximum.
Room 2: This next room will provide a deposit point for the Shard. Placing this will reset Terminal Resonance, and spawn the Aegis from the Vault of Glass raid on the other side of the room. 2 fireteam members must then pick up the Shard and the Aegis to continue. The Guardian that deposits the Shard will gain a debuff called Curbed Resonance, which will prevent them from picking up any relic for 30 seconds.
The Aegis from Vault of Glass functions exactly the same as in that raid. Shielding with the Aegis, via the sword block button, will create a bubble around the holder. Standing inside this bubble will remove Pervading Darkness, which will now begin to accrue on fireteam members through the rest of Exhibition. The Aegis holder must be ready to cleanse Guardians with regularity to keep the fireteam alive.
Advancing into the next room, the fireteam should split into two teams of three on each side. Various Scorn and Taken units will appear to harass the fireteam. Killing them will advance spawns of more enemies, and eventually a Glyphkeeper on each side. Killing these Glyphkeepers will spawn symbols, and the same identification process as in Room 1 must occur. Once the Glyphkeepers are dead, Overload Taken Hobgoblins will spawn. These can be killed or ignored, as moving toward the next objective will render them unable to attack you. Keep moving towards the far end of the room. The Shard holder should kill the Disciple's Hourglass to reset Terminal Resonance. Keep killing enemies to spawn two more Glyphkeepers. Once dead, more symbols appear. Identify the shared symbol, and together with the symbol identified in the first set of Glyphkeepers for Room 2, shoot the two symbols at the door to open it and advance. Ensure you kill the next Disciple's Glyphkeeper before doing this, to give yourself some extra time.
Be careful when rushing into the next room, as Screebs will spawn in a large group near the deposit points. Kill these from afar before moving forward. Have the Aegis holder deposit as soon as they can, but have the Shard holder keep it in their grasp. The reason for this is that the Aegis holder has 30 seconds of Curbed Resonance when depositing, being unable to grab a relic, and you should have enough time left on Terminal Resonance to let Curbed Resonance expire for them. This provides another person who can grab a relic in case of emergency or if the group identifies them as proficient with that relic. This is important for Room 4, but first...
Room 3: Room 3 introduces another relic, this time, Taken Essence from the Last Wish raid. It functions the exact same as Last Wish. The intended usage for the Taken Essence here is for the holder to cleanse Taken blights that will tether and protect enemies. Pushing the grenade button next to the blight will cleanse them. Two will spawn, one on left, one on right, for each set of Glyphkeepers. Cleansing both will be required to advance.
The exact same behavior as the last room will need to be followed initially. Three on left, three on right. However, once the first set of Glyphkeepers have been defeated, all Guardians can rendezvous where the right set of symbols spawn to be cleansed, then advance up the right side as a team to defeat the large amount of enemies that will appear, and make it easier for the Aegis holder to provide periodic cleanses to all, and protect the Taken Essence holder when they go to cleanse blights.
For the Shard holder, the Disciple's Hourglass will spawn on a tiny platform in the middle of the abyss, in the middle of the room. This will be the same spot for the next Knight for the next set of Glyphkeepers, so take note of this spot.
Continue advancing as a crew, defeating Overload Taken Hobgoblins, Glyphkeepers and Scorn to identify the correct symbols for the next door. Speed is essential due to the timer you are on. Once you know the right symbols and have killed the last Disciple's Hourglass, shoot the symbols and pile in to the next room, being careful of the Screeb wave. Deposit the Aegis and the Taken Essence, wait for Curbed Resonance to expire, then deposit the Shard.
Room 4: The final room, with no new mechanics or pick-ups required. The difficulty of this room is substantially increased due to the requirement for more platforming, as there is a large abyss to fall into that might doom your efforts. Enemies adore jumping between the platforms, so be extra careful not to get bodychecked by a Scorn in mid-air, sending you down to the depths. Dropping a relic into the abyss will return it to the start of this section, so dropping one might prove to be fatal to your clear efforts, as you need to rush back to grab it then come back to perform your job.
As before, split into two teams of three, advance to the small rooms on the left and right, cleansing blights, killing fodder and then Glyphkeepers. Once you identify the first symbol in common, gather up on a middle island to make it easier for the Aegis holder to perform a cleanse for everyone.
The Disciple's Hourglass spawn location for this room is on the highest island with the roof very close to it. This is generally a safe spot to be in, as the small walls can provide cover from the numerous enemies around. It can also be dangerous though, as fire belched by the Disciple's Hourglass and grenades from Scorn may prove inescapable by jumping due to the low ceiling.
Once you kill all Glyphkeepers and identify the common symbols, shoot them again, advance into the next room, staying aware of the Screebs, and deposit all relics to clear the encounter.
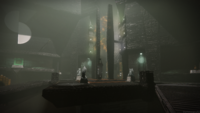
Dominion
The final stage of Vow of the Disciple concerns the defeat of Rhulk, Disciple of the Witness. Initially, Guardians will notice a sarcophagus-like object floating at the top of stairs at the back of the area. Approaching this will "wake" Rhulk up, with dialogue playing and him projecting a force field out that will push Guardians back to the starting edge of the arena, where a rally flag can be placed. Be aware that adding any additional force (such as jumping) will accelerate the push from the force field, potentially sending the Guardian over the edge into the abyss below. This is important to remember for a later part of the fight. Allowing it to push you and not moving will mean the friction of your character landing will prevent you from going over the edge.
Once pushed back, stepping up the first set of short stairs and approaching the force field will prompt Rhulk to summon his glaive, applying stacks of Pervading Darkness to all fireteam members. Shooting the glaive above his head will break it, providing a Leeching Force buff to the Guardian dealing the killing blow. It is advised that the Guardian breaking the Glaive use a long range weapon, such as a scout or pulse rifle, to make their job easier. It can take a few hits before breaking. Now comes the tactics, where you will need to assign specific roles to the fireteam.
Swapper: The role of Swapper is to ensure that at least one Guardian holds the Leeching Force buff at all times. If your fireteam loses this, Rhulk will re-summon his glaive and begin applying Pervading Darkness again. Repeating this 3 times will mean the glaive will become invincible, ensuring the fireteam will be wiped when Pervading Darkness stacks reach 10.
There is a plate in the middle ground of the lowest part of the arena, and standing on this while under the influence of Leeching Force will summon two Darkness Cruxes in the far back of the arena. When two Guardians shoot these and break them, Leeching Force will be applied to them, and removed from the initial Swapper, giving the role its name. You just need to swap the buff to other Guardians to keep things rolling.
If you are a designated Swapper, be careful not to be hit by Rhulk's beam of Darkness energy attack. Being hit by this will transform your buff into Emanating Force, which cannot be swapped to other Guardians. Also be aware of the timer on your Leeching Force. Once it hits 0, you will die.
Dunker: The role of the Dunker involves taking Leeching Force, and then transforming it into Emanating Force by being hit by Rhulk's beam of Darkness. Once Emanating Force is held, it must be deposited at a specific point in the raid arena to push back the force field, allowing the fireteam to progress the fight. Possessing Emanating Force means the barrier will no longer push you back.
Reader: The role of Reader is to take note of the symbols appearing on six different pillars spread around the arena. The Reader will look for the right symbol as called out by players reading symbols dropped from Glyphkeepers, and they will indicate which pillars a Guardian holding Emanating Force must go towards to dunk it to progress the fight. Advising a Dunker to deposit at the wrong pillar will cause them to die, as the symbol must match for a safe dunk. A good spot for the Reader to be able to see almost all symbols at once is by standing on the top of the left pillar just at the top of the first set of small stairs, where the fight is triggered.
To make reading easy for everyone, you should assign static callouts to the pillars. One popular method is to name them L1, L2, L3, R1, R2 and R3. The 1's are closest to where you place the rally flag, the 3's are the furthest away pair that flank the thin stairs at the back. Feel free to use any method that your fireteam can collectively agree is most simple.
First Phase: As the fight begins, waves of Taken Psions will spawn, with periodic Lacerated Abominations and Taken Hobgoblins during specific waves. After one wave, the second wave will spawn with two Glyphkeepers (Taken Phalanx on left, Scorn Chieftan on right). Killing these will spawn two columns of symbols, which can be seen on the left and right of the arena respectively. Anyone holding Leeching/Emanating Force can see the left column, anyone without it can see the right column. A Guardian holding Leeching/Emanating should call out the symbols they see on the left hand side, and the Reader should prepare to identify the safe pillars to dunk at from the common symbol between the two columns.
During this, Rhulk will continually teleport to the left, middle or right of the arena, and fire a large beam of Darkness that covers one whole third of the arena, dealing heavy damage and transforming Leeching Force to Emanating Force for anyone touching it. Anyone without a specific role can call this teleport out for the other fireteam members, though the time between teleport and beam is largely telegraphed and should be easy to avoid.
Every two Emanating Forces that are deposited, the force field will be pushed back towards Rhulk and the fireteam will have more room to maneuver, though it is advised to stay near the swapping plate. Continue swapping and dunking until you have deposited 6 Emanating Forces. This will begin the next phase.
If you lose Leeching Force from being held by anyone during this time, Rhulk will teleport back to the middle and summon his glaive. This must be broken again to regain Leeching Force, and will reset the symbol columns too. Glyphkeepers will appear again, and must be killed to reveal the symbol columns. They will be in different positions depending on how far back the force field is, though will not be hard to spot.
To make this phase go faster, your team can consider doing double dunks. There will always be two available pillars for depositing Emanating Force, so you can have two Dunkers, Two Swappers, a Reader and a free Guardian for focusing on enemy management. The only thing you need to be careful of is when depositing Emanating Force, after a few seconds, the pillars will scramble and show new symbols. Dunkers should time their deposits so that they don't accidentally kill the other by depositing early and rearranging what pillars are safe.
Second Phase: The second part of the fight will begin after Rhulk twirls his glaive and teleports away. The force field will now completely disappear, and the fireteam can advance up the small stairway to the final arena. Before doing so, take your time and collect ammo, swap mods and armour, or any other activity you want to do. You have a fair amount of time before the next phase begins proper.
As you step into the next area, Rhulk will be found levitating in midair. Getting close enough or advancing far enough into the arena will cause him to slam down to the ground, and begin patrolling after a random target (this can be controlled by firing at him, but is not guaranteed to attract his wrath). After a few seconds, Rhulk will begin telegraphing a charge attack with his glaive. After a couple of seconds, he will rush forward and slice at the indicated end point of the charge. Anyone caught by this will be dealt damage, and sent flying. Take note that only the end point of the charge will lead to damage. Guardians can run directly at Rhulk, if found at the end of the charge, and avoid damage completely. During this time, set waves of Shadow Thrall will spawn, 2 in each corner of the square arena.
When this charge is complete, he will leave behind his glaive, floating. Shooting this until it breaks will once again grant Leeching Force to the Guardian delivering the killing blow, and leave behind a stack of symbols. Meanwhile, Rhulk will still be stalking after Guardians, aiming to kick them if he gets close enough. Guardians should stay away from him to prevent this, and to avoid delaying the next attack. This next attack will involve Rhulk charging up his beam of Darkness again, but this time it will emanate from him in an X\+ shape, indicated by four shapes forming around him during the charge-up animation. This will inflict heavy damage, quickly rack up stacks of Pervading Darkness, and will transform Leeching Force to Emanating Force once again. The Guardian holding Leeching Force should aim to have this transformed into Emanating Force, with the rest of the fireteam advising them on which symbol was left behind by the glaive upon breaking it. The Emanating Guardian must then go to the pillar with the corresponding symbol and deposit their buff.
Once Emanating Force is correctly deposited in this section, Rhulk will become temporarily stunned, exposing a weak point on his shoulders, then his hips, with each successive deposit. You need four deposits in total to expose them all, Rhulk repeating his previous glaive charge then beam attack once you deposit. Break these weak points by shooting at them to advance him towards the damage phase of the battle.
After all 4 are broken, Rhulk will enter an Enraged stage and will proceed to attack again. This is his unique damage phase, wherein he is mobile but damageable. He will summon his glaive and begin stalking after Guardians at increased speed, combining his teleport and beam attack into one as he attempts to kill you. The previous weak points the fireteam broke will function as crit spots, and so will his head. Having a Guardian utilize the Exotic trace rifle Divinity is a highly recommended method to deal with Rhulk at this time, as the constant movement of the phase can make hitting accurate precision shots quite difficult.
When enough time has passed of Rhulk being enraged, he will slam his glaive into the ground and begin charging up. This is your cue to begin running back to the very start of the first phase arena. After a set amount of time, Rhulk will summon a force field that will push any Guardian back. This can be an easy death sentence, as if you hit any objects on the way back, you can be killed. You may also get sent off the arena, if you are caught mid-jump by the force field. If you are unable to get to safety before the field is summoned, try to stick to the middle of the arena. This will mean no obstacles to splat off, and you have a good chance of stopping via basic floor friction when the force field stops pushing you.
Repeat the process of the first phase to get back to the top. Once up there, the same applies to your previous second phase. However, once you reach the final stand stage of his health pool, Rhulk will apply constant Pervading Darkness stacks while still chasing Guardians and casting beams. This means the fireteam has a limited amount of time to kill him before being forcibly wiped out. Saving supers for the final stand is recommended, and also making sure you go into it without any prior stacks of Pervading Darkness.
Once defeated, enjoy the unique death animation for Rhulk, and claim your loot from his glaive in the center.
Master Mode
As with other Master difficulty content, the recommended power level is 20 above the Pinnacle Cap. The Chaff (radar disabled) and Shielded Foes modifiers are applied. All Glyphkeepers and Resonant Glyphkeepers are changed to their respective Champion version, while the Ravenous Taken Vandals in the Caretaker encounter become Overload Taken Hobgoblins. In addition to the usual Solar Absorption Shields of Taken Knights, (applied to the Disciple's Compass), uniquely all Wraiths will sport Solar shields and non-Champion Taken Hobgoblins will sport Void shields.
Unique enemies
- Abated Adherent
- Disciple's Centurion
- Disciple's Compass
- Disciple's Hourglass
- Glyphkeeper
- Knowledge Bearer
- Resonant Glyphkeeper
Rewards
Weapons
- Collective Obligation - Exotic Pulse Rifle[2]
- Submission - Legendary Submachine Gun[2]
- Cataclysmic - Legendary Linear Fusion Rifle[2]
- Insidious - Legendary Pulse Rifle[2]
- Forbearance - Legendary Grenade Launcher[2]
- Deliverance - Legendary Fusion Rifle[2]
- Lubrae's Ruin - Legendary Glaive[2]
Armor
Other rewards
Transcript
Mission Starts
- Mara Sov: Guardians, I am not your Vanguard, and I give no orders, only a warning: the Pyramid ahead is not like those you've previously encountered. This one was not left for you to find. You were not guided to it, not beckoned. This domain belongs to a dark entity, unknown in power. It seeks domination of the Throne World. Your presence within will be most un-
- Rhulk: Welcome, children of Light. Drown in the Deep. Or rise from it.
The Guardians make it through the Disciple's Bog and enters Rhulk's Pyramid ship.
- Rhulk: Earth scorches. Suns fade. Look... beyond.
The Guardians arrive in the Acquisitions encounter.
- Rhulk: The Witness... sees Light fall. Glimpses you... free of chains. Boundaries. Truly limitless potential. Domination unbound.
After successfully completing the Acquisitions encounter.
- Rhulk: The Upended. A triumvirate. Opportunity. Preservation. Salvation. It will serve the deserving. Crush the defiant.
The Guardians pass through the Collection and at the next encounter.
- Rhulk: Not kings. Not gods. Disciples. Prophets. Saviors serving existence. An undying purpose. A privilege.
The Fireteam defeat The Caretaker.
- Rhulk: The defiant... subjugated. Not for pleasure, nor glory... but in service of an ailing, endless void. Where does your purpose lie?
After completing the Exhibition encounter.
- Rhulk: Resilient, but credulous. You came to conquer. Moved pieces. Turned gears. To us, you sought harm, but performed aid. The Upended will live out its namesake. This world will be sealed from the Light, leaving your kind to suffer. You are not fit to serve the deserving. You will not rise from the Deep, but drown in it.
The Team arrives at the Dominion. Rhulk's sarcophagus is approached.
- Rhulk: You have served your purpose. All that awaits you now is the gift of death... The darkness beyond your final days.
During his boss fight, Rhulk has a chance to say a line or two of dialogue to the players.
- Rhulk: [Sighs facetiously]
- Rhulk: [Yawns in mocking exaggeration]
- Rhulk: Big day for all of you! Congratulations on making it this far.
- Rhulk: Embrace the end!
- Rhulk: Give up yet?
- Rhulk: I am very impressed with you all. Really! I'll still have to kill you, of course.
- Rhulk: Is this a test? Yes... MY test! I deliver you finality.
- Rhulk: No need to rush.
- Rhulk: Oh, how I cherish your constant dance with death!
- Rhulk: Serve the abyss...
- Rhulk: Stay and die, leave and die. Doesn't make much of a difference to me.
- Rhulk: Take your time!
- Rhulk: The only shape you'll take is that of death.
- Rhulk: The Upended has turned countless worlds upside down. Yours will be no different.
- Rhulk: The Witness sees you. Grants you opportunity. And you squander it!
- Rhulk: Thrilled to pick my teeth with your bones, little ones.
- Rhulk: Wake me when you're done playing around, little ones.
- Rhulk: Wow... I could really use a nap.
- Rhulk: What to do with your corpses? Perhaps they can line the walls of my domain.
- Rhulk: Your pointless efforts are indeed amusing.
These lines are only said if the team completes a damage phase.
- Rhulk: More. More! I will return the favor.
- Rhulk: My blood spilled. Bravo!
The team vanquishes Rhulk.
- Rhulk: Witness... forgive me!
Post-Raid Completion
A drawing of a Pyramid ship is temporarily shown before being covered by a bound Traveler seen in the Ritual mission. Savathûn is then sketched into the scene.
A flash of light consumes Savathûn, and the Traveler is shown losing it's bindings.
- Ikora: If only we'd known the flood she was holding back.
Rhulk's cracked Pyramid is then drawn into frame, and the camera zooms to a triangular entrance at the base of the ship.
- Ikora: These things don't see themselves as gods, no.
The Dominion is then drawn; the camera continues to zoom in.
- Ikora: They believe themselves so much more than that.
Rhulk appears in frame, looming over the arena. The camera continues to zoom in.
- Ikora: And yet, with all that power,
The scene then cuts to a fight between Rhulk and a fireteam of Guardians.
- Ikora: it was wielders of Light and Dark, saviors of humanity, who brought them down.
Vines then quickly consume Rhulk and the camera zooms back out to the Pyramid's exterior.
- Ikora: Regardless of victory, we must remember that was only a taste of success, barely achieved.
Light then erupts from the cracks of the Pyramid.
- Ikora: There will be more.
The light fades and the Traveler appears behind it.
- Ikora: And the power they hold will pale in comparison to that of their maker, the Witness.
The Pyramid fleet then appears before the Traveler and the camera zooms out to reveal them over Earth.
- Ikora: We must now face an inevitable truth. The Witness and its followers - they're coming. All of them. And when they get here?
A dark haze slowly creeps into the scene.
- Ikora: We'll finish what they started.
A few of the head pyramids erupt with light and the scene ends.
After the Raid's completion, players can approach Fynch and get the following dialogue, as well as access to the Preservation mission.
- Fynch: Wow. The unkillable... is dead. Ha, the Witness must be shaking in its boots, yeah? Oh man, you Guardians! You're always pulling off the unimaginable. I never knew the guy personally, but word on the street was Rhulk had been the, uh, proverbial thorn in Savathûn's side for, like, eons, really. But now, both of them are... y'know... in the ground. Which means nobody's controlling that Pyramid, and the Scorn see the opportunity. Their control could lead us right back to another Rhulk-sized problem, so if you, y'know, don't mind, maybe keep the place under our control instead? And who knows? Maybe in the process, we'll learn something more about Rhulk, or even better- the Witness. Good luck in there, friend!
Gallery
Areas
Disciple's Bog
Acquisition
Acquisition
Collection

Dominion


Weapons


Trivia
- This is the first raid to have Scorn as the main enemy faction.
- This is also the third raid with Taken as an enemy faction.
- This is the first raid to have a final boss from a race previously never seen nor mentioned in the Destiny franchise.
- This is the first raid to ever have two factions that are normally hostile towards each other, be allies.
- This raid features the largest variety of enemy races, having Hive at the entrance, Scorn and Taken throughout, and the final boss being a Lubraean.
- It is heavily implied that Rhulk does not at first take the guardians seriously as he fights them in the final encounter. This is likely because of his arrogant and egotistical ways, as he frequently taunts the guardians throughout the raid and in battle. However, his ego and underestimation of the light-bearers ultimately cost him the fight when the team of guardians overwhelms and defeat him, despite his effort to recover in a final stand.
- While on the way to the third encounter of the raid, Guardians can find a prophecy wall in one of the rooms that reveal some clues of The Witness's plans via the symbols encountered throughout the raid. When the symbols are put together, the prophecy reads as follows: "The Hive and the Scorn will love the Darkness and worship the Witness. The Black Fleet will enter Earth and stop the Guardians. The Witness will commune with the Traveler and drink the Light. Finally, the Witness will kill ____." The last symbol on the wall was destroyed by a crumbled pillar, so it is unclear what/who the Witness will kill.


