Pirrha, the Rifleman
From Destinypedia, the Destiny wiki
| Pirrha, the Rifleman | |
|---|---|

| |
| Biographical information | |
|
Other names: |
The Rifleman |
|
Homeworld: |
|
|
Species: |
|
|
Faction: |
|
|
Rank: |
|
|
Class: |
|
|
Gender: |
Male |
|
Height: |
12' |
| Combat information | |
|
Mission: |
|
|
Weapon(s): |
|
|
Abilities: |
Teleportation |
- "Trust me, kids: Keep your eyes open, head down …and your Ghost close."
- — Cayde-6 [1]
Pirrha, the Rifleman[2] is a Scorn Baron specialising in long-range combat.
Biography
The Rifleman was once blind when he was scorned by his House, he then was implanted with a cybernetic eye that was linked to a tracking system in his Scorn Launcher, he is likened to infamous Fallen assimilated to machinery such as Taniks, the Scarred and House of Devils Splicers with SIVA, he lurks in the Hellrise Canyon, with his all-seeing eye and being a crack-shot where he lures unwary travelers into an impenetrable security network before eliminating them from afar, removing any threats such as Corsairs which let his fellow Barons plan their next move.[1] He is a Raider class Scorn leader. He was credited for the deaths of many palace guards during the House of Wolves uprising.[3] Pirrha Responsible for the deaths of Awoken Paladins Tellos Cir, Loris Pol, and Hollis Eso at Pallas Falls, Pirrha is also known to have destroyed multiple Ghosts. After being imprisoned deep within the Prison of Elders alongside his fellow Barons, he was freed by Uldren Sov and was later present at the murder of Cayde-6, where he shot the Hunter Vanguard's Ghost Sundance with a specialized Devourer Bullet which operates on an ontological level, akin to the Weapons of Sorrow.[4] He would return to Hellrise Canyon to where he fought the Guardian one more time before his death.
Gameplay
Pirrha's main weapon of choice is a Scorn Crossbow, which fires powerful charged Void arrows from long range that can easily hit their mark; their high damage can crack a Guardian's shield in an instant. When faced at closer ranges, he will teleport or smoke dash to evade and flank the player, and if cornered, he will stomp the ground to knock them back. His most devastating ability, however, is the use of solid-light decoys. The decoys can easily distract unprepared Guardians and overwhelm them with constant crossbow fire, although they are easily destroyed. If his use of numerous simultaneous decoys proves bothersome, one can deactivate them en masse with a few shots each from a high ammo capacity weapon capable of automatic fire, before focusing their firepower on Pirrha himself.
Personality
Pirrha seems to look down on the Guardian, as well as Guardians as a whole (presumably due to having killed many of them), calling them things such as "target practice". He also seems to have quite an ego, as he frequently taunts the Guardian in what one could assume is an attempt to make them paranoid enough to leave the safety of cover, and continuously boasting about his kill count, Cayde-6 in particular; the Guardian's Ghost even remarks on how Cayde's Ghost was similar to him in demeanor. He also appears to see Ghosts as trophies, as he remarks on how he'll either sell the Ghost's shell to the Spider or keep it mounted on his wall, not unlike an actual hunter's behavior involving prey they have killed.
Though a skilled hunter and assassin, Pirrha's overconfidence in his ability to kill the Guardian led to his death.
Quotes
- "Go on, take out your Ghost. I need the target practice."
- "Every shot I take adds another soldier to the Scorn army."
- "Ah... Target practice."
- "You... missed... hahaha..."
- "King Uldren wants you dead. [laughs]"
- I bring him your body... keep your Ghost. [laughs]"
- Sell it's shell to Spider. [laughs]"
- ...Or I mount your Ghost on my wall... next to Cayde's... [laughs]"
- I... seeeee... you..."
Adventure (Heroic) Guide
In the adventure where the Guardian chases and eventually defeats the Rifleman in Hellrise Canyon, the Guardian must damage the Rifleman or shoot his decoys first in Sorik's Cut and then Jetsam of Saturn before entering Hellrise Canyon to defeat the Rifleman.
Until the player meets the Rifleman at the end inside of Hellrise Canyon, the final area where the adventure takes place, the player is unable to deal meaningful damage to the rifleman as the rifleman will leave and progress to the next area after taking enough damage. It is not currently known if player(s) with enough damage can one-phase the real Rifleman without needing to progress the adventure all the way into Hellrise canyon.
The player begins in a sniper's outlook and must traverse into the open area of Sorik's Cut. The player must deal enough damage to the Rifleman two or three times before he leaves the area for good. The damage the player deals is not permanent. The player can snipe the Rifleman from the sniper's nest in the immediate starting area.
Chasing the Rifleman to Jetsam of Saturn, after shooting the Rifleman and making him run away, the player discovers that the Rifleman they shoot afterwards are decoys which look similar to the Rifleman however are destroyed in a single hit. The player's ghost suggests that the decoy's technology could be used in the future, after which the player must shoot and collect five decoys. If the player has a hard time finding the Rifleman's decoys, when the decoys aim at the player, a thin purple line will emanate in the decoy's direction of aim.
After defeating and collecting five copies, the player pursues the Rifleman to Hellrise canyon, where the player will spot the Rifleman on top of a bridge fighting hive. The hive in this adventure do not need to be killed in order to further progression. Only at the end of this section where the caves are closed off by scorn does the player need to kill the scorn to progress. After this, the Rifleman will remark how he would mount the player's ghost on his own wall.
It is after this section that the player arrives in the final cave, where the damage done to the rifleman becomes permanent. The player enters the cave, and the first two Riflemen the player will shoot turn out to be decoys. After this, the Rifleman exposes himself for a certain amount of damage. Following this phase where the player can easily deal a third of his health, the rifleman sets up a large number of decoys in a ring around the player, only one of which is the real Rifleman.
The sequence will repeat itself until the Rifleman is dead.
By using Celestial Nighthawk, hunters can defeat the Rifleman in the final encounter in one shot. Outside the tunnel of the final boss encounter area, the player should save up and kill scorn with precision hits to stack Knock 'em Down before heading inside to face the Rifleman. After entering the center of the final encounter, two decoys of the Rifleman can provide an additional 5 seconds each of Knock 'em Down. With 20 seconds remaining, the player can cast Celestial Nighthawk to shoot the Rifleman in one shot. Be aware that while the true Rifleman spawns immediately where the second decoy is killed, the Rifleman can still choose to disappear to a nearby location to the left before taking damage.
Trivia
- Pirrha is the fourth English-speaking Fallen observed in the Destiny series, behind Variks, the Loyal, the Spider, and Fikrul, the Fanatic.
- He wears the pelt of a Cabal War Beast, as well as its mask.
- In the Forsaken-themed playing cards pre-order bonus, Pirrha is erroneously named as "Sekris, the Blind", however this name belongs to another Fallen.
- It’s possible that Sekris would've made an appearance as the rifleman, but the idea was scrapped.
- Notably, Pirrha sounds much more human when compared to the other English-speaking Fallen or Scorn.
- Pirrha and Yaviks are the only Barons who can have a different death animation depending on what element was used to kill them, including kinetic.
Gallery
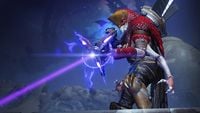
Pirrha taking aim

List of appearances
References
- ^ a b Game Informer: These Are The Eight Barons Who Helped Kill Cayde-6 In Destiny 2: Forsaken
- ^ Bungie (2018/9/4), Destiny 2: Forsaken, Playstation 4, Activision Blizzard, Lore entry, A Blind Eye Toward Tomorrow
- ^ A Blind Eye Toward's Tomorrow
- ^ The Murder of Cayde-6


